50.
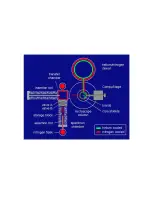
Retract the Insertion Rod to the checking position and check the cartridge
is present. Retract back completely.
51.
Move the Selection Rod to the empty position and lock into position.
52.
Move the Insertion Rod to the checking position (now this position
coincides with the cartridge clamped by the storage block).
53.
Simultaneously press on the Silver button and Red button on the
Insertion Rod and while keeping both buttons pressed retract the
Insertion Rod back completely. This will release the cartridge to the
storage block. Retract the Selection Rod back completely.
Inserting a Cartridge onto the holder
54.
Check that a cartridge is not present on the insertion rod by moving it to
the checking position. Retract it.
55.
Move in the Selection Rod to the position required.
56.
Move the Insertion Rod to the checking position. Retract.
57.
Retract the Selection Rod.
58.
Move the Insertion Rod to the checking position to make sure the
cartridge has been picked up. Retract.
59.
Click on the Cartridge button.
60.
Move the Insertion Rod slowly inwards to the final stop and ensure the
silver button pops up. Once locked double check by gently trying to move
the insertion rod to ensure it is locked in.
61.
On the holder, push in the white knob until the red stripe disappears and
then screw clockwise one complete turn to capture the threads on the
cartridge. Continue turning until finger tight.
DO NOT OVERTIGHTEN.
The
Cartridge button should turn Yellow.
62.
Retract the Insertion Rod to the checking position and ensure the
cartridge has been removed. Retract.
Microscope Alignments
-‐
Adjust eucentric height and press “eucentric focus”.
-‐
Center the C2 aperture (for 3 exposures/2um hole in EPU use the 50um
C2).
-‐
Choose the spot size and perform condenser astigmatism at 135K X
magnification.
-‐
Focus specimen/carbon at 59K X using Orius CCD.
-‐
Using fluorescent screen do Direct Alignments: Beam Shift
-‐
Using fluorescent screen do Direct Alignments: Beam-‐Tilt pivot points X
and Y
-‐
At the data acquisition mag use the Orius CCD to go slightly underfocus (-‐
500 nm). Using live FFT correct Direct Alignments: Comma free alignment
X and Y.
-‐
Using fluorescent screen go to diffraction mode and insert/center
objective aperture.
-‐
Using the Orius CCD to go slightly underfocus (-‐500 nm) and correct
objective lens astigmatism.
Summary of Contents for Tecnai F30 Polara
Page 5: ... ...


