background image

Chapter 1:  Safety Messages

9

Integrity Lightbar

Safety Messages to Operators of Federal Signal Sound/Light Systems

People’s lives depend on your safe operation of Federal Signal products. It is important to read and follow all 

instructions shipped with the products. In addition, listed below are some other important safety instructions 

and precautions you should follow:

•   Do not attempt to activate or de-activate the light system control while driving in a hazardous situation.

•   Although your warning system is operating properly, it may not be completely effective. People may not 

see or heed your warning signal. You must recognize this fact and continue driving cautiously.

•   Also, situations may occur which obstruct your warning signal when natural and man-made objects are 

between your vehicle and others, such as raising your hood or trunk lid. If these situations occur, be 

especially careful.

•   All effective sirens and horns produce loud sounds that may cause, in certain situations, permanent 

hearing loss. You and your passengers should consider taking appropriate safety precautions, such as 

wearing hearing protection.

•   The effectiveness of an interior mounted warning light depends on the clarity, the tinting, and the angle 

of the glass it is being placed behind. Tinting, dirt defects, and steeply angled glass reduce the light 

output of the warning light. This may reduce the effectiveness of the light as a warning signal. If your 

vehicle has dirty, tinted, or steeply angled glass, use extra caution when driving your vehicle or blocking 

the right of way with your vehicle. 

•   To be an effective warning device, this product produces bright light that can be hazardous to your 

eyesight when viewed at a close range. Do not stare directly into this lighting product at a close range or 

permanent damage to your eyesight may occur.

•   It is important that you fully understand how to safely operate this warning system before use.

•   You should only operate your vehicle and the light/sound system in accordance with your department’s 

Standard Operating Procedures.

•   If a selected function does not perform properly or if any of the lamps remain illuminated when the control 

is off, disconnect the power connector from the control unit and contact the nearest service center.

•   At the start of your shift, you should ensure that the entire warning light system and the siren system is 

securely attached and operating properly.

•   Suction cup mounting is for temporary applications only. Window-mounted warning lights should be 

removed from the window and stored securely when not in use. Temperature changes and sunlight can 

cause suction cups to lose holding power. Periodically check the unit to be sure the suction cups have 

a firm grip on the mounting surface. An improperly secured light could fall off of the vehicle causing 

injury and damage.

•   The holding power of magnetic mounting systems is dependent upon surface finish, surface flatness, and 

thickness of the steel mounting surface. Therefore, to promote proper magnetic mounting:

Summary of Contents for Integrity44

Page 1: ...25500063 REV B0 0215 Printed in U S A Installation Maintenance and Service Manual INTEGRITYTM Lightbar ...

Page 2: ...blank page ...
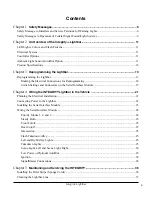
Page 3: ...or Reprogramming 14 Switch Settings and Connectors on the Serial Interface Module 15 Chapter 4 Wiring the INTEGRITY Lightbar in the Vehicle 21 Planning the Electrical Installation 21 Connecting Power to the Lightbar 22 Installing the Serial Interface Module 23 Wiring the Serial Interface Module 24 Priority Modes 1 2 and 3 24 Steady Burn 25 Front Cutoff 25 Rear Cutoff 25 Intersection 25 Flash Taked...

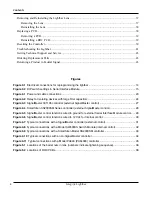
Page 4: ...4 7 Typical connections with a SignalMaster controller external control 31 Figure 4 8 Typical connections with a Model SW400SS Switch Module internal control 32 Figure 4 9 Typical connections with a SmartSiren Model SS2000SM controller 33 Figure 4 10 Typical connections with a non SignalMaster controller 34 Figure 4 11 Typical connections with a Model PA640 PA64000 controller 35 Figure 5 1 Locatio...

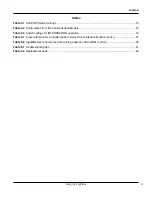
Page 5: ...l Interface Module 16 Table 3 3 Switch settings for INTERSECTION operation 19 Table 4 1 Cross reference for controller leads external Serial Interface Module control 27 Table 4 2 SignalMaster control wires and warning patterns internal SM control 28 Table 5 1 Troubleshooting tips 41 Table 5 2 Replacement parts 43 ...

Page 6: ...vice this product produces bright light that can be hazardous to your eyesight when viewed at a close range Do not stare directly into this lighting product at a close range or permanent damage to your eyesight may occur Do not install the light system in an area that would block impair or blind the driver s vision Ensure that the light system is mounted in a position that is outside of the driver...

Page 7: ...electrical device while it is connected to its power source Exposure to liquid while the product is connected to the power source may result in an electrical shock and personal injury and may short circuit and damage the product During Installation and Service DO NOT get metal shavings inside the product Metal shavings in the product can cause the system to fail If drilling must be done near the u...

Page 8: ...ystem to ensure that it is operating properly If a seat is temporarily removed verify with the vehicle manufacturer if the seat needs to be recalibrated for proper airbag deployment Test all vehicle functions including horn operation vehicle safety functions and vehicle light systems to ensure proper operation Ensure that the installation has not affected the vehicle operation or changed any vehic...

Page 9: ...a warning signal If your vehicle has dirty tinted or steeply angled glass use extra caution when driving your vehicle or blocking the right of way with your vehicle To be an effective warning device this product produces bright light that can be hazardous to your eyesight when viewed at a close range Do not stare directly into this lighting product at a close range or permanent damage to your eyes...

Page 10: ... good surface contact Ensure that mounting surface is flat A magnet mounting system should not be used on vehicles with vinyl tops To prevent sliding of light assembly on mounting surface quick acceleration and hard stops should be avoided Failure to follow all safety precautions and instructions may result in property damage serious injury or death ...

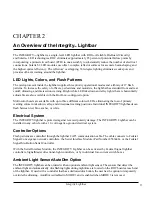
Page 11: ...e different colored LEDs eliminating the loss of primary warning colors in takedown alley and directional warning positions Individual INTEGRITY lightheads can flash between red blue amber or white Electrical System The INTEGRITY lightbar is protected against reversed polarity damage The INTEGRITY Lightbar can be installed in any vehicle with a 12 volt negative ground electrical system Controller ...

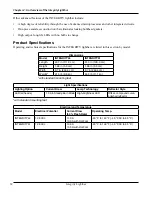
Page 12: ...mensions Model INTEGRITY44 INTEGRITY51 Length 43 7 in 111 0 cm 51 3 in 130 3 cm Height 1 96 in 5 0 cm 1 96 in 5 0 cm Width 9 7 in 246 4 cm 9 7 in 246 4 cm Weight 21 5 lb 9 8 kg 24 5 lb 11 1 kg with standard mounting feet Light Specifications Lighting Option Current Draw Lamp Technology Reflector Style LED all heads 1 0 A in Steady Burn Mode High brightness LED Offset compound curve polished reflec...

Page 13: ...ration uses the on board SignalMaster controller in the lightbar to generate directional warning patterns With Internal operation an external SignalMaster controller is not needed A standard low current switch box can activate the internal SignalMaster controller MODE 1 2 3 and INTERSECTION MODES 1 through 3 are most often selected by a progressive slide switch which enables the driver to turn on ...

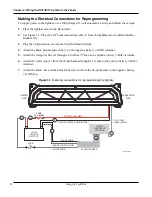
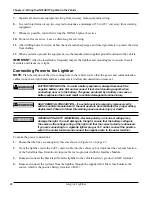
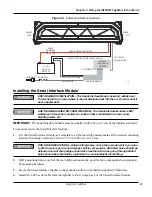
Page 14: ...ack ground power line 3 to the negative battery GND terminal 5 Attach the red power line 4 through a 40 A Maxi fuse to the positive battery BAT terminal 6 Attach the white wire 5 from the 24 pin harness through a 1 A fuse to the positive battery BAT terminal 7 Attach the black wire and the black white wire 6 from the 24 pin harness to the negative battery GND lug Figure 3 1 Electrical connections ...

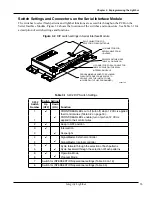
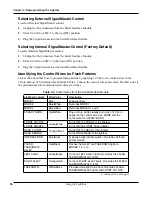
Page 15: ...FOR CLONING FLASH PATTERNS FROM VEHICLE TO VEHICLE SEE THE INSTRUCTIONS INCLUDED WITH THE PROGRAMMER SW1 PUSHBUTTON FOR SELECTING FLASH PATTERNS 290A7703 Table 3 1 SW 2 DIP Switch Settings SW 2 Switch Number Switch Setting Function Up OFF Down ON 1 FRONT REAR LEDs cut off turn off when 12 Vdc is applied their control wires Table 3 2 on page 16 1 FRONT REAR LEDs enable turn on when 12 Vdc is applie...

Page 16: ...s are stripes Table 3 2 Control wires from the Serial Interface Module Lightbar Controls Wire Color Description MODE 1 Blue Lowest priority MODE 2 Blue White Overrides MODE 1 MODE 3 Black Red Overrides MODES 1 and 2 STEADY BURN Red White One or more LEDs steadily burn when 12 Vdc is applied to the control wire for a MODE and the control wire for STEADY BURN FRONT CUTOFF Green White Turns OFF the F...

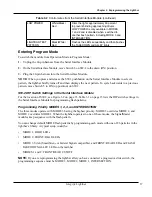
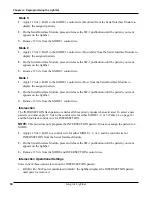
Page 17: ...en displays the next pattern To cycle backwards to a previous pattern move Switch 5 to ON up position on SW 2 SW 2 DIP Switch Settings in the Serial Interface Module For the location of SW 2 see Figure 3 2 on page 15 Table 3 1 on page 15 lists the DIP switch settings in the Serial Interface Module for programming flash patterns Programming Priority MODES 1 2 3 and INTERSECTION The three modes oper...

Page 18: ...press and release the SW 1 pushbutton until the pattern you want appears on the lightbar 3 Remove 12 Vdc from the MODE 1 control wire Intersection The INTERSECTION flash pattern overrides all three priority modes when activated To select a new pattern you must apply 12 Vdc to the control wire for either MODE 1 2 or 3 Table 3 2 on page 16 and the blue black control wire for INTERSECTION NOTE This p...

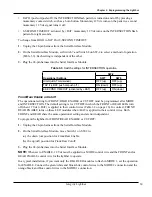
Page 19: ...he operational setting for FRONT REAR ENABLE or CUTOFF must be programmed after MODE and INTERSECTION The default setting is for CUTOFF in which the FRONT or REAR LEDs turn off when 12 Vdc BAT is applied to their control wires Table 3 2 on page 16 In contrast FRONT REAR ENABLE turns on these LED modules when BAT is applied to their control wires Both FRONT and REAR share the same operational setti...

Page 20: ...hen you are finished switch the Serial Interface Module from Operation Mode to Program Mode 1 Unplug the 24 pin harness from the Serial Interface Module 2 On the Serial Interface Module move SW 2 Switch 6 to the up OFF position 3 Plug the 24 pin harness into the Serial Interface Module ...

Page 21: ...red at the factory and does not require any additional internal wiring All the conductors necessary for control of any and all basic and optional functions are contained in the CAT5 cable The basic light functions of the INTEGRITY must be controlled by a installer supplied control head To prevent damage to the lightbar and vehicle and ensure that all equipment operates properly carefully plan wher...

Page 22: ... near or to the battery The gases produced by a battery can cause a battery explosion that could result in vehicle damage and serious injury SEAT REMOVAL PRECAUTION If a vehicle seat is temporarily removed verify with the vehicle manufacturer if the seat needs to be recalibrated for proper airbag deployment Failure to follow this warning cause serious injury or death REVERSE POLARITY MISWIRING Rev...

Page 23: ...NT The Serial Interface Module must be installed within 36 in 91 cm of the lightbar controller To mount and wire the Serial Interface Module 1 Use the Serial Interface Module as a template to scribe four drill position marks at the selected mounting location Mounting centers are 2 00 in x 5 95 in 5 08 cm x 15 11 cm DRILLING PRECAUTIONS Before drilling holes check the area into which you plan to dr...

Page 24: ...he power source Be sure that the fuse is properly rated to protect the electrical load the wiring and the connectors used in the circuit Failure to follow this notice could result in vehicle or equipment damage This section is an overview of default settings that are activated when connecting LED and Mode control wires to 12 Vdc BAT The basic light functions of the lightbar must be controlled by a...

Page 25: ... for the lightbar s front and rear lightheads to turn them off Cutoff To change the default setting to turn on these LEDs when 12 Vdc is applied Enable see Front Rear Enable or Cutoff on page 19 Intersection When 12 Vdc BAT is applied to the Intersection control wire blue black and a Mode control wire it turns on the Intersection pattern When 12 Vdc is removed the lightbar returns to its previous ...

Page 26: ... in serious injury or death to you or others in your vicinity When 12 Vdc BAT is applied to the control wire for Low Power the LEDs are dimmed to approximately 50 percent of their full brightness Low Power is only functional in MODE 1 or MODE 2 Low Power is disabled when switching to another flash pattern including Intersection To use Low Power again disconnect 12 Vdc from the Low Power control wi...

Page 27: ...pendent ground signal to turn on each head To cross reference external SignalMaster wiring to a Federal Signal controller or the SM2000SM series siren see Table 4 1 Table 4 1 Cross reference for controller leads external Serial Interface Module control 24 Pin Harness from the Serial Interface Module SignalMaster Wire Figure 4 2 SS2000SM Wire Figure 4 3 Red White White 1 Green Brown Brown 2 Green B...

Page 28: ...10 14 AWG BAT FUSE 5 A Table 4 2 SignalMaster control wires and warning patterns internal SM control Warning Pattern Control Wires Description with 8 head example LEFT Red Rear LEDs flash from right to left 6 5 4 3 2 1 7 8 CENTER OUT Green Rear LEDs flash from center out to both sides 2 1 1 2 3 4 3 4 RIGHT Green Black White Rear LEDs flash from left to right 3 4 5 6 7 8 2 1 WARN 1 Orange Green Out...

Page 29: ...LEFT ALLEY WHITE BLACK TAKEDOWNS GREEN WHITE FRONT CUTOFF ENABLE ORANGE BLACK REAR CUTOFF ENABLE WHITE BLACK RED LOW POWER BLACK WHITE RED LIGHTBAR TEST RED 1 LEFT GREEN 2 3 GREEN BLACK WHITE ORANGE GREEN 4 ORANGE 5 BLUE RED 6 RED GREEN 7 8 RIGHT WHITE RED 1A IGNITION POWER WHITE BLACK GROUND 1 BLACK WHITE GROUND 2 J1 CABLE TO SERIAL INTERFACE MODULE IGNITION IGNITION POWER INCLUDES POWER IN THE C...

Page 30: ...LACK GROUND 1 BLACK WHITE GROUND 2 IGNITION IGNITION POWER INCLUDES POWER IN THE CRANKING POSITION 290A7461 POWER 12 Vdc 1A 1A 1A 1A 1A 1A 1A 1A 1A 1A 1A 1A 1A 1A 1A 1A 1A 1A 1A 1A 1A 1A MODE 2 MODE 1 STEADY BURN INTERSECTION FLASH TAKEDOWN ALLEY RIGHT ALLEY LEFT ALLEY FRONT CUTOFF ENABLE REAR CUTOFF ENABLE BLACK RED MODE 3 TAKEDOWN BLUE WHITE BLUE RED WHITE CENTER RIGHT WARN 1 WARN 2 WARN 3 WARN ...

Page 31: ...GRN BLU RED ORG ORG GRN GRN BLK WHT GRN RED BLU MODE 1 BLU WHT MODE 2 RED BLK FL HAL BLK RED MODE 3 WHT BLK TD ORG RED R AL GRN BLK L AL SWITCH BOX REMAINING CONNECTIONS PER DEVICE INSTRUCTIONS BOX BLU YEL GRY VIO ORG GRN BRN WHT SIGNALMASTER CONTROLLER REMAINING CONNECTIONS PER DEVICE INSTRUCTIONS 290A7487B 12 V BATTERY TAKE DOWN MODE 1 2 3 AUX 1 LEFT ALLEY RIGHT ALLEY INTEGRITY LIGHTBAR MOVE SW2...

Page 32: ...LK RED CAT5 BLK BLK WHT BLU MODE 1 BLU WHT MODE 2 RED BLK FL HAL BLK RED MODE 3 INTEGRITY LIGHTBAR WHT BLK TD ORG RED R AL GRN BLK L AL SWITCH BOX REMAINING CONNECTIONS PER DEVICE INSTRUCTIONS BOX 290A7482B RED LEFT 12V GRN CENTER GRN BLK WHT RIGHT ORG GRN WARN1 ORG WARN2 WHT RED FAST SWITCH PANEL REMAINING CONNECTIONS PER DEVICE INSTRUCTIONS 12 V BATTERY MOVE SW2 DIP SWITCH 4 TO THE DOWN POSITION...

Page 33: ... BLK L AL ORG RED R AL LIGHTS AUX OUTPUTS NO NC C BAT SIGNALMASTER FUSE MIC KEYPAD INPUT 3 2 1 A B C D E SS2000SM REMAINING CONNECTIONS PER DEVICE INSTRUCTIONS SIREN WHT 1 BRN 2 GRN 3 ORN 4 PRP 5 GRA 6 YEL 7 BLU 8 RED GRN GRN BLK WHT ORG GN ORG BLU RED RED GRN WHT RED NONE 9 RED 10 BLK 11 40 A 12 V BATTERY MOVE SW2 DIP SWITCH 4 TO THE UP POSITION FOR EXTERNAL SIGNALMASTER CONTROL Figure 4 9 Typica...

Page 34: ...gnalMaster controller TYPICAL CONNECTIONS NON SIGNALMASTER IGNITION 1 A WHT BLK RED CAT5 BLK BLK WHT BLU MODE 1 BLU WHT MODE 2 RED BLK FL HAL BLK RED MODE 3 INREGRITY LIGHTBAR SERIAL INTERFACE MODULE WHT BLK TD ORG RED R AL GRN BLK L AL SWITCH BOX REMAINING CONNECTIONS PER DEVICE INSTRUCTIONS BOX 40 A 12 V BATTERY 2907484 ...

Page 35: ...SE 7 PLACES WHT BLK TD GRN BLK L AL ORG RED R AL PA640 640000 REMAINING CONNECTIONS PER DEVICE INSTRUCTIONS SEE INST SHT 255366 8 AWG RED 18 AWG GRN 18 AWG BLK 2 A 12 AWG BLK IGNITION HOT IN CRANK AND RUN 18 AWG RED 10 AWG BLK 40 A MAXI FUSE 12 V BATTERY 10 AWG RED RED BLK FL TKD AL 290A7485B 12 AWG RED INTEGRITY LIGHTBAR TYPICAL CONNECTIONS PA64000 MOVE SW 2 DIP SWITCH 4 TO THE UP POSITION FOR EX...

Page 36: ...lightbar Establishing a regular maintenance and inspection schedule extends the life of the lightbar and ensures safety For service support or replacement parts contact the Federal Signal Service Department at 1 800 433 9132 7 a m to 5 p m Monday through Friday CT See Table 5 2 on page 43 for replacement parts and part numbers Installing the Filler Strips Sponge Cords To reduce the potential for a...

Page 37: ... avoid damaging the finish do not use heavy pressure or caustic abrasive or petroleum based cleaners 3 Rinse and dry the lens with a soft cloth to prevent water spotting 4 To remove fine scratches and haze use a soft cloth and a high quality automotive paste cleaner wax that is non abrasive Removing and Reinstalling the Lightbar Lens The lightbar lens which is the top half of the INTEGRITY housing...

Page 38: ...ou hear the click of the threads engaging 2 Tighten the barrel nuts to 16 24 in lb in the sequence shown in Figure 5 1 Replacing a PCB The INTEGRITY lightbar has two end and two intermediate ROC PCBs as well as a controller PCB Figure 5 3 They are configured at the factory per the customer order STATIC SENSITIVE DEVICE This lightbar circuitry can be damaged by electrostatic discharge ESD Follow an...

Page 39: ... the sequence shown in Figure 5 2 on page 38 3 Reconnect power to the lightbar Resetting the Controller These instructions explain how to reset the Valor lightbar controller after you install a service replacement board or if the lightheads operate erratically For the Valor lightbar to operate correctly the controller stores information about which LED colors it controls Resetting the lightbar con...

Page 40: ... reconnecting both after at least 5 seconds In response the ROC TX RX LED and the Convergence TX RX LEDS flash ON OFF together The POWER ON LED turns ON 6 Plug the two ROC board connectors back into their connections 7 Cycle power to the lightbar by removing both the Convergence Network CAT5 connector and the power connector and reconnecting both after at least 5 seconds All LEDs briefly flash onc...

Page 41: ...s in the sockets Try a new CAT5 cable Check the connections on the Serial Interface Module 1 the black wire and the black white wire are connected to ground GND 2 the white wire is connected to 12 Vdc Check the 1 A fuse 3 a MODE wire has 12 Vdc Check the position of Switch 1 on SW 2 in the Serial Interface Module If Switch 1 is down ON ensure that the ENABLE control wires green white and orange bl...

Page 42: ...the lightbar controller outputs with a known good output If the problem moves to another halogen light send the lightbar controller to Federal Signal for repair Reset the controller page 39 Takedown alley lights work but Flash Takedown Alley lights do not work Ensure that 12 Vdc is applied to the takedown and alley red black control wire Check the 12 Vdc power and negative ground connections to th...

Page 43: ... list of replacement parts To order replacement parts call the Federal Signal Service Department at 1 800 433 9132 1 708 534 3400 7 a m to 5 p m Monday through Friday Central Time or contact your nearest distributor Table 5 2 Replacement parts Description Part Number PCB Assembly End Configured Contact Factory PCB Assembly Front Configured Contact Factory PCB Assembly Rear Configured Contact Facto...

Page 44: ...n you receive your RMA Number Write the RMA number on the outside of the box of returned items Reference the RMA number on your paperwork inside of the box Write the RMA number down so that you can easily check on status of the returned equipment Send all material with the issued RMA Number to Federal Signal Corporation 2645 Federal Signal Drive University Park IL 60484 3167 Attn Service Departmen...

Reviews: