H
igH
L
igHter
™ LED Mini-Lightbars
13
MAKE A GOOD GROUND CONNECTION
The lightbar will not function properly without a good ground connection. Ensure that the black
wire is attached to good vehicle ground.
5.
Route the wires or the optional cable kit from the control head or switch to the lightbar wires.
6.
Connect the black ground wire to ground. Extend the wire as needed to a reliable ground
connection.
DRESS WIRES TO PREVENT SHORT CIRCUIT
To prevent a short circuit or broken wire, dress the wires to avoid pinching between the mounting
plate and mounting surface. Do not allow the mounting screws to pierce the wires.
7.
If the jumper pins (PROG) are to be used for selecting the flash pattern (Figure 3), test the
lightbar for proper operation and select the pattern as described in “Selecting a Pattern Using
the Jumper Pins” on page 16. Set any
H
igH
L
igHter
LEDs that are controlled to Pattern 4. For a
description of the flash patterns, see Table 2 on page 15 and Table 3 on page 16.
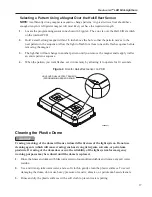
Figure 3 Fuses, connectors, and programming jumper pins (PROG)
290A6097B
MINUS PLUS
7.5
(−) (+)
F1
7.5A
F2
7.5A
SYNC
IN
PROG
SYNC
OUT1
ALT
OUT2
WLC
8.
Within the dome are one exit and an optional knockout for wires (Figure 1 on page 11). Each
wire exit can accommodate three 16 AWG to 18 AWG wires. Guide the wires through the holes
and secure the upper assembly with the four hex-head screws.
Completing the Installation Directly to the Vehicle
1.
Carefully position the lightbar over the mounting holes with the mounting pad in place (if it is to be
used) between the lightbar and the mounting surface.
2.
Ensure that the wiring is routed neatly. Secure the lightbar to the mounting surface using the 1/4-inch
thread-forming screws.
NOTE:
The mounting screws are 5/8-inch long and provide 1/4-inch of thread engagement when
you install the mounting pad on a 1/8-inch thick mounting surface. If the mounting surface is thicker,
longer screws are needed or the optional pad may be omitted provided that there is a minimum of
1/4-inch of full thread engagement into the mounting base.


