background image

11

Humidistat:

1.  Locate the humidistat in the living area (see location of humidifier

diagram on page 4), making sure that it is at least five (5) feet from
a supply register (duct mounted installation) or discharge nozzle
(free standing installation).

2.  The humidistat should be installed four and a half (4 1/2) feet above

the floor, out of the direct sun and not subject to damage from
traffic within the room.

3.  If you would like the ability to cut off the electricity to the

humidifier for maintenance, a throw -switch may be  installed.

4.  Turn the humidistat to the highest level (past 60%) and the

humidifier should begin to run. The humidifier should stop when
the humidistat is turned off.

5.  Set the furnace controls and humidistat for the desired conditions

(30-40% RH is recommended). Operation of this unit is automatic.

6.  If condensation occurs on single pane windows, lower the

humidistat setting until the condensation has disappeared.

NOTE: It may take several days for the humidity level in your home
to reach comfortable levels.

Wiring diagram for humidifier installation - Free standing installation - (707U only)

-Dedicated wiring connection

Electrical installation

Humidistat installation

Input Power

Summary of Contents for Herrmidifier 356686-001C

Page 1: ... 11 Maintenance 12 Unit Diagram and Parts List 14 Warranty Back cover Manual for Installation Operation Maintenance Duct Mount Centrifugal Atomizer Humidifier Table of Contents 256703 001 7 04 CAUTION Read installation operation and maintenance instructions carefully for safe operation Exercise the usual precautions when working with electricity 707U Model 356686 001C 115 60 1 707U UK Model 356686...

Page 2: ...t into the home and heated When heated this air dries out and greatly increases its capacity to hold more moisture By using a humidifier a source of water is provided to satisfy this increased moisture holding capability rather than having it drawn from our body surface and the surrounding furnishings in the home A properly maintained and efficiently operating humidifier is a source of improved In...

Page 3: ...r turn the humidistat to the OFF position Sq Footage of Home 1000 1500 2000 2500 3000 4000 Tight Home GPD 0 5 3 0 5 0 7 5 10 0 14 5 Average Home GPD 5 0 10 0 14 0 19 0 23 5 33 0 Loose Home GPD 10 0 16 5 24 0 30 5 37 5 51 5 The above calculations are for reference only and are based on the following Inside temperature 70 F 35 relative humidity Outside Temp 20 F 70 relative humidity 8 foot ceiling h...

Page 4: ... at least six 6 linear feet preferably 10 feet upstream from any electronic air cleaner Failure to follow this recommendation can cause excessive nuisance arcing and or power supply failure If the duct seams inside the duct are not flat locate the humidifier at least three 3 linear feet upstream from the seam If the humidification needs of the home require more than one humidifier each unit should...

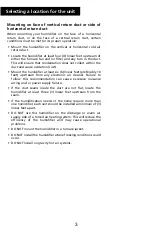
Page 5: ...arge nozzle should be at least two 2 feet below the ceiling and from a vertical wall along the side The discharge nozzle should be about six and a half 6 1 2 feet from the floor If this is not possible locate the humidifier in the area of least traffic The humidifier should be located between wall studs to facilitate cutting the discharge hole through the wall No obstructions should be directly in...

Page 6: ...acturer s original warranty Remember to select a location that is readily accessible for periodic inspection and cleaning of your humidifier Allow a minimum of 2 clearance in front of the humidifier and 2 below the water pan to allow for maintenance and repair Prior to installing this product Read the instructions carefully to ensure safe operation Failure to follow them could damage the product o...

Page 7: ...s position with 2 10 sheet metal screws and flat washers provided 10 The float and valve assembly have been factory adjusted to maintain 1 1 1 2 of water in the water reservoir pan at normal water pressure If necessary bend the float arm to the required position to maintain the water level at other water pressures 11 Before mounting the humidifier in its final position carefully rotate the impelle...

Page 8: ...a II of the inside wall using a saber saw or equivalent Do NOT cut through the entire wall 8 Remove the template from the wall In the 6 5 16 diameter holes previously drilled into the inside wall install the 6 anchor bolts provided Remove each one of the bolts and mount the wire mounting bracket to the wall with 6 removed bolts and flat washers 9 The float and valve assembly have been factory adju...

Page 9: ...nsion nozzle provided will be 2 5 8 long PLUS the total wall thickness as determined in the previous step Cut the extension nozzle to length on the square end The opposite end of the extension nozzle is angled to provide the correct fit with the outside wall 15 Fit the flexible connector sleeve onto the discharge dome and fasten securely with one 1 hose clamp provided 16 Insert the angle cut end o...

Page 10: ... copper tubing to the float and valve assembly with the ferrule and compression nut provided Caution The float and valve assembly must not turn when tightening the copper tubing compression fittings to the humidifier water reservoir pan fitting Turn the water supply on at the saddle valve Check the water level in the water reservoir pan to ensure it is 1 1 1 2 deep IMPORTANT In installations where...

Page 11: ...c operation of the humidifier during the heating season 3 The humidifier will only operate when the furnace blower is in operation 4 It is recommended to install a humidistat provided with model 707U in the system to provide optimum performance when continuous air circulation is desired 5 If a humidistat is not used in the installation install an ON OFF switch in its place This provides a simple y...

Page 12: ...throw switch may be installed 4 Turn the humidistat to the highest level past 60 and the humidifier should begin to run The humidifier should stop when the humidistat is turned off 5 Set the furnace controls and humidistat for the desired conditions 30 40 RH is recommended Operation of this unit is automatic 6 If condensation occurs on single pane windows lower the humidistat setting until the con...

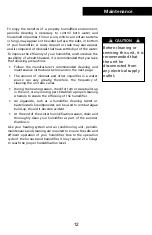
Page 13: ...tly therefore the frequency of cleaning the unit also varies During the heating season check for film or scale build up in the unit or any moving part Establish a proper cleaning schedule to ensure the efficiency of the humidifier An algaecide such as a humidifier cleaning tablet or bacteriostatic liquid powder can be used to combat algae build up should it become evident At the end of the winter ...

Page 14: ...7 Remove the pump from the end of the impeller shaft If the pump is stuck in the motor drive shaft run hot water over the end of the shaft for a few seconds to loosen the pump 8 Flush water through the impeller tube ensuring that the six holes at the top of the impeller tube are open and clear of mineral deposits A pipe cleaner works well for this cleaning operation Note The impeller tube and pump...

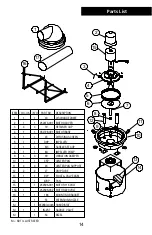
Page 15: ...G SCREEN 6 1 1 D9P IMPELLER 7 1 1 M3 SCREW SET CUP 8 1 1 8A IMPELLER PUMP 9 4 4 90 VIBRATION DAMPER 10 1 1 35P CENTER PAN 11 4 4 23 CENTER PAN SUPPORT 12 2 2 27 DRIP TUBE 13 1 1 92P FLOAT VALVE ASM 14 1 1 47BP PAN 15 1 252596 001 MOTOR 115 VOLT 15A 1 252596 002 MOTOR 220 VOLT 16 1 1 186 MOUNTING BRACKET 17 1 53 EXTENSION NOZZLE NI 1 3526BO 002C HUMIDISTAT NI 1 1 IN 2ST SADDLE VALVE NI 1 54 BEZEL N...

Page 16: ...dders com Humidifiers which have been installed or become part of real estate cannot be returned CareCo will receive freight prepaid only removable parts or components of such defective humidifiers 6 This limited warranty does not apply to any part or component that is damaged in transit or in handling has been subject to misuse neglect or accident has not been installed operated and serviced acco...

Reviews: