background image

Model

5

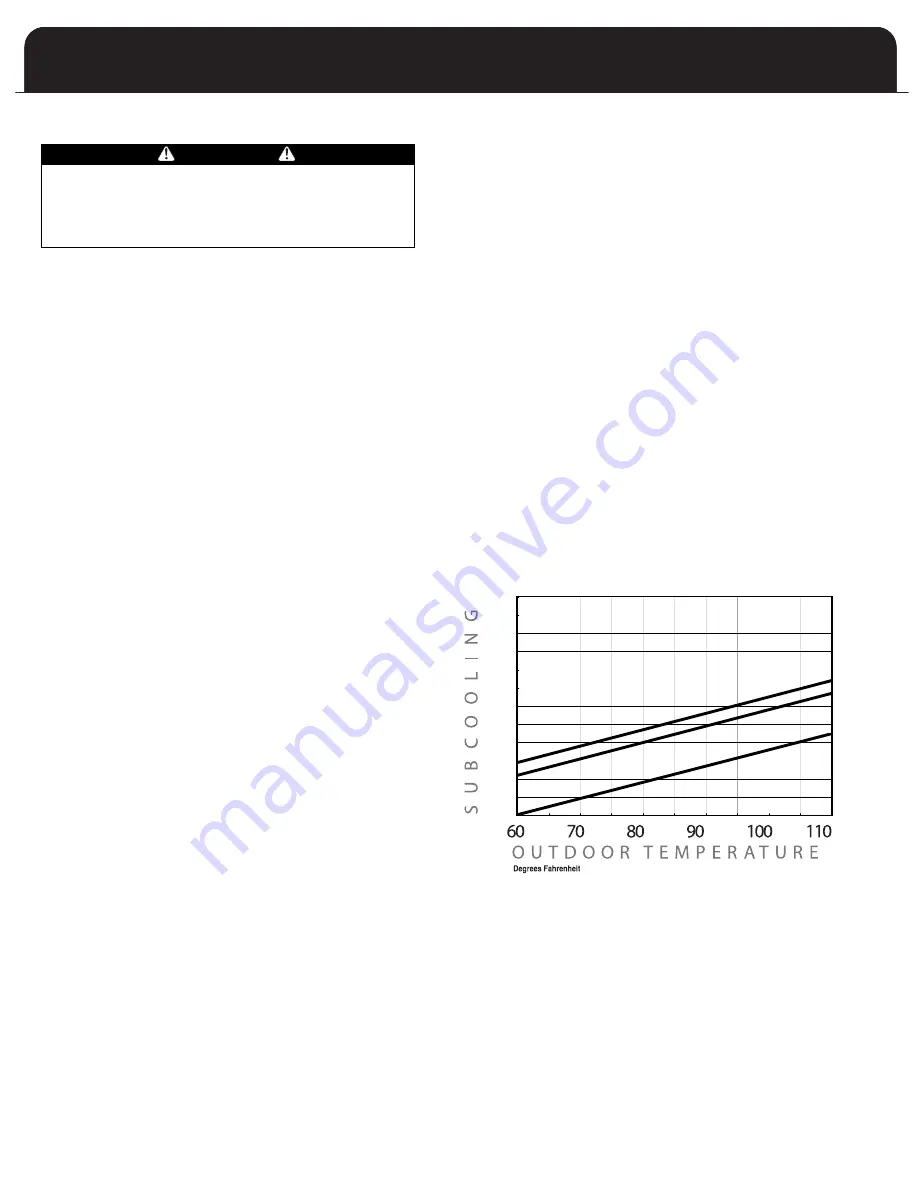
SUB-COOLING CHARGING 

Coils with TXVs should be charged 10-12 degrees (+ or – one
degree) of sub-cooling. For proper sub-cooling readings, a
standard high side gauge is required for pressure readings.

Use the chart below to determine the required sub-cooling value.

INSTRUCTIONS

1. Measure the outdoor air temperature. (T1)
2. Measure the liquid line pressure and determine the liquid

refrigerant temperature by the scale on the high side
pressure gauge. (T2) In cooling mode take reading at the
indoor coil before TXV. 

3. Measure the liquid line temperature on the liquid line. (T3) In

cooling mode take reading at the indoor coil before TXV. 

4. Subtract T3 from T2. (T2 – T3) This is the subcooling value.

Compare this value and the outdoor temperature (T1), to the
charts below. If the value is below the line, add refrigerant. If
the value is above the line, remove refrigerant charge. When
removing refrigerant, always use standard reclaim procedures.

NOTE: For the majority of installations no adjustment to the

TXV setting is required. However, if the measured superheat
at the evaporator is less than 4° or greater than 8° an
adjustment is required. The adjustment stem is at the base of
the valve under the flare nut. To increase superheat tighten
the stem clockwise and to decrease superheat back-out the
stem counter-clockwise. Use a 1/4” refrigeration service
wrench for this function.

NOTE: When removing refrigerant, always use standard reclaim

procedures.

FINAL CHECKS FOR INSTALLER

1. Ensure that all wiring is routed away from tubing and sheet

metal edges to prevent rub-through or wire pinching.

2. Ensure that all wiring and tubing is secure in unit before

adding panels and covers.

3. Tighten service valve stem caps to 1/12 turn past finger tight.
4. Leave Owner’s Manual with owner. Explain system operation

and periodic maintenance requirements outlined in manual.

°F

°F

°F

°F

°F

°F

SUB-COOLING CHART FOR UNITS WITH TXV

WARNING

DO NOT USE R-22 SERVICE EQUIPMENT OR
COMPONENTS ON R-410A REFRIGERANT EQUIPMENT.
FAILURE TO FOLLOW THIS WARNING COULD RESULT
IN PERSONAL INJURY OR EQUIPMENT DAMAGE.

R-410A Refrigerant Precautions

• R-410A refrigerant operates at much higher pressure

than R-22 refrigerant

• Only use service equipment and replacement

components designed to operate with R-410A
refrigerant

• Recovery cylinder service pressure rating must be 400

psig, DOT 4BA400 or DOT BW400

• Hose pressure rating must be 700 psig

• Manifold set ratings should be 700 psig high side and 

180 psig low side

• Leak detectors should be designed to detect R-410A

refrigerant

• R-410A refrigerant systems should be charged ONLY with 

liquid refrigerant

• Only use liquid line filter driers with rated working

pressures above 600 psig

• R-410A refrigerant is only compatible with POE oils

• POE oils absorb moisture rapidly. Do not expose oil 

to atmosphere.

• Use only TXV rated for use with R-410A refrigerant

8

4

C

,

4

2

C

6

3

C

,

0

3

C

0

6

C

,

2

4

C

,

8

1

C

6

8

10

12

14

16

18

Summary of Contents for C18ABZ1VF

Page 1: ...alve Step Valve 3 REFRIGERANT PIPING 4 Precautions 4 Liquid Line Sizes 4 Suction Line Sizes 4 SUBCOOLING CHARGING 5 OPERATION INSTRUCTIONS 6 MAINTENANCE INSTRUCTIONS 6 CONDENSING UNIT NOMENCLATURE 7 CIRCUIT DIAGRAM 6 NOTE THESE INSTRUCTIONS ARE INTENDED AS AN AID TO QUALIFIED SERVICE PERSONNEL FOR PROPER INSTALLATION ADJUSTMENT AND OPERATION OF THIS EQUIPMENT READ THE ENTIRE INSTRUCTION MANUAL THO...

Page 2: ...local state and federal codes and or regulations pertaining to this type of equipment and its installation Such codes and or regulations should take precedence over any recommendations contained herein in lieu of local codes Installations SHALL be made in accordance with the National Electrical Code local codes and recommendations made by the National Board of Fire Underwriters Consult local build...

Page 3: ...ssible to the evaporator will increase the system capacities by reducing the line set refrigerant pressure drop and will make the system less susceptible to liquid migrations due to less refrigerant charge 1 The installer shall check available power to make certain it matches the unit rating plate located inside control box cover and that constant voltage can be maintained to the unit Unsatisfacto...

Page 4: ...d wire If thermostat is located more than 100 ft from unit as measured along the control voltage wires use No 16 AWG wire to avoid excessive voltage drop 3 All wiring must be NEC Class 1 and must be separated from incoming power leads Use furnace transformer fan coil transformer or accessory transformer for control power Note Use of available 24 volt accessories may exceed the minimum power requir...

Page 5: ...cessary use hanger straps which are 1 in wide and conform to shape of tubing insulation Isolate hanger straps from insulation by using metal sleeves bent to conform to shape of insulation Condensing units are available with pre charged sweat type copper connecting fittings Units are factory charged for 15 of line set tubing Adjust charge 0 65 oz per foot of variation from chart for 1 4 and 5 8 lin...

Page 6: ...function NOTE When removing refrigerant always use standard reclaim procedures FINAL CHECKS FOR INSTALLER 1 Ensure that all wiring is routed away from tubing and sheet metal edges to prevent rub through or wire pinching 2 Ensure that all wiring and tubing is secure in unit before adding panels and covers 3 Tighten service valve stem caps to 1 12 turn past finger tight 4 Leave Owner s Manual with o...

Page 7: ...res are equalized the compressor motor may trip on its overload An additional waiting period will be required before restarting OPERATION INSTRUCTIONS For continuing high performance and to minimize possible equipment failure periodic maintenance must be performed on this equipment Frequency of maintenance may vary depending upon geographic areas such as costal applications MAINTENANCE INSTRUCTION...

Page 8: ...e Township NJ 08831 24 A B 1 V Z C 18 18000 BTU H 5 28 kW 24 24000 BTU H 7 03 kW 30 30000 BTU H 8 79 kW 36 36000 BTU H 10 55 kW 42 42000 BTU H 12 31 kW 48 48000 BTU H 14 07 kW 60 60000 BTU H 17 5 kW 1 208 230 Volts 1 Phase 60 Hz 2 230 Volts 1 Phase 50 Hz 3 208 230 Volts 3 Phase 60 Hz 4 460 Volts 3 Phase 60 Hz 5 230 Volts 3 Phase 50 Hz 6 380 Volts 3 Phase 50 Hz C Air Conditoner CH Heat Pump A Poduc...

Reviews: