HiMaxX
HiMaxX
HiMaxX
HiMaxX
HiMaxX
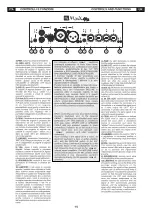
1) LIMITER:
l'accensione del led LMT indica che il sistema viene
utilizzato al limite della potenza media sopportabile dagli
altoparlanti; in questo caso il segnale viene ridotto in modo
graduale fino a riportare l'altoparlante entro i limiti di sicurezza. Si
consiglia di operare in condizioni per cui il led si accenda
saltuariamente.
2) PRT:
l'accensione del led PRT indica che la temperatura interna
dell'amplificatore ha raggiunto il limite massimo; in questo caso il
segnale viene ridotto automaticamente in modo graduale fino a
riportare la temperatura entro i limiti di sicurezza. L'accensione del
led può anche indicare il malfunzionamento dell'amplificatore,
dovuto a corto-circuito in uscita.
3) HIGH/MID/LOW
: controlli di tono che permettono di modificare
la timbrica del suono.
4) VOL:
regola il livello generale del segnale.
5) PEAK:
l'accensione di questo led indica che il livello del
segnale è prossimo alla saturazione; se è collegata una sorgente
di segnale con controlli di volume propri (mixer, ecc) agire su
questi ultimi per abbassare il volume del segnale e poi sul
controllo di volume della HiMaxX.
6) IN link OUT:
prese di ingresso ed uscita bilanciate
elettronicamente; la presa "IN" XLR-jack Combo consente il
collegamento di un segnale preamplificato come quello in uscita
da un mixer; la presa "OUT" XLR è connessa in parallelo (link) con
l'ingresso "IN" e permette il collegamento di più diffusori con lo
stesso segnale.
7) GND LIFT:
interruttore per la separazione elettrica tra il circuito
di massa e il circuito di terra; con il pulsante premuto la massa dei
segnali in ingresso viene elettricamente scollegata dal circuito di
terra ( identificato nello chassis ); nel caso si manifesti un "ronzio"
sul diffusore, questa posizione provvede ad aprire gli "anelli" di
massa, spesso causa di tali disturbi. UTILIZZARE IL GROUND
LIFT SOLO PER SEGNALI BILANCIATI.
8) PWR:
indica l'accensione del sistema.
1) LIMITER:
the led illuminates when the system is being used at
the limits of the average power tolerance of the loudspeakers; the
signal is then gradually reduced until it is within the safety limits of
the loudspeaker; it is advised to operate the system so that this led
illuminates only occasionally.
2) PRT:
the PRT led illuminates when the internal temperature of
the amplifier reaches the maximum limit: the signal is then
automatically gradually reduced, until the temperature is once
again within safety limits. The illumination of this led may indicate
a malfunction of the amplifier caused by a short circuit.
3) HIGH/MID/LOW:
controls which allow the modofication of the
tone of the sound
4) VOL:
regulates the general signal level.
5) PEAK:
the led illuminates to indicate the signal level is close to
saturation; if a signal source having its own volume control (mixer,
etc.) is connected, use such controls to lower the volume of the
signal and, then, use HiMaxX volume control.
6) IN link OUT:
electronically balanced input and output
connectors; the "IN" XLR-jack Combo enables the connection of a
preamplified signal such as a mixer output; the "OUT" XLR is
connected in parallel (link) with the "IN" input and enables the
same signal to be relayed to several speakers.
7) GND LIFT:
switch to isolate the chassis ground and the signal
ground. With the switch held down, the input signal ground is
electrically disconnected from the chassis ground (identified in the
chassis); in the case where speaker hum should occur, this allows
for the opening of "ground loops" which are often the cause of
these problems. ONLY USE THE GROUND LIFT FOR
BALANCED SIGNALS.
8) PWR:
the led illuminates to indicate that the system is switched
on.
Summary of Contents for HiMaxx
Page 2: ......
Page 4: ......
Page 10: ...HiMaxx HiMaxx HiMaxx HiMaxx HiMaxx HiMaxx HiMaxx HiMaxx...
Page 11: ...HiMaxX HiMaxX HiMaxX 60 HiMaxX 60 HiMaxX 40 HiMaxX 40...
Page 14: ...HiMaxX HiMaxX...
Page 15: ......
Page 17: ......
Page 22: ...800W 1200W RMS MAX SPL cont peak 135 139dB...
Page 23: ......
Page 24: ...HIGH MID LOW 15 15 6 15 LIMIT PRT 6 15 0...
Page 25: ......
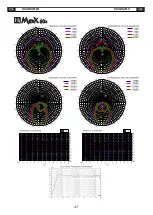
Page 27: ...DIAGRAMMI DIAGRAMS...
Page 28: ...DIAGRAMMI DIAGRAMS...
Page 29: ...DIAGRAMMI DIAGRAMS...
Page 30: ...DIAGRAMMI DIAGRAMS...
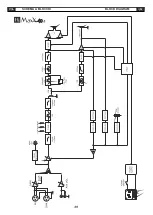
Page 31: ...SCHEMA A BLOCCHI BLOCK DIAGRAM...
Page 32: ...SCHEMA A BLOCCHI BLOCK DIAGRAM...
Page 35: ......


