background image

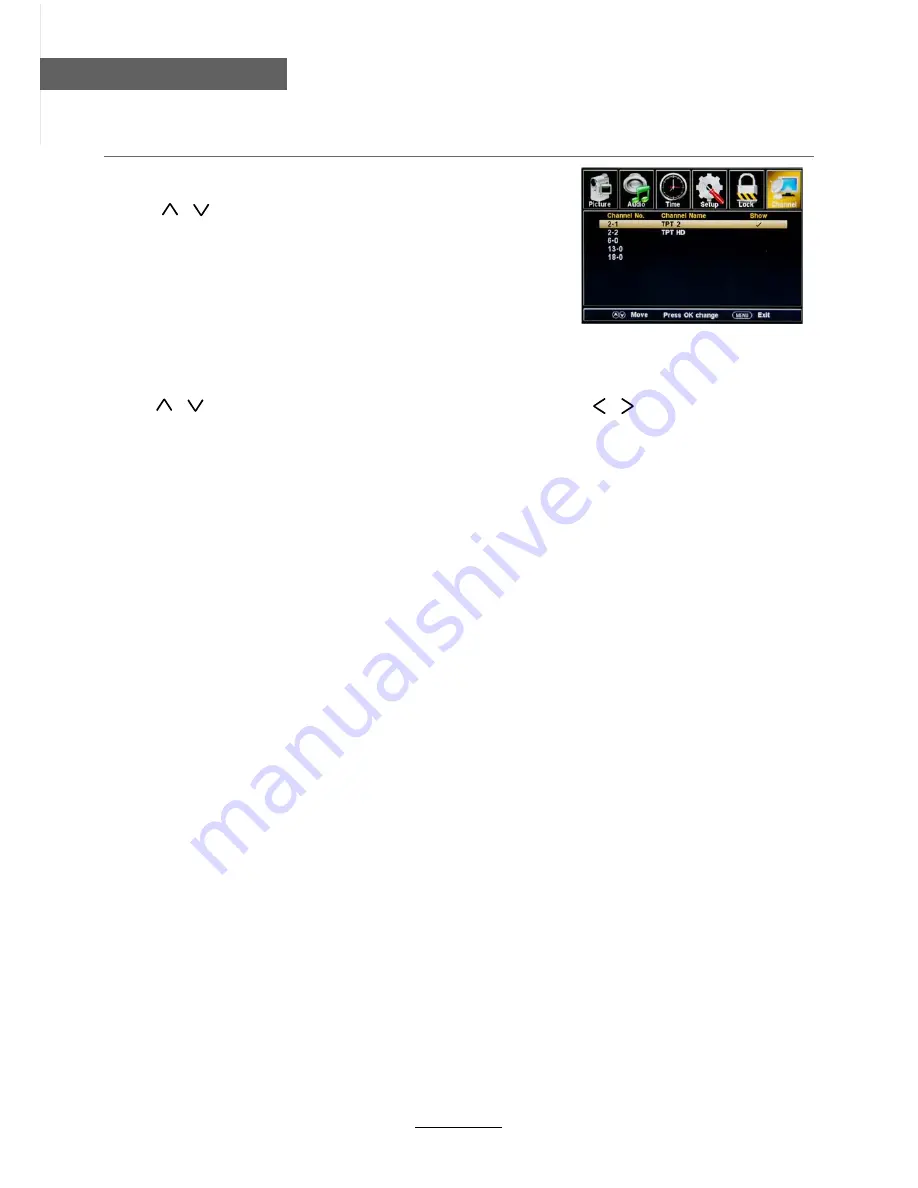
Channel No.:

 Show and select the channel.

Channel Label: 

Allows you to setup a label for the channel.

Press      /     button to select the position of the table, and press      /      button to select the
words.

DTV Signal:

 Shows the quality of digital signal: good, normal, bad.

OSD Menu

15

OSD Menu

Show/Hide:

Allows you to show or hide the channels.

Use     /      button to highlight the desired item, then press

OK

 button to show or hide the highlighted channel.

Summary of Contents for L1918A-V-BL

Page 1: ...MODEL NO L1918A V P WH BL 19 LCD TV with DVD ENTERTAINMENT ...

Page 2: ......

Page 3: ...ont View Rear View OSD Menu 1 Picture menu 2 Audio menu 3 Time menu 4 Setup menu 5 Lock menu 6 Channel menu 1 2 3 3 4 5 4 4 9 15 9 10 11 12 13 14 15 Connections 6 7 Remote Control 8 Basic Operation DVD Basic Operation DVD Systerm Setup 18 19 Simple Troubleshooting 16 19 16 17 Disc Care 17 20 DVD Operation ...

Page 4: ...tems for used electrical and electronic products Please help us to conserve the environment we live in 1 Caution The exclamation point within an equilateral triangle is intend to alert the user to the presence of important operating and maintenance servicing instructions in the literature accompanying the appliance The lightning flash with arrowhead symbol within an equilateral triangle is intende...

Page 5: ...g out immediately and seek professional help if The main plug or cable is damaged Liquid is spilled onto the set or if it is accidentally exposed to water or moisture Anything accidentally penetrates the ventilation slots The set does not work normally Do NOT remove the safety covers There are no user serviceable parts inside You may invalidate the warranty Qualified personnel only are permitted t...

Page 6: ...C NTSC 19 inch diagonal 1366x768 2x3W DC 12V 5A 60W TV system Screen size Resolution Aerial input Audio output power Power consumption Remote Control Type Control distance Control angle Batteries 0 Infrared 5m 30 horizontal 2 x 1 5V size AAA PICTURE SOUND SLEEP DISPLAY INPUT VOL VOL EXIT MUTE MENU OK CH CH 1 2 3 4 5 6 7 8 9 0 CC MTS EPG FAV SETUP TITLE ANGLE GOTO MENU REPEAT INTRO A B PROGRAM LANG...

Page 7: ...rom the remote control Power on Standby LED indicator Press POWER to turn on and off The effective receiving range for the signal is 16 26 feet from the front of the remote control window and 300 to the left or right side and 200 above or below the control window Indicator on Red Standby mode Indicator on Green Power on mode Insert disc according to the label next to the disc slot EJECT Press the ...

Page 8: ...t it to the audio output terminal of PC RF Connect antenna or cable 75 Ohm coaxial to receive TV signal R L in Connect them to the audio output terminal of DVD shared with YPbPr VIDEO Connect it to video output terminal of DVD YPbPr Connect to the YPbPr video output terminal of DVD used in component source For Updates USB Headphone Connect it to your headphone or other audio equipment POWER Connec...

Page 9: ... sound Press again or press VOL to unmute DISPLAY Display the imformation of current mode PICTURE Press repeatedly to cycle through the available video picture modes SOUND Press to cycle through the different sound settings SLEEP Press to setup the sleep time CH Channel Program VOL Volume MENU Press to display the OSD menu EXIT Press to exit form the OSD menu Allows you to navigate the on screen m...

Page 10: ...title or chapter PROGRAM DVD program ANGLE Select DVD picture angle ZOOM Adjust picture size in DVD mode DVD next chapter DVD previous chapter SUBTITLE Select DVD disc subtitle SLOW Play DVD programs at slow speed Stop DVD program DVD eject Play Pause DVD program DVD fast reverse DVD fast forward SETUP DVD system setup LANGUAGE Select DVD disc language MENU DVD play list Disc menu TITLE GOTO DVD t...

Page 11: ...he input source press OK button on the remote control to enter Note Before you select the input source make sure the connections are prepared Basic OSD Menu operation Use button to select the main menu and press button to enter the submenu In the submenu use or press button to enter the submenu Press MENU button to return to the upper menu Press EXIT button to exit the menu display Note Only when ...

Page 12: ...the PICTURE button on the remote control Contrast Control the difference between the bright and dark regions of the screen picture Brightness Adjust brightness of the picture Color Adjust color of the picture Tint Control the flesh tones to make them appear natural Sharpness Set the amount of fine detail in the picture Color Temp Select between Normal Cool and Warm ...

Page 13: ...ovie Sports and User You may select the sound mode directly by pressing the SOUND button on the remote control Bass Low frequency intensity Treble High frequency intensity Balance Left and right stereo audio channels balance Surround Activate or deactivate the Surround function Audio Language Select audio language ...

Page 14: ... timer choosing from 5 to 240 minutes or deactivate this function Time zone Select between Pacific Alaska Hawaii Eastern Central Atlantic and Mountain Daylight Saving Time Select between On and Off Clock User can not change time manually during DTV mode for time is from signal source directly ...

Page 15: ... V Position Clock Phase or even perform an Auto adjustment Closed Caption CC Mode Allows you to select the CC Mode among On Off CC or Mute Basic Selection Allows you to select the basic selection among CC1 CC2 CC3 CC4 Text1 Text2 Text3 and Text4 Advanced Selection Allows you to select the advanced selection among Service1 Service2 Service3 Service4 Service5 and Service6 Option Use thumbstick butto...

Page 16: ...n to block or unblock rating MPAA The Movie rating MPAA is used for original movies rated by the Motion Picture Association of America MPAA as broadcasted on cable TV and not edited for television Use button to select N A G PG PG 13 R NC 17 or X Canada English Select among E C C8 G PG 14 and 18 Canada French Select among E G 8ans 13ans 16ans and 18ans G General Audiences Movie is appropriate for a...

Page 17: ...can then press button to search the channels automatically The receivable channels will be stored automatically When searching channels press MENU to stop If you select Air as input signal in Antenna item you can press button to search the channels automatically The receivable channels will be stored automatically When searching channels press MENU to stop NOTE It will take a while to auto scan in...

Page 18: ...n to select the position of the table and press button to select the words DTV Signal Shows the quality of digital signal good normal bad OSD Menu 15 OSD Menu Show Hide Allows you to show or hide the channels Use button to highlight the desired item then press OK button to show or hide the highlighted channel ...

Page 19: ...laying language the amount of optional languages or Off Language Type Audio Type Subtitle the serial number of playing subtitle the amount of optional subtitles or Off Angle the serial number of playing angle the amount of optional angles or Off Press the button for the third time the display menu fades out 3 Loading and playing SVCD discs two pages Disc Type Track the playing track total tracks M...

Page 20: ...igital Audio discs 2 The player will search the disc directory automatically and display the contents on screen 4 To change directories use the direction buttons Disc Care About Disc Terms Title Generally pictures or music compressed on a DVD are divided into several sections title Chapter The smaller section unit of picture or music in a DVD under the title usually one title is comprised of one o...

Page 21: ...ired feature and then press OK to select the new setting 5 To exit the menu press SETUP or button to select EXIT SETUP and then press OK When launching the setup routine the pressing of the following buttons will turn off the setup menu while the choices that have been changed will be saved 1 SYSTEM SETUP The system setup options are illustrated below TV SYSTEM According to the Color system of you...

Page 22: ...setup options are illustrated below 3 AUDIO SETUP TONE Use the button to move the scroll and adjust the tone 4 DIGITAL SETUP The video setup options are illustrated below DYNAMIC RANGE Use the button to move the scroll and adjust the dynamic range DUAL MONO Choose the mode of the audio output There are four modes STEREO MONO L MONO R MIX MONO OSD LANGUAGE The OSD will display in the language you c...

Page 23: ...re quality Check the aerial connections Check that the channel is tuned in properly Adjust the picture settings brightness colour sharpness contrast hue Make sure that the TV is not located close to electrical appliances that may emit radio frequency interference No colour Adjust the colour setting Check that the programme is broadcast in colour Check that the cannel is tuned properly TV does not ...

Reviews: