Fastmark FM400 Series Quick Installation Manual Download Page 6

P/N 140121 Rev B                                                Page   6/6 


Installing Windows Drivers 

Windows drivers are included with each 
printer 

on 

CD. 

Run 

the 

printer 

installation  setup,  as  required  for  the 
version Windows you are using.   


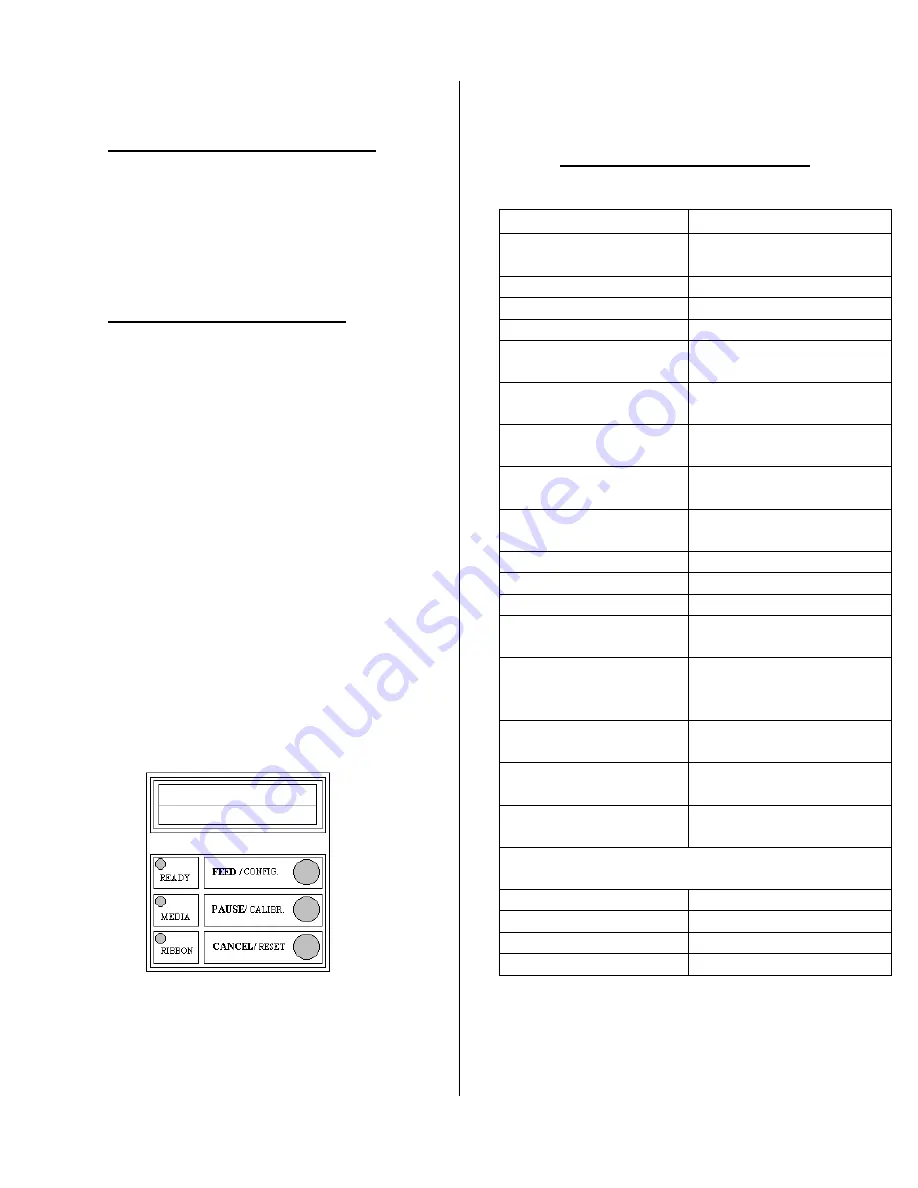
Setting Printer Features 


  Press 

PAUSE,

 verify mode on LCD 

display. 

  Press 

FEED

 and 

PAUSE

 at the 

same time to enter setup mode. 

  Press and hold 

FEED, 

use

 CANCEL


to scroll through the list of features. 

  Press 

CANCEL

 to select desired 

feature. 

  Press and hold 

FEED, 

use

 CANCEL


to scroll through the list of values for 
that feature. 

  Press 

CANCE

L to save the currently 

displayed value. 

  Press 

PAUSE

 twice to exit setup 

mode and READY the printer. 


User Selectable Features 


Feature 

Description 

Print Mode 
 

Direct Thermal 
Thermal Transfer 

Auto Calibrate Mode 

Mode 1~4 

Cut/Peel Offset 

-015 ~+.050 

TPH Vertical Offset 

-.003~+.003 

Recover Print 

Enable 
Disable 

Cutter Installed 

Yes 
No 

Peeler Installed 

Yes 
No 

Counting 

Up 
Down 

Media Sensor Type 

Gap 
Black Bar 

Present Distance 

0~040 

ABS Darkness 

0~030 

Trim Darkness 

-030~+030 

Baud Rate 

600~1200~2400~4800 
~9600~19200~None 

Parity (RS232) 

None 
Even 
Odd 

Length 

7 Data Bits 
8 Data Bits 

Clear Flash 

Yes 
No 

DHCP 

Enable 
Disable 

NOTE:

 To manually set Internal Ethernet 

addresses, chan

ge DHCP to “DISABLE”. 

IP Address 

###.###.###.### 

Subnet Mask 

###.###.###.### 

Default Gateway 

###.###.###.### 

Mac Address 

####.####.#### 


PAUSE 

NOTE:

 Features are subject to change depending on printer model. 


Summary of Contents for FM400 Series

Page 1: ...models 203dpi dots per inch model 300dpi dots per inch model Unpacking 1 Remove top foam packing piece 2 Lift printer straight up out of box 3 Remove accessory kit and supplies 4 Remove printer from plastic bag NOTE Save box and all packing materials for future use in the event the printer needs to be shipped TIA 230E Model No Serial No FM12345678 ...

Page 2: ...ff 0 3 Connect the power cord to the AC Inlet Receptacle located on the back of the printer 4 Connect AC power plug to a suitable AC source 5 Connect a suitable interface cable i e Parallel Serial USB or Ethernet NOTE The default serial interface parameters are 9600 8 data bits 1 stop bit XON XOFF and RTS CTS Front View Back View External Label Feed Slot Cover Parallel Port AC Inlet Receptacle Pow...

Page 3: ...r of the printer 9 Slide the Media Supply Guide towards the center of the printer until it is snug against the media Left up to lock in place 10 Rotate the green Outside Media Guide counter clockwise off the front rail 11 Thread the media over the Back Media Rail and under the Front Media Rail 12 Continue feeding the media through the black Upper and Lower Media Sensor Arms located under the print...

Page 4: ...e Front Media Rail Media is routed between the Upper and Lower Media Sensor Arms located under print module The green Outside Media Guide has been re installed If required the Media Sensor is adjusted directly over the notch hole or gap 17 If Thermal Transfer Media requiring a ribbon is being used skip to the next section Loading Ribbon otherwise continue with step 18 below 18 Rotate the Side Acce...

Page 5: ...a should be below this arm See decal on access cover for routing paths 9 IMPORTANT Proceed to the next section Calibrating Media Sensors Calibrating Media Sensors Important The first time media is installed the Media Sensors must be calibrated After the first calibration no further calibration is required unless the media type length color backing material etc is changed or irregular feeding occur...

Page 6: ...lue Press PAUSE twice to exit setup mode and READY the printer User Selectable Features Feature Description Print Mode Direct Thermal Thermal Transfer Auto Calibrate Mode Mode 1 4 Cut Peel Offset 015 050 TPH Vertical Offset 003 003 Recover Print Enable Disable Cutter Installed Yes No Peeler Installed Yes No Counting Up Down Media Sensor Type Gap Black Bar Present Distance 0 040 ABS Darkness 0 030 ...

Reviews: