Farnell L104AKL User Manual Download Page 8

(1). Power 


Turn the monitor on/off. LED: Green Monitor on 
LED: Red: Standby mode (no input signal)   

(2./3). Adjust Up / Down 

▲/▼ 


Increase or decrease the values in the OSD menu: 
Up: Increase the values. Down: Decrease the values.   

(4). Item/Select: 


Hot key for OSD adjustments of volume, contrast, brightness, hue, saturation, sharpness, and 
Red, Green, Blue.   

(5). Menu/Function


Press this button to call-up the OSD menu. 
This button is also used as “Exit“.   

(6). Source: 


To switch the video inputs, (or sub picture source in pip mode) This button is 
also used as “Enter“ and “Select “function in the OSD menu and to confirm 
your selected settings in the OSD menu.   

KEY Lock Function:    ***Push “Menu” and “Item” after the LED flashes, OSD of screen will 
show “Key Lock”, Into key lock mode. And push again after the LED flashes, OSD of screen 
w

ill show “Key Unlock “, Into key unlock mode. 


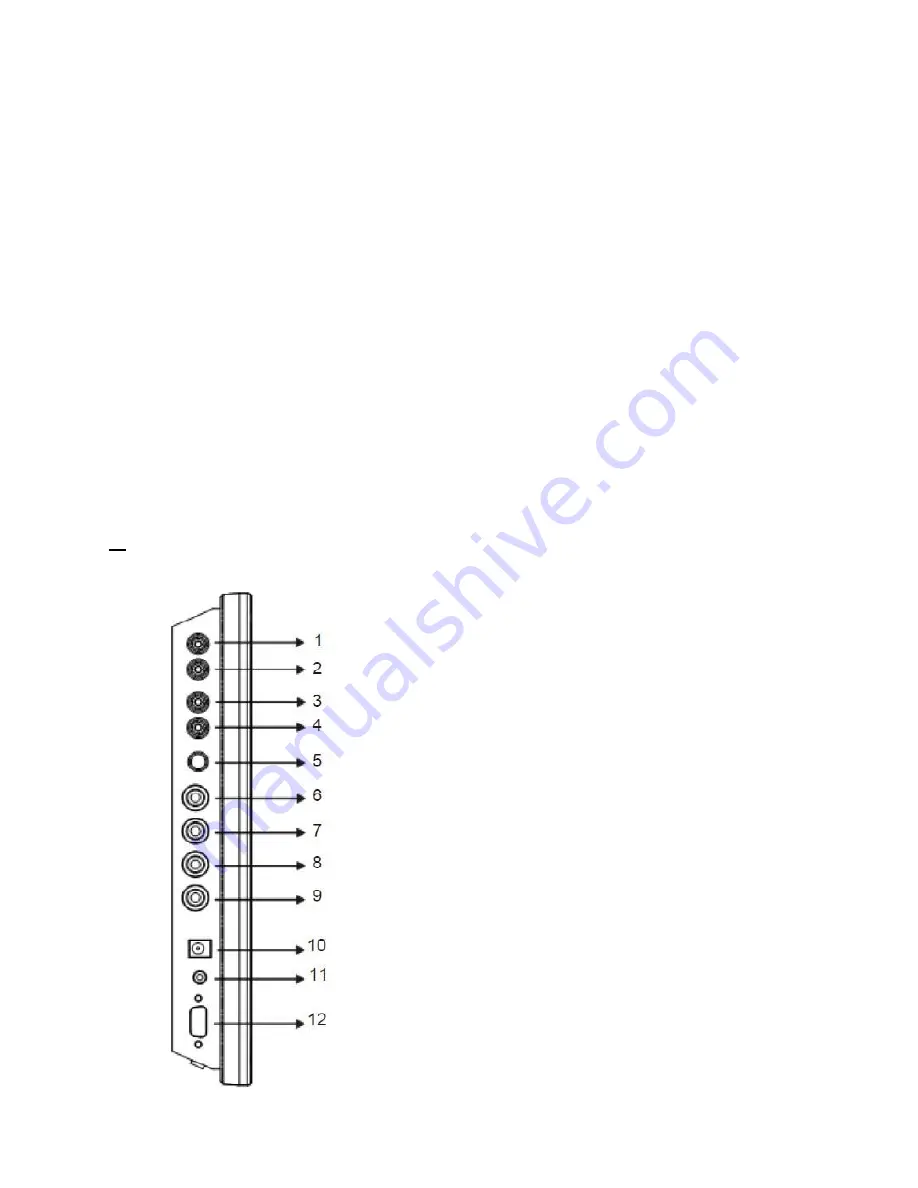
4. Connections 


1: AUDIO 2 OUT          Audio looping 
output for AUDIO 2   
2: AUDIO 2 IN          Audio 2 signal input, 
for AV2/YC/PC   
3: AUDIO 1 OUT          Audio looping 
output for AUDIO 1   
4: AUDIO 1 IN          Audio 1 
signal input, for AV1   
5: YC(S-VIDEO) IN          YC 
separated signal input.   
6: VIDEO 2 OUT          Video looping 
output for VIDEO2.   
7: VIDEO 2 IN          Composite signal 
input for VIDEO2.   
8: VIDEO 1 OUT          Video looping 
output for VIDEO1.   
9: VIDEO 1 IN          Composite signal 
input for VIDEO1   
10: DC12V IN   
11: AUDIO Live out (Ear phone out)   
12: PC VGA IN   

Summary of Contents for L104AKL

Page 1: ...TFT LCD MONITOR USER MANUAL Series Models L104AKL L121AKL L152AVL L156HDL L172AVL L185AVL L192AVL L260HDL ...

Page 2: ...ning TO REDUCE THE RISK OF FIRE OR ELECTRIC SHOCK DO NOT EXPOSE THIS PRODUCT TO RAIN OR MOISTURE DO NOT INSERT ANY METALLIC OBJECT THROUGH VENTILATION GRILLS Caution Explanation of Graphical Symbols Danger This symbol is intended to alert the user to the presence of un insulated dangerous voltage within the product s enclosure that may be of sufficient magnitude to constitute a risk of electric sh...

Page 3: ...terials for safe transport of this unit in the future Safety Precautions Federal Communications Commission FCC Statement This Equipment has been tested and found to comply with the limits for a Class B digital device pursuant to Part 15 of the FCC rules These limits are designed to provide reasonable protection against harmful interference in a Residential installation This equipment generates use...

Page 4: ...at all appliance items are included in the delivery Should items be missing do not operate the appliance and contact your local dealer Never attempt to repair the appliance yourself This should only be done by qualified service personnel Improper handling of the appliance will invalidate the warranty Items included in the delivery 1 x LCD monitor 1 x Power supply unit 12 V DC Except for the 26 1 x...

Page 5: ...signal source directly PC VGA 6 Item Hot key for OSD adjustments of volume contrast brightness hue saturation sharpness and Red Green Blue 7 Source To switch the video inputs or sub picture source in pip mode please use the IR remote control included in the delivery This button is also used as Enter and Select function in the OSD menu and to confirm your selected settings in the OSD menu 8 OK Menu...

Page 6: ...e press the position button to define the position of the sub picture Either in one of the four screen corners or centred 15 ID Can be control several monitors are installed in the same area In ID mode press ID key then input setting number 01 99 to unlock ID function Please press ID key again to lock ID function 16 0 9 For ID setting number used 17 USB Right Left Catalog No use 2 LCD monitor Moun...

Page 7: ...3 Monitor controls 26 10 4 Plastic 10 4 12 1 15 15 6 17 18 5 19 Aluminum 15 17 19 Plastic 15 17 19 26 Aluminium 15 17 Aluminium 150 170 ...

Page 8: ...D menu and to confirm your selected settings in the OSD menu KEY Lock Function Push Menu and Item after the LED flashes OSD of screen will show Key Lock Into key lock mode And push again after the LED flashes OSD of screen will show Key Unlock Into key unlock mode 4 Connections 1 AUDIO 2 OUT Audio looping output for AUDIO 2 2 AUDIO 2 IN Audio 2 signal input for AV2 YC PC 3 AUDIO 1 OUT Audio loopin...

Page 9: ... signal output 11 VIDEO 2 OUT Video looping output for VIDEO2 12 VIDEO 2 IN Composite signal input for VIDEO2 13 VIDEO 1 OUT Video looping output for VIDEO1 14 VIDEO 1 IN Composite signal input for VIDEO1 15 DC12V IN 16 AUDIO Live out Ear phone out 17 PC VGA IN This device complies with Part 15 FCC Rules Operation is subject to the following t conditions 1 This device may not cause harmful interfe...

Page 10: ... menu item Item Description Contrast Use the buttons to increase decrease the screen contrast Brightness Use the buttons to increase decrease the screen brightness Hue Use the buttons to increase decrease the hue Saturation Use the buttons to increase decrease the saturation Sharpness Use the buttons to increase decrease the sharpness Color Temp Use the source buttons to select the color temperatu...

Page 11: ... the same area Use the source buttons to into the function then use up down key to select you setting the number 01 99 then press menu to exit OSD Press IR remote control ID key again to confirm the SET ID function Gamma Use the source buttons to set the gamma values 0 1 2 Freeze Use the source buttons to freeze the picture Press this button again to disable the freeze picture and to re establish ...

Page 12: ...um Large Position Use source button to define the position of the sub picture Note This function is only active if you have previously defined a sub picture Border Colour Use source button to select the sub picture background colour Black Blue Sound Source Use source button to select the sound source Main Sub Swap Use source button to swap the main picture and the sub picture Note This function is...

Page 13: ... Contrast Use the buttons to increase decrease the screen contrast Brightness Use the buttons to increase decrease the screen brightness Colour Temp Use the source buttons to select the color temperature Normal Warm Cool RGB User Scale Use the source buttons to select the picture size Normal Center Auto Adjust Use the source buttons to Adjust the best image Item Description H Position Use the butt...

Page 14: ... 3D Comb Filter Technology Automatic Color Control and Color Killer Luminance transient improvement LTI Chrominance transient improvement CTI Directional zoom engine Video out support auto termination 75 Ohms Build in 2W speaker Support IR remote controller VESA standard bracket 75 100mm Mode Resolution 1 800 x 600 60 2 800 x 600 72 3 800 x 600 75 4 1024 x 768 60 5 1280 x 1024 60 6 1360 x 768 60 ...

Page 15: ...ime 35ms 16 ms View angle U D L R 40 70 70 70 75 75 75 75 Video input output 2x 2x Composite BNC S Video input 1x 4 Pin Mini Dim Audio input output 2x 2x RCA PC input 1x VGA input D Sub 15 pin Speaker 1x built in speaker 2 watt 3D Comb Filter Yes 3D De Interlace function Yes Picture in Picture PIP Yes video PC OSD setting Yes Power input AC 100 240V 50 60Hz Adapter DC 12V 3A Power consumption Appr...

Page 16: ...1 700 1 700 1 600 1 Response time 20ms 30 ms 35 ms 25ms View angle U D L R 50 60 70 70 60 80 80 80 65 75 80 80 80 60 80 80 Video input output 2x 2x Composite BNC S Video input 1x 4 Pin Mini Dim Audio input output 2x 2x RCA PC input 1x VGA input D Sub 15 pin Speaker 1x built in speaker 2 watt 3D Comb Filter Yes 3D De Interlace function Yes Picture in Picture PIP Yes video PC OSD setting Yes Power i...

Page 17: ...Subject to technical changes without prior notice Error excepted ...

Page 18: ...Subject to technical changes without prior notice Error excepted ...

Page 19: ...Subject to technical changes without prior notice Error excepted ...

Page 20: ... 2 ms View angle U D L R 80 80 80 80 80 80 85 85 Video input output 2x 2x Composite BNC S Video input 1x 4 Pin Mini Dim Audio input output 2x 2x RCA PC input 1x VGA input D Sub 15 pin Speaker 1x built in speaker 2 watt 3D Comb Filter Yes 3D De Interlace function Yes Picture in Picture PIP Yes video PC OSD setting Yes Power input AC 100 240V 50 60Hz Adapter DC 12V 5A Power consumption Approx 21 wat...

Page 21: ...3 7 ms View angle U D L R 80 80 80 80 80 80 85 85 80 80 85 85 Video input output 2x 2x Composite BNC S Video input 1x 4 Pin Mini Dim Full HD input 1x Full HD A Type Audio input output 2x 2x RCA PC input 1x VGA input D Sub 15 pin Speaker 1x built in speaker 2 watt 3D Comb Filter Yes 3D De Interlace function Yes Picture in Picture PIP Yes video PC OSD setting Yes Power input AC 100 240V 50 60Hz Adap...

Page 22: ...Is the unit turned on 3 Is the signal cable connected to the unit 4 Is the unit in power saving mode 1 Make sure the power cable has been properly connected to the unit 2 Turn on the unit 3 Make sure the signal cable has been properly connected to the unit 4 Press any key on computer keyboard Strange color 1 Is the signal cable connected to the unit 1 Make sure the signal cable has been properly c...

Page 23: ...cture PIP Yes video PC OSD setting Yes Power input AC 100 240V 50 60Hz Adapter DC 12V 5A AC 100 240V 50 60Hz Power consumption Approx 21 watt Approx 30 watt Approx 70 watt Dimensions W H D mm 385 x 310 x 80 420 x 350x 80 663 x 411 x 107 Weight 4 2 kg 5 7kg 9 9kg Operating temperature 0 to 40 C Problem Possible Causes Solutions No picture 1 Is the power cable connected to the unit 2 Is the unit tur...

Reviews: