CHICK-INN
LAYING
NEST
1
Revision date: 10.22.10
©2010 FarmTek
®
All Rights Reserved. Reproduction
is prohibited without permission.
105356
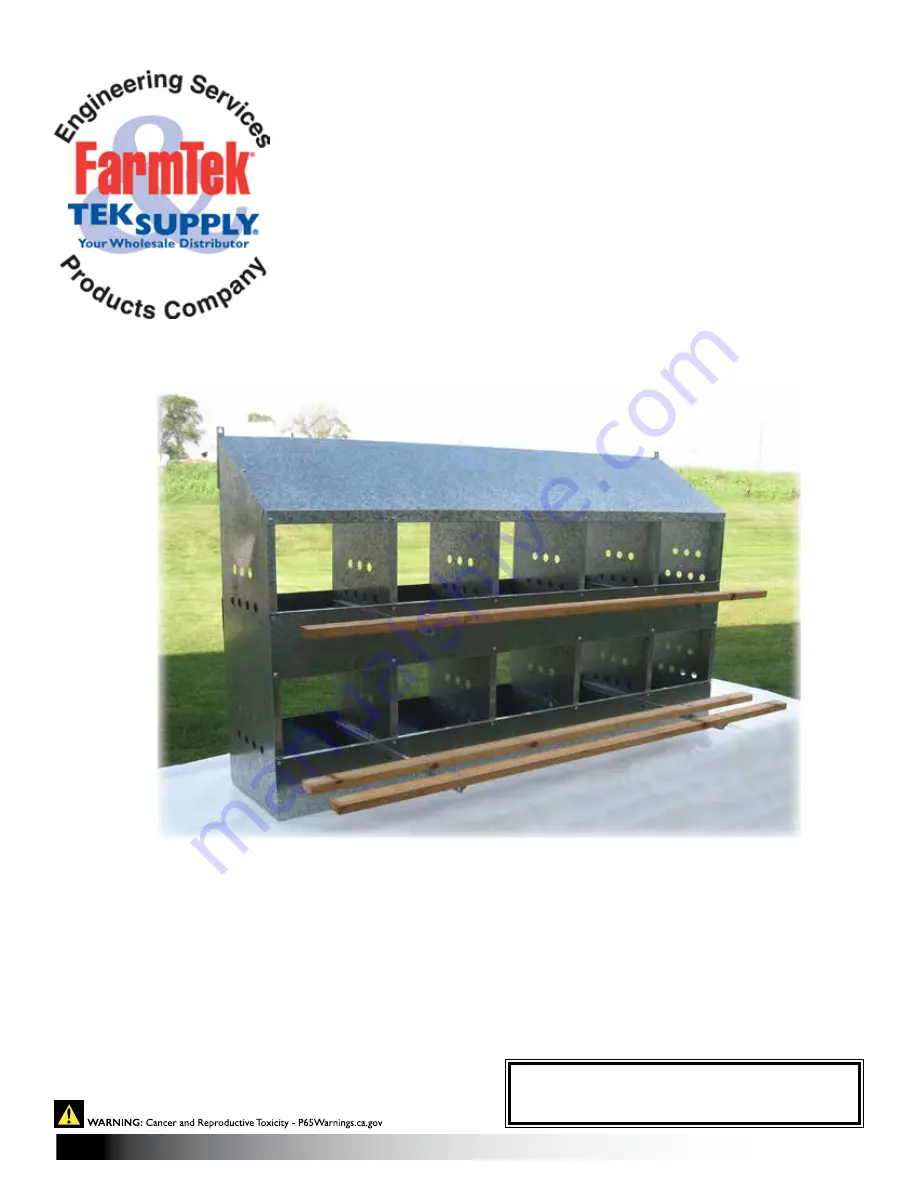
10-Hole Chick-Inn Laying Nest
STK#
Description
105356 10-Hole Chick-Inn Lying Nest
Page 1: ...INN LAYING NEST 1 Revision date 10 22 10 2010 FarmTek All Rights Reserved Reproduction is prohibited without permission 105356 10 Hole Chick Inn Laying Nest STK Description 105356 10 Hole Chick Inn Lying Nest ...
Page 2: ...ment and place where you can easily inventory the parts 2 If anything is missing or you have questions consult the Pictorial Parts List or contact Customer Service READ THIS DOCUMENT BEFORE YOU BEGIN TO ASSEMBLE THE CHICK INN LAYING NEST Thank you for purchasing this Chick Inn Laying Nest When properly assembled and maintained this product will provide years of reliable service These instructions ...
Page 3: ...ach the lower front panel with holes to the side panels and partitions as shown Secure in place using twelve 12 machine screws and hex nuts The front panel has notches and must be installed as shown with the lip of the panel facing up Machine screw heads go to the outside of the laying nest 1 ATTACH LOWER FRONT PANEL Flat Screwdriver Right Panel 1 Left and Center Panels 5 10 24X1 2 machine screws ...
Page 4: ...cure in place using twelve 12 machine screws and hex nuts Note the location of the front panel install the lip of the panel toward the top of the nest ATTACH UPPER FRONT PANEL Socket Wrench Set Flat Screwdriver 10 24X1 2 machine screws 12 10 24 hex nuts 12 Items not to scale Panel with Notches Lip Notch Panel with Notches 1 Square Hole Square Hole ...
Page 5: ...Panel without Notches Notch Panel with Notches 1 10 24X1 2 machine screws 24 10 24 hex nuts 24 Items not to scale 1 Carefully flip nest over so the back side faces up 2 Attach panels to the back of the assembly using the same procedure as the front panels using the remaining panels Install the panel without notches on the lower section of the assembly See photos on this page ...
Page 6: ...ATTENTION Do not install a machine screw into the corner holes Corner holes are used to install the hanging brackets in the following step Machine screw heads go to the outside of the laying nest ATTACH TOP Socket Wrench Set Flat Screwdriver Top 1 10 24X1 2 machine screws 10 10 24 hex nuts 10 No machine screw at this time Machine Screws Items not to scale ...
Page 7: ...5 Attach hanging brackets to the outer corners using 1 2 machine screws and hex nuts Position screw heads to the outside INSTALL HANGING BRACKETS Socket Wrench Set Flat Screwdriver Hanging Brackets 2 Bracket Bracket 10 24X1 2 machine screws 6 10 24 hex nuts 6 Items not to scale ...
Page 8: ...machine screws and locknuts Install the long support brackets on the lower section of the assembly install the short support brackets on the upper section ATTACH SUPPORT BRACKETS Socket Wrench Set Flat Screwdriver Long Support Bracket 2 Short Support Bracket 2 Long Support Bracket Short Support Bracket 10 24X1 2 machine screws 8 10 24 hex nuts 8 Items not to scale ...
Page 9: ...LAYING NEST Parts List and Tools Required 7 Socket Wrench Set Attach the perches to the support arms using 1 1 2 machine screws and hex nuts ATTACH PERCHES 1 4 20 x 1 1 2 machine screws 12 1 4 20 hex nuts 12 Perches 3 Items not to scale ...
Page 10: ... NEST Parts List and Tools Required 8 INSERT THE NEST BOTTOMS Nest Bottoms 10 Item not to scale Next insert one 1 nest bottom into each compartment Position beveled edges against the sides of the nest Gently push the nest bottom down into place ...
Page 11: ... Brackets 2 F Long Support Brackets 2 G Back Panel with Notches 1 H Front Panel with Notches 2 I Back Panel without Notches 1 Nest Bottom Panels not shown 10 Hardware pack not shown Hardware Pack Contents Qty 10 24 x 1 2 Machine Screw 72 10 24 Hex Nut 72 1 4 20 x 1 1 2 Machine Screw 12 1 4 20 Flange Nut 12 Hanging Brackets 2 A B B B B B H H C I G D E E F F D D ...