background image

DVD Setup

General Setup

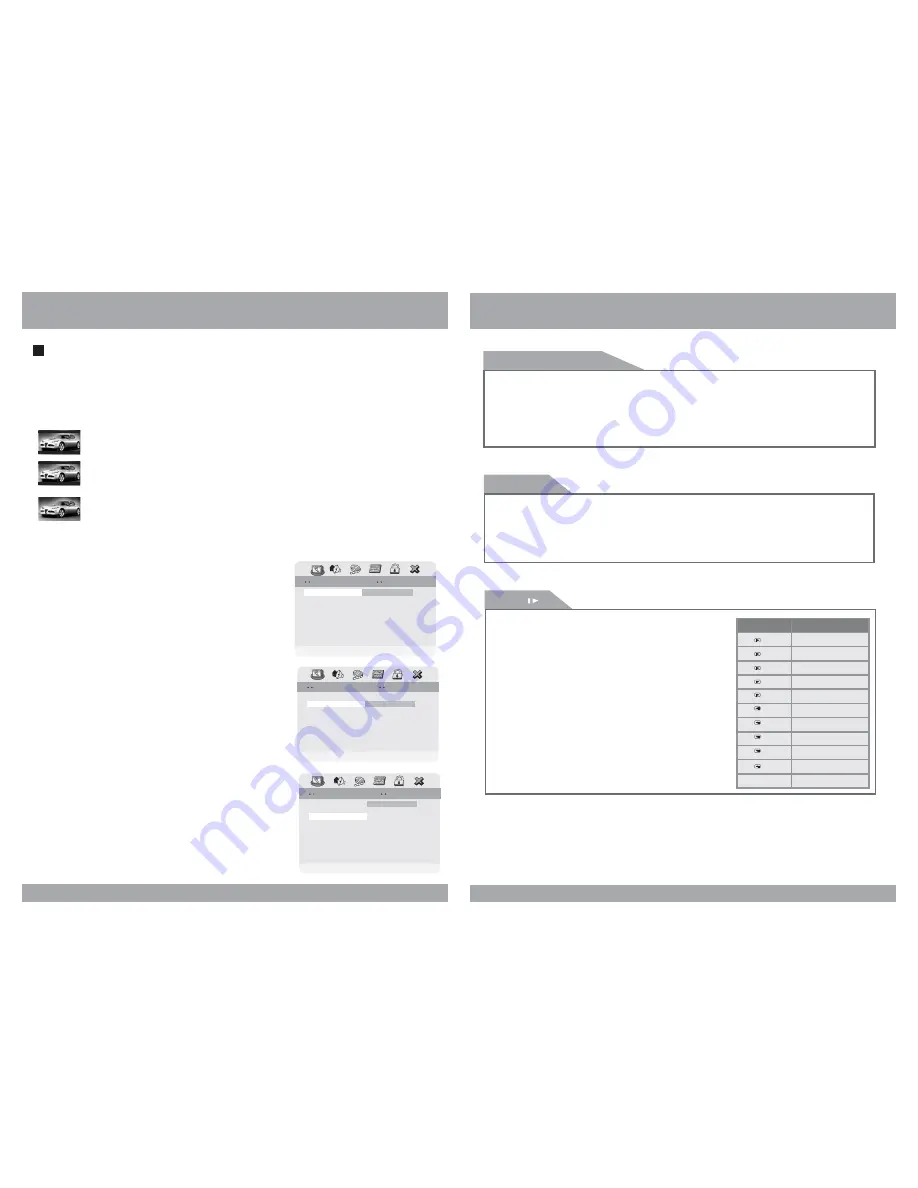
1. TV Aspect Ratio

In the Setup function called TV Display, you set the player to output the video signal at the
same aspect ratio as your monitor. If the monitor is widescreen format, select

WIDE.

If it is as

normal

screen (4:3), choose NORMAL/PS (Pan and Scan) or NORMAL L/B

(Letterbox).

Normal / PS 4:3 PAN SCAN
Choose this setting if you want the movie to fill the entire screen.
(This might mean that the left and right edges won t be seen)

Normal / LB 4:3
Choose this setting if you want to see the movie in its original aspect ratio.
(The movie might appear with black bars at the top and bottom of the screen.)

Wide 16:9 WIDE SCREEN
Choose this setting if your DVD Player is connected to a widescreen TV.
(This opition is available only if the disc has a 16:9 display aspect ratio.)

2. Angle Viewing

Some DVD discs contain programming which allows you
to view a scene from a few different camera angles. You
can tell when a scene is so recorded when an

Angle Mark

is displayed on the screen. This mark will only appear if you
have enabled the Angle Mark feature
in the DVD Setup menu.

On: When selected, the screen will be shown with

angle mark.

Off: When selected, no angle mark is shown on

the screen.

3. OSD Language

Use this option to set the OSD language.
When selected, change to set the on-screen display
language.

14

Angle Mark

Angle Mark
OSD Lang

OSD Lang
Screen Saver

Screen Saver

On
ENG
On

Set TV Display Mode

Set TV Display Mode

General Setup Page

General Setup Page

Normal/LB

Wide

TV Display

TV Display

PS

Normal/PS

OSD Lang

OSD Lang
Screen Saver

Screen Saver

ENG
On

Set Angle Mark

Set Angle Mark

General Setup Page

General Setup Page

Off

TV Display

TV Display

PS

Angle Mark

Angle Mark

On

On

Screen Saver

Screen Saver

On

Set OSD Language

Set OSD Language

General Setup Page

General Setup Page

TV Display

TV Display

PS

Angle Mark

Angle Mark

On

OSD Lang

OSD Lang

ENG

English
Korean
French
German
Italian
Spanish
Por tuguese
Dutch

English
Korean
French
German
Italian
Spanish
Por tuguese
Dutch

DVD Functions

Subtitle(SUB-T)

This button is used to select the language for the on-screen display system.
(This title menu may vary, depending on the particular DVD.)

[DVD]

OSD

1 / 2

Title

Slow(

)

27

Used to display the title menu of the loaded DVD disc.
This function is only present on discs which support it.

[DVD]

[DVD]/[VCD]

CONDITION

1 / 4

1 / 8

2X slow forward

4X slow forward

8X slow forward

Use this button to play a disc in slow-forward or
slow-reverse. Slow playback can be done at five
different speeds. Pressing this button repeatedly
decreases the speed in steps. Pressing a sixth
time returns playback to the normal speed.

1 / 16

1 / 2

1 / 4

1 / 8

1 / 16

Play

16X slow forward

2X slow rewind

4X slow rewind

8X slow rewind

16X slow rewind

Play

1 / 32

32X slow forward

1 / 32

32X slow rewind

Summary of Contents for MD-1120CMX

Page 1: ...OWNER S MANUAL 11 2 TFT LCD DVD SD USB COMBO MONITOR M PLAY AV MENU POWER MD 1120CMX...

Page 2: ......

Page 3: ...Mode Password Change 4 6 8 10 12 13 14 16 21 22 23 6 12 18 21 21 21 21 22 22 23 23 DVD Functions Eject Vol Vol Mute Play or Pause Audio Stop Arrows Setup Menu Display Number Buttons Subtitle Title Sl...

Page 4: ...y liquids in your car If you or your child spills any liquid on these products pull your vehicle to the roadside and turn the key off to disconnect or wipe the products with a towel Do not operate the...

Page 5: ...sh of lightning You may receive an electric shock Do not cover or stop up heater ducts or vents It may cause a fire or receive an electric shock Watching the monitor for an extended period of time wit...

Page 6: ...the shiny side of the disc the side with the embedded information Don t stick a label or a glue based note on either side of the disc Don t use discs that have glue or a damaged label with exposed ad...

Page 7: ...INSTALLATION PLATE UNIT SCREW A SCREW B 2 Connect the external compoments to the RCA cable or AV output Refer to the connection diagram on page 33 3 Match the position of installation bracket and inst...

Page 8: ...ress this button to resume playback RIGHT LEFT ARROWS not function in this unit Use to incease or decrease volume level Use these buttons press once to skip to the next or last track chapter or file o...

Page 9: ...m Use thes buttons to navigate the various menus and screens for the monitor and DVD systems To start playback of a disc press this button Press again to pause the playback If playback is paused press...

Page 10: ...pter time Repeat Sets the repeat play Time Display Watch play time 31 OSD 2 X 3 X 4 X 1 2 1 3 1 4 ZOOM X 2 CONDITION ZOOM X 3 ZOOM X 4 ZOOM X 1 2 ZOOM X 1 3 ZOOM X 1 4 Off Menu Title Chapter Audio Sub...

Page 11: ...lay Shuffle Random Single Repeat folder one time Single play NTSC PAL This button is used to select the video standard for the DVD mode between NTSC and PAL formats Angle Some DVD s are recorded with...

Page 12: ...until canceled DVD VCD AUDIO 29 OSD CONDITION A A B Start point of repeat Ending point repeat function To adjust CONTRAST BRIGHTNESS COLOR or FM press the MENU button until you arrive at the screen fo...

Page 13: ...play mode as follows repeatedly FR 16X FR 32X PLAY 8X rewind search 16X rewind search 32X rewind search Play OSD CONDITION FR 2X FR 4X FR 8X 2X rewind search 4X rewind search FR 16X FR 32X PLAY 8X rew...

Page 14: ...set the on screen display language 14 Angle Mark Angle Mark OSD Lang OSD Lang Screen Saver Screen Saver On ENG On Set TV Display Mode Set TV Display Mode General Setup Page General Setup Page Normal L...

Page 15: ...Display the Title Remain Display the Chapter Elapsed VCD Whenever press the button title chapter will be displayed as follows Pressing the display button displays information about the current CD on t...

Page 16: ...p Dolby Digital Setup Channel Delay Equalizer 3D Processing 2 Equalizer Settings Bass Boost Bass Boost Super Bass Super Bass Treble Boost Treble Boost Off Off Off Select Equalizer Type Select Equalize...

Page 17: ...alizer Page Equalizer Page EQ Type EQ Type None Off Bass Boost Bass Boost Off On Super Bass Super Bass Off Treble Boost Treble Boost Off DVD Functions Eject Audio Change the audio output format A the...

Page 18: ...2 Password Change 23 Password Password Mode Password Mode Password Setup Page Password Setup Page Off Password Mode On Password Mode On On Change Password Change Password Password Setup Page Password...

Page 19: ...Setup Menu will be returned to the factory defaut settings except for Parental Level Region and Password values 1 Press the SETUP button when stop mode 2 Press the buttons to move to Preference 3 Pre...

Page 20: ...that you prefer If the disc you are playing has that language available it will display subtitles in that language 1 Press the SETUP button during stop mode 2 Press the buttons to move to Preference 3...

Reviews: