background image


- 18 - 

TOUCH SCREEN OPERATIONS 

 
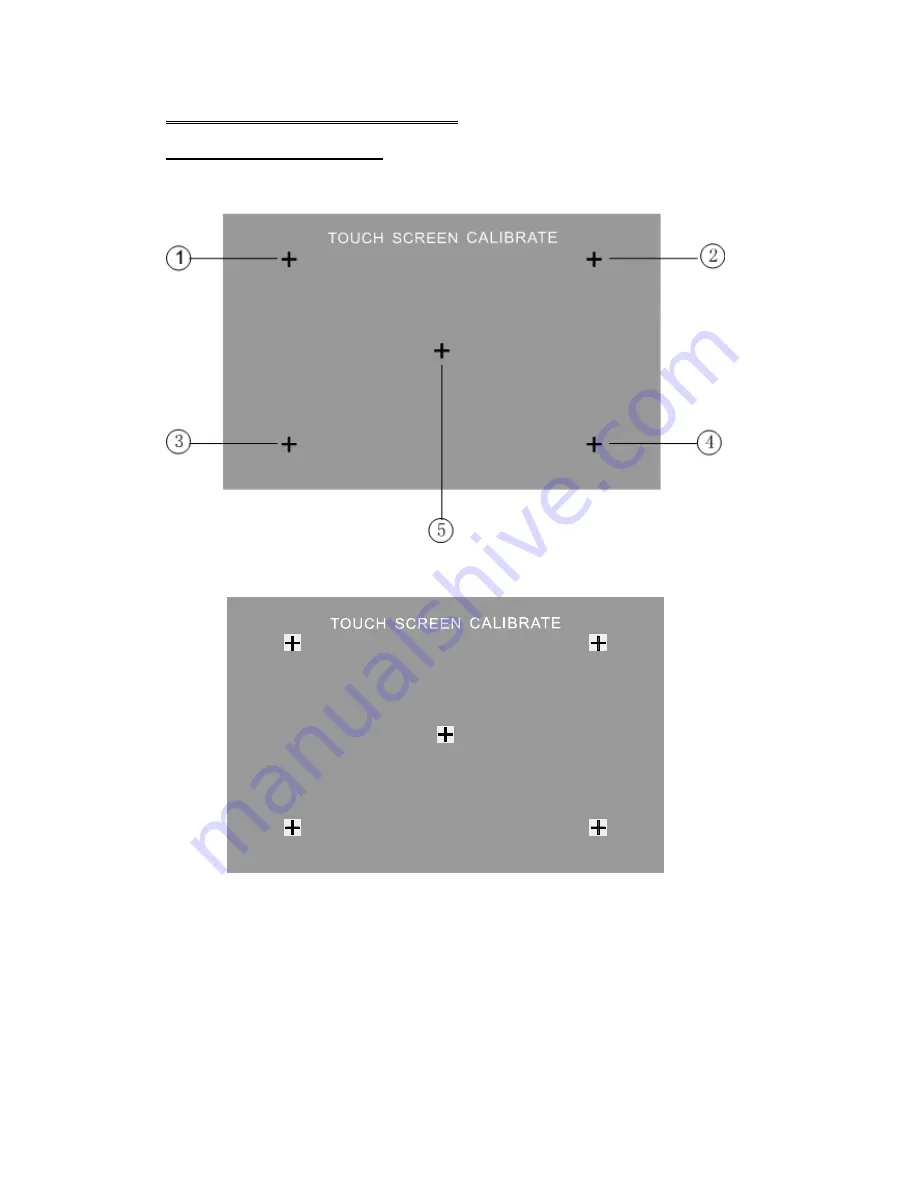
TOUCH SCREEN CALIBRATE 

When “Power Off”, press the buttons 1, 2, 3, 4, 5, [BAND] of remote control to enter 
the CALIBRATE page: 


To touch the points from 1 to 5 until the points change to brighter by using a ballpoint 
pen or pencil


After all 5 points change to brighter, the unit would finish the CALIBRATE and power 
off again. Then the Touch Screen is restored to their default positions.


Summary of Contents for 2 Din Motorized 6.95" Wide Touch-Screen Monitor AM/FM Receiver, DVD Player, USB, SD Card, MP4, iPod Connection...

Page 1: ...Operating Manual 2 Din Motorized 6 95 Wide Touch Screen Monitor AM FM Receiver DVD Player USB SD Card MP4 iPod Connection Bluetooth Function ...

Page 2: ...emote Control 13 Touch Screen Operations 17 Touch Screen Calibrate 17 Main Menu 18 Radio Operations 19 DVD Operations 22 USB Operations 24 SD CARD Operations 24 Bluetooth Operations 25 iPod Operations 33 AV IN 1 Operations 35 AV IN 2 Operations 36 NAVI Operations 37 System Setup 41 DVD Setup Menu 45 Trouble Shooting 50 Specifications 52 Disc Notes 53 ...

Page 3: ...ving with the sound at a level preventing you from hearing sounds outside and around the car may cause an accident When cleaning Do not expose the product to water or excessive moisture This could cause short circuit fire or other severe damage When parked Parking in direct sunlight can result in very high temperature levels inside your car Let the interior and unit cool down before switching the ...

Page 4: ...er Wire Amplifier Trigger Wire Brake Screen Safety Trigger AM FM With 30 Pre sets 18 FM 12 AM Auto Store Pre set Scan 4 Channel High Power 50 x 4 Channels Mosfet Power Dual RCA Outputs Front Rear Sub Woofer Selectable Frequency Outputs 80 120 160Hz Variable Sub Woofer Volume Control 1 Auxiliary Video Input For Back up Camera 1 RCA Video Output LO DX And Stereo Mono Selector Switch Electronic Bass ...

Page 5: ...Screws x 8 Connecter Wire x 1 Remote Control x 1 Keys x 2 Operational Manual x 1 Mounting Sleeve x 1 USB Cable x 1 iPod Cable x 1 option Trim Bezel x 1 Air Vent Cover x 1 AV Cable x 1 External Microphone x 1 1 2 3 4 5 6 7 8 9 10 11 12 13 14 ...

Page 6: ... 5 UNIT INSTALLATION 1 connect the power cable with unit 2 press the P ANGLE button to slide down the front panel 3 turn over the unit loose the screws ...

Page 7: ... 6 4 press the P ANGLE button to close the front panel 5 install the Mounting sleeve into the dashboard 6 install the unit into the mounting sleeve NOTE Screws are useful to protection during shipment ...

Page 8: ... 7 UNIT REMOVAL Insert the keys supplied with the unit on both sides as illustrated as this will release the internal locks so you can slide the unit out ...

Page 9: ... 8 WIRE CONNECTION NOTE Plug the external microphone input into the MIC IN jack for Bluetooth ...

Page 10: ...FT monitor will display the alarm picture see as follows in order to ensure the safety Under the Rear View Mode the Brake Control function is no effective Auto Antenna Control Connect the auto antenna control wire AUTO_ANT see Wiring Diagram the antenna will lift when the unit startup it will descend when the unit turnoff ...

Page 11: ... 10 FRONT PANEL 1 MINI USB 5 RESET 9 MENU NAVI 2 OPEN CLOSE P ANGLE 6 REMOTE 10 POWER SOURCE 3 VOLUME 7 MIC 11 AV IN 2 4 VOLUME 8 MUTE ...

Page 12: ... VOLUME Press to increase decrease the volume 5 RESET Press the button to switch back to all the original factory settings Keep in mind this will erase all your preset radio stations and any EQ settings you may have made and saved 6 REMOTE Infrared Remote Receiver 7 MIC Microphone 8 MUTE Press the button to switch off the sound press it again to resume to the previous volume level Hold on pressing...

Page 13: ...nected The unit could be switched to iPOD Mode if iPod connected 11 AV IN 2 Connect an external audio video device to this jack to watch to the device through your car video system 12 EJECT When flip down the front panel press to eject load a disc 13 SD CARD SLOT The unit will be switched to SD Mode automatically when SD card inserted and play the songs pictures videos in SD card ...

Page 14: ... 13 REAR PANEL 14 RADIO ANTENNA IPOD MINI DIN IR REPEATER ADAPTER 15 16PIN SOCKET 16 VIDEO AUDIO OUTPUT INPUT ...

Page 15: ...BER BUTTONS 15 TITLE PBN 27 RIGHT Seek up 4 MENU 16 ZOOM CALL 28 STOP 5 AUDIO 17 SUBTITLE PBP 29 D ANGLE 6 LOUD EQ 18 OPEN CLOSE P ANGLE 30 PLAY PAUSE 7 UP Tune up 19 SETUP 31 NEXT 8 LEFT Seek Down 20 VOLUME 32 A B PHONE PAIR 9 ENTER BAND 21 VOLUME 33 REPEAT PHONE 10 PROGRAM 22 DISPLAY 34 PAL NTSC AP ...

Page 16: ...Under the DVD Setup menu Press the buttons to move the cursor upward downward to select item Press the buttons to move the cursor leftward rightward to select item Under RADIO Mode Press the buttons to switch the stored stations Hold on pressing the buttons to fast seeking the next available channel by decreasing increasing the tuning frequency seeking will stop by pressing any button Press the bu...

Page 17: ...ions as key on front panel 19 SETUP Press to enter the DVD SETUP menu 20 VOL 21 VOL Press to increase decrease the volume 22 DISPLAY Press to display current playback information when playing DVD disc 23 PBC AST CLEAR Press to select the PBC function on off when playing VCD disc Hold on pressing to seek radio station TV channel automatically under RADIO TV Mode Press to cancel or clear the numbers...

Page 18: ...DVD disc 35 STEREO MUSIC PAIR Press to turn the stereo on off under Radio Mode REPLACING THE BATTERIES If the remote control has no function or if the operating range reduced replace the old battery with new one 1 Pull out the battery holder Follow the arrow 1 slide it to the right toward the battery while at the same time pull the battery holder away from the remote control 2 Place the new batter...

Page 19: ...f remote control to enter the CALIBRATE page To touch the points from 1 to 5 until the points change to brighter by using a ballpoint pen or pencil After all 5 points change to brighter the unit would finish the CALIBRATE and power off again Then the Touch Screen is restored to their default positions ...

Page 20: ... 19 MAIN MENU Touch the icon MORE to enter the 2nd page of main menu ...

Page 21: ...performs same operation Recall a Preset Station Touch the icon 1 6 to recall the corresponding stored station in M1 M6 channels To press the number buttons 1 6 of remote control performs same operation 7 FREQUENCY 8 SEEK 9 SEEK Touch the icon to seek the next available channel by increasing decreasing the tuning frequency Press any button to stop seeking Seeking will stop automatically when seek a...

Page 22: ...ing increasing Hold on touching the icons has same function with SEEK SEEK To press the buttons of remote control performs same operation 3 LOCAL ON OFF When you are using the local searching function of LOCAL you can only receive the radio station with strong enough signals and fine state 4 NEXT PAGE Touch the icon to enter the 3rd page of RADIO Mode ...

Page 23: ...op playing 4 It is independent for FM AM frequency There are 3 wave bands of FM1 FM2 FM3 2 wave bands of AM1 AM2 each can store 6 radio stations totally 30 radio stations 5 The unit will stop on the beginning frequency if no available station after seeking one cycle 6 To press the AST button of panel or hold on pressing the PBC AST button of remote control performs same operation 2 P SCAN The unit...

Page 24: ...f remote control performs the same operation 4 EXIT Touch the icon to exit the TOUCH ICONS display 5 F REV 6 F FWD Touch the icon to select fast reverse forward search Touch the PLAY icon to resume to normal playback To press the F REV F FWD buttons of remote control performs the same operation 7 STOP During movie playback touch the icon once the DVD player memorizes the location where you stopped...

Page 25: ...To press the direction buttons UP DOWN LEFT RIGHT arrow of remote control performs same operation 5 ENTER Touch the icon to confirm the selection To press the ENTER button of remote control performs same operation 6 EXIT Touch the icon to exit the TOUCH ICONS display 7 MENU Touch the icon to return the main menu 8 NEXT PAGE Touch the icon to enter the 1st page of DVD Mode ...

Page 26: ...lly if there is a disc inside Under USB Mode all operations are same as DVD operations SD CARD OPERATIONS Touch the icon SD CARD to enter the SD CARD Mode if SD card connected The unit will switch to SD CARD Mode automatically if connecting SD card When disconnecting SD card the unit will switch to RADIO Mode automatically if there is no disc in the unit and the unit will switch to DVD Mode automa...

Page 27: ... control performs same operation 2 PHONE CALL Touch the icon to enter the phone calling 3 PHONE BOOK Touch the icon to enter the phone book lookup 4 AUDIO Touch the icon to enter the audio device operation 5 SETTINGS Touch the icon to enter the Bluetooth settings NOTE To press the BAND button of remote control to toggle between the different working pages as following PHONE CALL PHONE BOOK AUDIO S...

Page 28: ... the item would be changed to red color 1 INFORMATION DISPLAY 2 AUTO ANSWER Touch the icon to select auto manual answer when call is coming 3 PHONEC CONNECT Touch the icon to select auto manual phone connect when return back the car 4 PHONE PAIRING Touch the icon then see the below words on information display Then set the phone to pair with unit Touch the icon again to cancel the pairing and see ...

Page 29: ...ally 5 different devices including cell phones and audio players 1 When you want to connect another paired cell phone with unit to press the PHONE button of remote control to disconnect the current connecting cell phone use the another cell phone to connect with the unit without paring operations 2 When you disconnected the current connecting cell phone also you can press the PHONE button of remot...

Page 30: ...u have input To press the CLEAR button of remote control performs same operation 4 END CALL To touch the icon to reject or hang up a call To press the END CALL button of remote control performs same operation 5 TRANSFER When talking the phone touch the icon to transfer the call between the unit and your cell phone To press the TRANSFER button of remote control performs same operation 6 NUMBER KEYS...

Page 31: ...ation Then when talking you will see the below information And end the call you will see the below information CALLING IN When call in you will see the below image Then when talking you will see the below image And when end the call you will see the below image ...

Page 32: ...ANSFER When talking the phone touch the icon to transfer the call between the unit and your cell phone To press the TRANSFER button of remote control performs same operation 2 CALL To touch the icon to call a number or to receive a cell phone call To press the CALL button of remote control performs same operation 3 END CALL To touch the icon to reject or hang up a call To press the END CALL button...

Page 33: ... NOTE Touch the icon 2 when item is changed to blue color the item is selected To press the buttons of remote control to select the item and the item would be changed to blue color 1 INFORAMTION DISPLAY You will see the phone number of the item in blue color 2 CURRENT PHONE NUMBER If this number is stored you will see the name if not you will see the phone number 3 RETURN Touch the icon to return ...

Page 34: ... performs same operation 2 NEXT Touch the icon to select the next track To press the NEXT button of remote control performs same operation 3 PLAY PAUSE Touch the icon to pause playback when playing touch it again to continue playing To press the PLAY PAUSE button of remote control performs same operation 4 INFORAMTION DISPLAY It could be displayed the name of connecting audio device ...

Page 35: ... List 3 The Playing Time 4 The Name of Playing Song 5 The Name of Artist 6 The Name of Album 7 PREV 8 NEXT Touch the icon to go to the pervious next chapter track or song To press the PREVIOUS NEXT buttons of panel or remote control performs same operation 9 F REV 10 F FWD Touch the icon to select fast reverse forward search Touch the PLAY to resume to normal playback To press the F REV F FWD butt...

Page 36: ...Touch the icon to exit the TOUCH ICONS display Video Operation 1 MUTE Touch the icon to switch off the sound touch it again to resume to the previous volume level 2 MUSIC Touch the icon to switch to the MUSIC operation 3 MENU Touch the icon to return the main menu 4 EXIT Touch the icon to exit the TOUCH ICONS display ...

Page 37: ...ch it again to resume to the previous volume level 2 EQ The user can set to adjust the audio output to your preference USER POP CLASSIC ROCK JAZZ USER 3 MENU Touch the icon to return the main menu 4 EXIT Touch the icon to exit the TOUCH ICONS display NOTE AV IN 1 is for the RCA audio L R video input on rear panel of unit ...

Page 38: ...et to adjust the audio output to your preference USER POP CLASSIC ROCK JAZZ USER 3 MENU Touch the icon to return the main menu 4 EXIT Touch the icon to exit the TOUCH ICONS display NOTE AV IN 2 is for the audio L R video input jack on the right side of front panel see item 11 in page 10 Connect an external audio video device to AV IN 2 jack to listen to the device through your car speakers ...

Page 39: ...lease touch the points from 1 to 5 by using a ballpoint pen or pencil To verify the calibration please touch the points from 1 to 5 again Then the following screen is displayed The Touch Screen is restored to their default positions Touch anywhere of panel to finish the calibration and go to the following screen ...

Page 40: ... connect another unit please take out the SD card from the NAVIbox and connect with computer the following screen is displayed on computer Delete the file calib ifo only Insert the SD card into NAVIbox again and connect the NAVIbox with another unit Go to NAVI mode Touch the icon NAVI to enter the NAVI Mode if NAVIbox connected ...

Page 41: ... button at the bottom of the screen Enter the NAVI mode by main menu the NAVI operations are effective only all other processes are disable such as Radio CD etc NOTE Under NAVI mode please view all operations by Navigation Device NAVIBOX 1 User s manual Quick Access Key NAVI ...

Page 42: ...he Radio mode Enter the NAVI mode by Quick Access Key the previous working mode is still working on background For example under Radio mode press the NAVI button to switch to NAVI mode and you can still listen to the radio stations But when voice of Navigation comes the radio will be interrupted until voice of Navigation ends No NAVIbox Connection Touch the NAVI icon to enter the following screen ...

Page 43: ...tly 6 SAVE SETTINGS Touch the icon 5 to save all settings and exit SETUP SETUP MENU OPERATION Press the ENTER BAND button of remote control to switch the main menus as following SYSTEM VIDEO AUDIO MORE AUDIO CLOCK SYSTEM Press the buttons of remote control to select the item you want to change Press the buttons of remote control to change the value of item Holding on pressing the SYSTEM button of ...

Page 44: ...H ON OFF DEFAULT the unit will restore all default settings of Sound Parameter Picture Parameter Tuner Parameter VIDEO SETUP BRIGHTNESS 0 64 CONTRAST 0 64 COLOR 0 64 HUE 0 64 VIDEO TYPE NTSC PAL AUTO NTSC NOTE It is available to setup of HUE under NTSC VIDEO TYPE only ...

Page 45: ... 44 AUDIO SETUP BASS 15 15 TREBLE 15 15 BALANCE L 15 R 15 FADER F 15 R 15 MORE AUDIO SETUP SUB WF FRQ 80HZ 120HZ 160HZ OFF 80HZ SUB WF VOL 0 15 BEEP SOUND ON OFF ...

Page 46: ... 45 CLOCK SETUP CLOCK 12H 24H DISPLAY ON OFF HOUR 00 23 MINUTE 00 59 ...

Page 47: ...ess the buttons to select the submenus as your need Press the or ENTER buttons to enter the items of submenus Press the button to exit the items of submenus Press the buttons to select the item you want to change Press the ENTER button to confirm the item you have selected and exit to the submenus Press the SETUP button of remote control or press the ENTER button on the submenu EXIT SETUP to exit ...

Page 48: ...PG 13 5 PG R 6 R 7 NC 17 8 ADULT The Parental Ratings could be changed after the correct password input DEFAULT The unit will restore all default settings by selecting this option LANGUAGE SETUP OSD LANGUAGE Following options are available for the OSD LANGUAGE ENGLISH GERMAN SPANISH FRENCH PORTUGUESE ITALIAN RUSSIAN DUTCH SWEDISH KOREAN DANISH NORWEGIAN POLISH HUNGARIAN AUDIO LANGUAGE Following op...

Page 49: ...g options are available for the MENU LANGUAGE ENGLISH GERMAN SPANISH FRENCH PORTUGUESE ITALIAN RUSSIAN DUTCH SWEDISH KOREAN DANISH NORWEGIAN POLISH HUNGARIAN DIVX LANGUAGE Following options are available for the DIVX LANGUAGE CENTRAL EU WESTERN EU KOREAN AUDIO SETUP AUDIO OUT Following options are available for the AUDIO OUT SPDIF OFF SPDIF RAW SPDIF PCM KEY Following options are available for the...

Page 50: ...or the BRIGHTNESS 0 2 4 6 8 10 12 CONTRAST Following options are available for the CONTRAST 0 2 4 6 8 10 12 HUE Following options are available for the HUE 6 4 2 0 2 4 6 SATURATION Following options are available for the SATURATION 0 2 4 6 8 10 12 SPEAKER SETUP ...

Page 51: ...e for the BASS MODE ALL LG SPK ALL SM SPK MIXED SPK DIGITAL SETUP OP MODE Following options are available for the OP MODE LINE OUT RF REMOD DYNAMIC RANGE Following options are available for the DYNAMIC RANGE FULL 6 8 4 8 2 8 OFF DUAL MONO Following options are available for the DUAL MONO STEREO MONO L MONO R MIX MONO ...

Page 52: ...ulate all speaker wiring connections Poor sound quality or distortion Pirate disc is in use Speaker power rating not compatible with unit Speaker is shorted Use original copy Connect proper speakers Check speaker contact Unit resets itself when engine is off Incorrect connection between ACC and Positive battery wire Check wiring and correct TUNER Weak station searching Auto antenna is not fully ex...

Page 53: ...ng VCD playback PBC is not available on the disc No repeat or searching while playing VCD PBC is on Turn PBC off MP3 Interruption occurred during playback Disc is dirty or scratched Clean disc or replace Cannot read disc File is damaged bad recording Recreate disc with good files Incorrect playback message displayed Message is longer than LCD can display Error Messages Message Displayed Cause Corr...

Page 54: ...z Europe China IF 10 7 MHz Usable Sensitivity 15 dBµV Stereo Separation 27 dB 1KHz Frequency Response 20 10000 Hz AM TUNER Frequency Range 530 1710 KHz USA 522 1620 KHz Europe 531 1602 KHz China IF 450 KHz Usable Sensitivity 34 dBµV DVD PLAYER Signal System PAL NTSC Signal to noise Radio 80 dB 1KHz Distortion 0 5 MONITOR Resolution 1440 w x 234 H RGB Brightness 350 cd m2 Contrast 300 1 NOTE Specif...

Page 55: ...nt such as benzene thinner or conventional record cleaners which may mar the surface of the disc NOTE A disc may became somewhat scratched although not enough to made it unusable depending on your handing it in the condition of the usage environment These scratches are not an indication of any problem with the player Dolby and the double D symbol are trademarks of Dolby Laboratories Repairing New ...

Reviews: