background image

31

RAC 3000

75036025 - RAC 3000 – rev 09 - ( 12-2021 )

D

GB

F

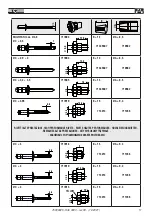
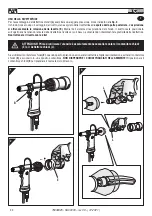
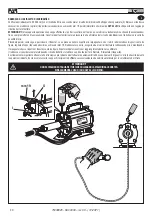
TOPPING UP THE OIL-DYNAMIC CIRCUIT

Verify periodically (15000 cycles), that the oil level does not go below 3/4 of the limit indicated by the proper indicator (

I

). Whether you need  to top the 

circuit up, remove the plug (

G

) using a 19 mm wrench, then let in the oil 

HLP 32 cSt

 until reaching the lip of the threaded hole.

ATTENTION!

If you fail to perform this operation, you will note power loss that will lead to compromise the proper working. Therefore, it will be necessary 

to get rid of the air from the hydro-pneumatic circuit and restore the exact oil level.
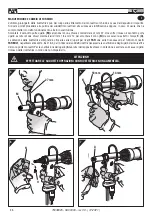
Then proceed as follows: position the Booster higher than the handle and the supply pipes as shown in picture, remove the cap (

G

) by a 19 mm wrench. 

Top up with oil, perform a few riveting cycles adding oil while keeping the handle down with respect to the Booster, as per picture. Repeat the operation 
until the optimal stroke is reached. 
Topping up is completed when the oil level is stable and touches the lip of the threaded hole. Fit again the cap (

G

).

It is very important to follow the above mentioned instructions and always use gloves when you handle the machine. The overflow oil must be collected 
in proper containers and delivered afterwards to authorised waste companies.

ATTENTION !!!

 DO NOT SMASH OR CUT THE CONNECTING PIPES BETWEEN GUN AND BOOSTER.

WE RECOMMEND TO USE OIL HLP 32 cSt OR SIMILARS.

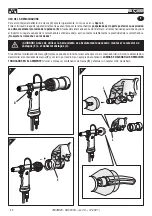
REMPLISSAGE DE L’HUILE DU CIRCUIT HYDRAULIQUE 

Le niveau d’huile doit être périodiquement contrôlé (15000 cycles): il ne doit jamais se trouver au-dessous des trois quarts signalés par l’indicateur spécial 

(

I

). Dans le cas où il serait nécessaire de procéder à un remplissage, retirer le bouchon (

G

) à l’aide d’une clé de 19 mm, puis ajouter l’huile hydraulique 

HLP 32 cSt 

jusqu’à ce que celle-ci atteigne le bord du trou fileté.

ATTENTION!

 Ne pas effectuer cette opération peut avoir pour effet d’abaisser progressivement la course de la machine et d’en compromettre le bon 

fonctionnement. Dans ce cas, il est nécessaire d’éliminer l’air présent dans le circuit hydraulique et de rétablir la quantité d’huile nécessaire. A cet effet, 
procéder comme suit: placer le Booster sur un plan plus haut que la poignée, avec les tuyaux d’alimentation disposés comme indiqué sur la figure, enlever 
le bouchon (

G

) en utilisant une clé de 19 mm. Verser l’huile, effectuer quelques cycles de rivetage, en faisant le remplissage de l’huile et en gardant la 

poignée plus basse que le Booster, comme indiqué sur la figure. Répéter l’opération jusqu’à atteindre la course idéale. Le remplissage est complété 
lorsque le niveau de l’huile a atteint le bord du trou fileté. Remonter le bouchon (

G

). 

Il est très important de respecter les instructions ci-dessus et d’effectuer les opérations de remplissage d’huile muni de gants. L’huile qui s’écoule 

durant les opérations ci-dessus doit être récupérée dans un récipient et remise ensuite à une entreprise agréée pour l’élimination de ce type de déchets.

ATTENTION!!! 

VEILLER À NE PAS ÉCRASER ET NE PAS COUPER LES TUYAUX QUI RELIENT LA MACHINE AU BOOSTER.

 NOUS RECOMMANDONS L’UTILISATION D’HUILE HLP 32 CST OU SIMILAIRES

NACHFÜLLEN VON ÖL DES ÖLDYNAMISCHEN KREISLAUFS

Regelmäßig überprüfen (15000 Arbeitszyklen), dass der Ölstand den durch die entsprechende Anzeige angezeigten 3/4-Wert nicht unterschreitet (

I

). 

Sollte ein Nachfüllen erforderlich sein, mit einem 19-mm-Schlüssel den Stopfen (

G

) entfernen und das Hydrauliköl HLP 32 cSt bis zum Rand der 

Gewindebohrung auffüllen.

ACHTUNG!

 Wenn dieser Vorgang nicht durchgeführt wird, kann es im Laufe der Zeit zu einer Verringerung des Hubs der Maschine kommen, die sich 

bis hin zur Beeinträchtigung ihres Betriebs verstärkt. Es ist daher notwendig, das Vorhandensein von Luft im Hydraulikkreislauf zu vermeiden und die 
korrekte Ölmenge aufzufüllen. Gehen Sie dann wie folgt vor: Platzieren Sie den Booster in einer Ebene höher als der Griff, wobei die Zuleitungen wie in 
Abbildung gezeigt angeordnet sind, entfernen Sie den Öleinfülldeckel (

G

) mit einem 19-mm-Schraubenschlüssel. Füllen Sie Öl nach und führen Sie einige 

Nietzyklen durch Hinzufügen von Öl, während der Griff in Bezug auf den Booster niedrig gehalten wird, wie in Abbildung gezeigt. Wiederholen Sie den 
Vorgang, bis der optimale Hub erreicht ist. Das Nachfüllen gilt als abgeschlossen, wenn sich der Ölstand mit der Kante des Gewindelochs stabilisiert. 
Setzen Sie den Öleinfülldeckel wieder auf (

G

).

Es ist äußerst wichtig, die obigen Anweisungen zu befolgen und die Ölnachfüllung mit Handschuhen durchzuführen. 
Das während der angegebenen Arbeiten austretende Öl muss in speziellen Behältern gesammelt und anschließend einem autorisierten Unternehmen zur 
Entsorgung des Abfalls übergeben werden. 

ACHTUNG!!! 

DIE SCHLÄUCHE, DIE DIE MASCHINE MIT DEM BOOSTER VERBINDEN, NICHT QUETSCHEN ODER SCHNEIDEN.

WIR EMPFEHLEN DIE VERWENDUNG VON HLP 32 CST ODER ÄHNLICHEM ÖL.

Summary of Contents for RAC 3000

Page 1: ...TS 4 8 7 8 Sauf Aluminium Seulement Aluminium MODE D EMPLOI PIECES DETACHEES BERSETZUNG VON ORIGINALANLEITUNGEN PNEUMATISCH HYDRAULISCHES WERKZEUG F R NIETE 4 8 7 8 Ausgenommen Aluminium Nur Aluminium...

Page 2: ...2 Fraz QuartoInferiore 40057 GranaroloEmilia Bologna Italy Die Unterzeichnete Fa Far S r l mit Sitz in ViaGiovanniXXIII 2 Fraz QuartoInferiore 40057 GranaroloEmilia Bologna Italy ERKL RT hiermitaufih...

Page 3: ...tr 33 CZ CI ZAMIENNE str 44 AKCESORIA str 50 ROZWI ZYWANIE PROBLEM W str 57 9 9 13 13 15 18 21 25 29 33 46 50 58 INDEX GUARANTEE page 4 SAFETY MEASURES AND REQUIREMENTS page 4 MAIN COMPONENTS page 11...

Page 4: ...sponsabilit per danni da particolari difettosi che si dovessero verificare per inadempienza di quanto sopra Direttiva CEE 85 374 L elenco dei centri di assistenza disponibile sul ns sito web http www...

Page 5: ...stausch nach ihrem ausschlie lichen Ermessen der Komponenten die f r mangelhaft befunden werden SICHERHEITSMASSNAHMEN UND ANWEISUNGEN Die Anleitung vor Gebrauch des Ger ts aufmerksam lesen DieWartungs...

Page 6: ...pulita e ordinata il disordine pu causare danni alla persona Non lasciare che persone estranee al lavoro tocchino gli utensili Assicurarsi che i tubi di alimentazione dell aria compressa siano corret...

Page 7: ...ssenem Ger t durchf hren Wenn notwendig verwenden Sie einen Sicherheits Balancer F a l l s d e r A b e w e r t e t e n Emissionsschalldruckpegel 70 dB bersteigt m ssen Sie einen Geh rschutz verwenden...

Page 8: ...czynno ci serwisowych nale y stosowa klucze z wyposa enia narz dzia lub inne akcesoria o kt rych mowa w rozdziale Konserwacja w niniejszej instrukcji Przy wymianie oleju nale y stosowa olej o parametr...

Page 9: ...9 RAC 3000 75036025 RAC 3000 rev 09 12 2021 RUS RUS Far 12 Far S r l FAR s r l FAR s r l 85 374 http www far bo it o A 70 A c c...

Page 10: ...Tappo carico olio H Tappo di servizio I Segnalatore livello olio SMALTIMENTO DELLA RIVETTATRICE Per lo smaltimento della rivettatrice attenersi alle prescrizioni imposte dalle leggi nazionali Dopo ave...

Page 11: ...e tool from the pneumatic system disassemble and split all the components according to the material steel aluminium plastic material etc Then proceed to scrap the materials in accordance with current...

Page 12: ...aceite H Tap n de servicio I Indicador nivel aceite ELIMINACI N DE LA REMACHADORA Para eliminar la remachadora seguir con atenci n cuanto establecido por las leyes nacionales Despues de haber descone...

Page 13: ...H Korek serwisowy I Wska nik poziomu oleju A B C D E F G H I UTYLIZACJA NITOWNICY W przypadku utylizacji nitownicy nale y przestrzega wymog w na o onych przez prawo krajowe Po od czeniu maszyny od ins...

Page 14: ...sons make it very handy The possibilities of leakage from the oil dynamic system are eliminated by sealed gaskets NOTES G N RALES ET CHAMP D APPLICATION L outildeposenepeut treutilis quepourrivetsde 4...

Page 15: ...f cil manejo Las posibilidades de perdida por el sistema oleodin mico son eliminadas con el uso de juntos que eliminan este problema ADNOTACJE OG LNE I ZAKRES ZASTOSOWANIA Narz dziejestprzeznaczonewy...

Page 16: ...8 5 710562 FARBOLT 4 8 C 3 717016 B 15 713213 A 9 4 711356 FARBOLT 6 4 C 4 717015 B 15 713213 A 9 4 711356 TAMP Acc 4 8 C 3 2 717004 B 13 71345507 A 8 5 710562 TAMP Acc 6 C 3 9 717005 B 13 71345507 A...

Page 17: ...45507 A 8 5 710562 C 3 95 717019 B 15 713213 A 9 4 711356 RIVETTI ALTE PRESTAZIONI HIGH PERFORMANCE RIVETS RIVETS HAUTES PERFORMANCES HOCHLEISTUNGSNIETEN REMACHES ALTAS PRESTACIONES NITY WYSOKOWYTRZYM...

Page 18: ...aison sociale et adresse du fabricant d signation de l outil de pose marquage CE En cas de recours au service apr s vente il faut toujours se r f rer aux donn es indiqu es sur la riveteuse WERKZEUGIDE...

Page 19: ...5 50 Valore medio quadratico ponderato in frequenza dell accelerazione complessiva Ac a cui sono sottoposti gli arti superiori 2 5 m s2 Pressione acustica dell emissione ponderata A 77 dBA Pressione...

Page 20: ...8 640 Kg Betriebstemperatur 5 50 Gewogener quadratischer Mittelwert in Frequenz der Gesamtbeschleunigung Ac dem die Arme ausgesetzt sind 2 5 m s2 A bewertete Emissionsschalldruckpegel 77 dBA Momentan...

Page 21: ...21 RAC 3000 75036025 RAC 3000 rev 09 12 2021 RUS 6 7 min 8 mm 14 6 21620 1 550 8 640 5 50 Ac 2 5 m s2 A 77 C 130 A 89 20 C...

Page 22: ...rivetto resta posizionato sull ugello anche tenendo la testa della rivettatrice rivolta verso il basso aumentando notevolmente la praticit della rivettatrice Non trattenere il rivetto con le dita Sesi...

Page 23: ...tte fa on on augmentera consid rablement la practicit du pistolet Ne pas retenir le rivet avec les doigts Si l on utilise le bol r cup ration clous E ne pas actionner l outil de pose quand il est plei...

Page 24: ...ci n seactivamediantelarotaci ndelapalanca B Atrav sdelsistemadeaspiraci ndelclavo elremachequedaposicionadosobre el inyector aunque la cabeza de la remachadora est hacia abajo esto aumenta notablemen...

Page 25: ...ny na dyszy utrzymuj c r wnie g owic nitownicy skierowan w d znacznie zwi kszaj c praktyczno nitownicy Nie przytrzymywa nitu palcami L 3 B W przypadku korzystania z pojemnika na gwo dzie E gdy jest on...

Page 26: ...rciale di mm 27 Una volta rimosso il cannotto porta ugello servirsi di due chiavi commerciali di mm 18 e mm 14 per smontare il cono N da cui saranno estratti i morsetti O La dotazione della rivettatri...

Page 27: ...raire les mors O L outil de pose est pourvu part le jeu de buses pour rivets FAR d un jeu d accessoires pour l utilisation de rivets FARBOLT respectivement de 4 8 et 6 4 Pour utiliser ce type de rivet...

Page 28: ...ve de tipo estandard de mm 27 Despu s de haber desmontado la manguito porta inyector con dos llaves de tipo estandard de mm 18 y mm 14 quitar el cono N y extraer los bornes O La dotaci n de la remacha...

Page 29: ...Pousuni ciutulejkiuchwytudyszynale yskorzysta zdw chkluczydost pnychwhandlu18mmi14mm abyzdemontowa sto ek N z kt rego zostan wyci gni te szcz ki O Wyposa enie nitownicy obejmuje opr cz serii dysz do...

Page 30: ...come segue posizionare il Booster su un piano superiore rispetto alla impugnatura con i tubi di alimentazione disposti come da figura togliere il tappo G servendosi di una chiave di mm 19 Rabboccare c...

Page 31: ...mm Verser l huile effectuer quelques cycles de rivetage en faisant le remplissage de l huile et en gardant la poign e plus basse que le Booster comme indiqu sur la figure R p ter l op ration jusqu att...

Page 32: ...i n proceda de la siguiente manera coloque el Booster en un plano m s alto que la empu adura con los tubos de alimentaci n colocadoscomoenfigura retireeltap n G porunallavede19mm Relleneconaceite real...

Page 33: ...e y w wczas usun powietrze znajduj ce si w obwodzie hydraulicznym i przywr ci prawid owy poziom oleju Nast pnie wykona poni sze czynno ci Umie ci Booster w g rnej cz ci wzgl dem uchwytu rury zasilaj c...

Page 34: ...3 D 43 711261 1 Levetta apertura aspirazione 44 710824 1 Pulsante 45D 710919 1 Guarnizione OR 2 004 D 46 711253 1 Pistoncino valvola 47 711356 1 Cono porta morsetti per Farbolt 48 711370 1 Raccordo us...

Page 35: ...1 4 H 27 46 716356 1 Raccordo 6525 8 1 4 47 71C00373 1 Anello di tenuta 2661 3 8 48 711998 1 Tappo 2611 3 8 49 71C00216 1 Anello di tenuta 2661 1 4 50GH 710923 1 Guarnizione OR 012 GH 51G 710912 1 Da...

Page 36: ...2 003 D 43 711261 1 Leve for inlet opening 44 710824 1 Push button 45D 710919 1 Gasket OR 2 004 D 46 711253 1 Valve piston 47 711356 1 Cone holding clmaps for Farbolt 48 711370 1 Out put connector 49...

Page 37: ...8 UNI 5721 44 712824 1 Stud bolt 2525 1 4 H 27 46 716356 1 Connector 6525 8 1 4 47 71C00373 1 O Ring 2661 3 8 48 711998 1 Cap 2611 3 8 49 71C00216 1 O Ring 2661 1 4 50GH 710923 1 Gasket OR 012 GH 51G...

Page 38: ...2 003 D 43 711261 1 Levier ouverture aspiration 44 710824 1 Poussoir 45D 710919 1 Joint OR 2 004 D 46 711253 1 Piston soupape 47 711356 1 C ne porte mors pour Farbolt 48 711370 1 Raccord sortie 49 710...

Page 39: ...721 44 712824 1 Colonnette 2525 1 4 H 27 46 716356 1 Raccord 6525 8 1 4 47 71C00373 1 Bague de tenue 2661 3 8 48 711998 1 Bouchon 2611 3 8 49 71C00216 1 Bague de tenue 2661 1 4 50GH 710923 1 Joint OR...

Page 40: ...43 711261 1 Hebel f r Einla ffnung 44 710824 1 Drucktaste 45D 710919 1 Dichtung OR 2 004 D 46 711253 1 Kleiner Ventilkolben 47 711356 1 Spannbackenhalterkegel Farbolt 48 711370 1 Austrittanschlussst...

Page 41: ...0703 8 Mutter M 8 UNI 5721 44 712824 1 Schraubbolzen 2525 1 4 H 27 46 716356 1 Anschlussst ck 6525 8 1 4 47 71C00373 1 Verdichtungsring 2661 3 8 48 711998 1 Verschluss 2611 3 8 49 71C00216 1 Verdichtu...

Page 42: ...42D 711338 1 Junto OR 2 003 D 43 711261 1 Palanca de apertura aspiraci n 44 710824 1 Pulsador Interruptor 45D 710919 1 Junto OR 2 004 D 46 711253 1 Pistoncito valvula 47 711356 1 Cono portamordazas pa...

Page 43: ...M 8 UNI 5721 44 712824 1 Esparrago 2525 1 4 H 27 46 716356 1 Empalme 6525 8 1 4 47 71C00373 1 Anillo de cierre 2661 3 8 48 711998 1 Tap n 2611 3 8 49 71C00216 1 Anillo de cierre 2661 1 4 50GH 710923...

Page 44: ...261 1 D wignia otwracia zasysu powietrza 44 710824 1 Przycisk 45D 710919 1 Uszczelka OR 2 004 D 46 711253 1 Tloczek zaworu 47 711356 1 Os ona szcz ki do nit w Farbolt 48 711370 1 Z cze wyjcia 49 71090...

Page 45: ...H 27 46 716356 1 Z cze 6525 8 1 4 47 71C00373 1 Pier cie uszczelniaj cy 2661 3 8 48 711998 1 Korek 2611 3 8 49 71C00216 1 Pier cie uszczelniaj cy 2661 1 4 50GH 710923 1 Uszczelka OR 012 GH 51G 710912...

Page 46: ...2A00163 1 40D 710918 2 OR 2 005 D 41 711254 1 42D 711338 1 OR 2 003 D 43 711261 1 44 710824 1 45D 710919 1 OR 2 004 D 46 711253 1 47 711356 1 Farbolt 48 711370 1 49 710906 1 400 020 4490 50 710839 1 5...

Page 47: ...CE M6 x 20 UNI 5923 43 71C00703 8 M 8 UNI 5721 44 712824 1 2525 1 4 H 27 46 716356 1 6525 8 1 4 47 71C00373 1 2661 3 8 48 711998 1 2611 3 8 49 71C00216 1 2661 1 4 50GH 710923 1 OR 012 GH 51G 710912 1...

Page 48: ...ICAMBIO TAV 1 2 A B C 50 49 25 28 44 46 43 41 38 36 65 10 29 30 31 32 33 38 24 18 17 12 11 48 52 27 13 21 22 14 15 13 16 1 2 4 3 D 5 6 7 39 34 47 58 60 62 63 54 51 56 57 mt 1 8 KIT A KIT A KIT B KIT C...

Page 49: ...0 KIT H KIT E KIT F KIT G 62 32 63 31 43 43 30 30 26 2 47 48 18 23 H 20 60 E H 61 E H 34 24 34 69 66 37 53 54 55 56 57 36 21 KIT G 50 G H KIT E H 19 22 H 51 G 42 29 34 39 40 41 42 1 43 34 39 30 23 H 2...

Page 50: ...ILISATION DE RIVETS S TRIFAR X TRIFAR F R DIE VERWENDUNG VON BLINDNIETEN S TRIFAR X TRIFAR PARAELUSODEREMACHESS TRIFAR XTRIFAR DONIT WS TRIFAR XTRIFAR S TRIFAR XTRIFAR TESTE PROLUNGATE EXTENDED HEADS...

Page 51: ...75036025 RAC 3000 rev 09 12 2021 51...

Page 52: ...iltro Lubrificatore Perdita d olio Guarnizioni usurate Rivolgersi al centro assistenza Tappo rabbocco olio non serrato Serrare correttamente Perdita d aria Posizionamento non corretto del tubo di alim...

Page 53: ...ubricated air Equip yourself with lubricator filter assembly Oil leak Worn gaskets Contact the service center Oil filler cap not tightened Tighten correctly Air leak Incorrect positioning of the feedi...

Page 54: ...vous avec l Ensemble Filtre Lubrificateur Fuite d huile Joints us s Contacter le service apr s vente SAV Le bouchon de remplissage d huile n est pas ferm Fermer correctement Fuite d air Mauvais positi...

Page 55: ...chmierte Luft R sten Sie sich mit der Schmiermittelfilter Baugruppe aus lverlust Verschlissene Dichtungen Wenden Sie sich an das Service Center leinf lldeckel nicht festgezogen Richtig anziehen Luftle...

Page 56: ...r Perta de aceite Juntas desgastadas P ngase en contacto con el servicio tecnico Tap n de llenado de aceite no apretado Apretar correctamente Perta de aire Posicionamiento incorrecto del tubo de alime...

Page 57: ...marownicy Wyciek oleju Zu yte uszczelki Skontaktowa si z centrum obs ugi klienta Korek wlewu oleju nie jest dokr cony Dokr ci prawid owo Utrata powietrza Nieprawid owe ustawienie rurowego przewodu zas...

Page 58: ...58 RAC 3000 75036025 RAC 3000 rev 09 12 2021 RUS...

Page 59: ......

Page 60: ...ar bo it A lista de centros de servi o est dispon vel no nosso site Web http www far bo it Organiza o I F E PL RUS GB D PT SISTEMI DI FISSAGGIO FASTENING SYSTEMS SYSTEMES DE FIXATION VERBINDUNGSSYSTEM...

Reviews: