FAR R2536WDW Instructions Manual Download Page 20

ENGLISH

ENGLISH

GB-11

GB-10

STORING FROZEN FOOD

All frozen food you purchase should be placed in the freezer as soon as possible to 

avoid them from defrosting and spoiling.

All storage recommendations printed on the packaging of frozen food by the 

manufacturer should always be followed.

When using the freezer for the first time or after defrosting, set the thermostat knob 

to the maximum position for at least 2 hours before introducing food to be stored, 

and then readjust it to the normal position.

The technical data mentioned in the ‘Technical Information’ are obtained in the case 

that the freezing drawers are removed.

MAKING ICE CUBES

1. 

Fill the ice tray with ¾ full of clean water.

2. 

Place the tray in the top freezing drawer.

3. 

Close the door.

To remove the ice cubes from the tray, put the tray under running water for a while 

and then twist the tray slightly to loosen the ice cubes.

To freeze raw meat, wrap in plastic bags or in airtight containers and place on the 

lowest shelf to avoid cross contamination.
Do not allow raw meat to come into contact with cooked foods. For safety, only store 

raw meat for two or three days. Fruit and vegetables should be thoroughly cleaned 

and placed in the crisper.
Milk and other liquids should be sealed with lids and placed in the bottle shelf in the 

door.

NOTE:

 The ambient temperature of the freshly stored food and how often the 

door is opened affect the temperature in the refrigerator. If required, change the 

thermostat temperature settings.
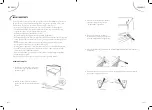
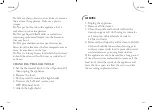
WATER DISPENSER

The refrigerator includes a water dispenser which makes it easier to fill your cup 

of water and have access to cold water almost immediately. The water tank has a 

capacity of 1.5 litre which has to be filled out with pure water. To use water dispenser 

follow the instructions below:

Filler cover

Water tank cover

Water tank

open

close

1. 

Open the refrigerator door and ensure the 

water tank is well fixed.

2. 

Open the filler cover of the water tank, 

slowly fill the water tank to prevent any 

spillage until the tank is filled. Then close 

the filler cover. See image C.

3. 

When filling for the first time, turn the 

thermostat knob to maximum number and 

wait 30 minutes for water getting cold. Take 

water by pushing the handle with a cup. See 

image D. 
When using the water dispenser, some 

water may drip and accumulate at the 

bottom of the water dispenser. Please wipe 

it with a cloth when necessary.

NOTE: Do not take away the cup until no 

water drop.

Water Dispenser

Water 

switch

Summary of Contents for R2536WDW

Page 1: ...R2536WDW R2536WDS R2536WDBK...

Page 2: ...s recommandons de lire attentivement ce manuel d instructions et de le conserver pour toute r f rence ult rieure TABLE DES MATI RES MANUEL D UTILISATION INSTRUCTIONS DE S CURIT FR 2 CARACT RISTIQUE TE...

Page 3: ...on MISE EN GARDE Ne pas utiliser d appareils lectriques l int rieur du compartiment de stockage des denr es moins qu ils ne soient du type recommand par le fabricant Cet appareil peut tre utilis par d...

Page 4: ...clairage r f rez vous au CHANGEMENT DE L AMPOULE Attention risque d incendie Mod le FAR R2536WDW R2536WDS R2536WDBK Cat gorie d appareil de r frig ration m nager cat gorie 7 Classe d efficacit nerg ti...

Page 5: ...16 C...

Page 6: ...t le cas ch ant consommez les imm diatement ou faites les cuire avant de les recongeler INDICATEUR DE TEMPERATURE Pour vous aider au bon r glage de votre appareil celui ci est quip d un indicateur de...

Page 7: ...porte du r frig rateur et assurez vous que le r servoir d eau soit bien install sa place 2 Ouvrez le couvercle remplissez lentement le r servoir d eau en vitant le d versement jusqu ce que le r servo...

Page 8: ...e plus de 45 N allongez pas l appareil car cela peut endommager son syst me de r frig ration Vous devez reposer l appareil contre quelque chose de solide par exemple une chaise juste sous le panneau s...

Page 9: ...charni re du milieu sur la gauche du r frig rateur et ins rer le pistolet de charni re dans le trou de la porte puis le fixer fermement 4 Enlever la but e de la porte du compartiment cong lateur et l...

Page 10: ...ce Les fines couches de givre r centes sont assez molles et faciles enlever avec une brosse ou un grattoir en plastique N utilisez pas de grattoirs m talliques ou coupants d ustensiles m caniques ou t...

Page 11: ...appareil doit tre r guli rement nettoy et d givr V rifiez le contenu des compartiments de temps en temps Les plats pr par s doivent tre conserv s d une mani re conforme aux instructions des tiquettes...

Page 12: ...E L AMPOULE 1 Mettez le bouton du thermostat en position arr t 0 puis d branchez l appareil 2 Sortez les aliments 3 Poussez vers le haut pour retirer le couvercle de la lampe 1 D branchez l appareil 2...

Page 13: ...ment sur la porte du r frig rateur 3 D bloquez le couvercle des deux c t s 4 D montez les pi ces nettoyez l int rieur et l ext rieur du r servoir avec une ponge ou un chiffon doux Utilisez de l eau ch...

Page 14: ...CCESSOIRES MISE AU REBUT Etiquette nerg tique Notice d utilisation en FR EN Bac gla ons Bac ufs Grattoir Le gaz frigorig ne contenu dans le circuit de cet appareil est de l isobutane R600a gaz peu pol...

Page 15: ...ropean regulation For a better use of your new device we recommend you to read carefully this user manual and keep it for record SAFETY INSTRUCTIONS GB 2 TECHNICAL INFORMATION GB 5 DESCRIPTION OF THE...

Page 16: ...cuit WARNING Do not use electrical appliances inside the food storage compartments of the appliance unless they are of the type recommended by the manufacturer This appliance can be used by children a...

Page 17: ...6WDS R2536WDBK Category of household refrigerating appliance catalogue 7 Energy class A Annual energy consumption 235kWh an Storage volume Refrigerator 197L Freezer 53L Defrost Refrigerator automatic...

Page 18: ...16 C...

Page 19: ...failure do not open the door Frozen food should not be affected if the failure lasts for less than 25 hours If the failure is longer then the food should be checked and either eaten immediately or co...

Page 20: ...and vegetables should be thoroughly cleaned and placed in the crisper Milk and other liquids should be sealed with lids and placed in the bottle shelf in the door NOTE The ambient temperature of the...

Page 21: ...be retained in order to reinstall the door The refrigerator must not be tilted further than 45 Do not lay the appliance down as this may damage the refrigeration system You should rest the appliance a...

Page 22: ...ert Remove unscrew 3 Position the middle hinge on the left of the refrigerator and insert the gun of hinge in the hole of the door then fix it firmly 4 Remove the door stop of the Freezer door and put...

Page 23: ...plastic scraper Do not use metal or sharp scrapers mechanical devices or other means to accelerate the defrosting process Remove all dislodged frost from the cabinet floor For the removal of thin fro...

Page 24: ...Leave the door open to prevent any unpleasant smells from building up while the appliance is not in use PROLONGED OFF PERIODS NOTES FOR USE Do clean and defrost your appliance regularly Do check cont...

Page 25: ...to the off position 0 then unplug the appliance 2 Remove the food 3 Push upward to remove the light shield 4 Unscrew the bulb and screw a new 10W E14 base bulb 5 Attach the light shield 1 Unplug the...

Page 26: ...ater tank from refirgerator door 3 Unlock the cover ay both sides 4 Disassemble the parts clean the interior and exterior of the tank with a clean sponge or soft cloth use warm water or 1 teaspoon of...

Page 27: ...CESSORIES DISPOSAL Energy label FR ENG manual Ice box Egg tray Ice scraper The refrigerating gas contained in the circuit of this appliance is isobutane R600a it causes a low level of pollution but is...

Page 28: ......

Reviews: