background image

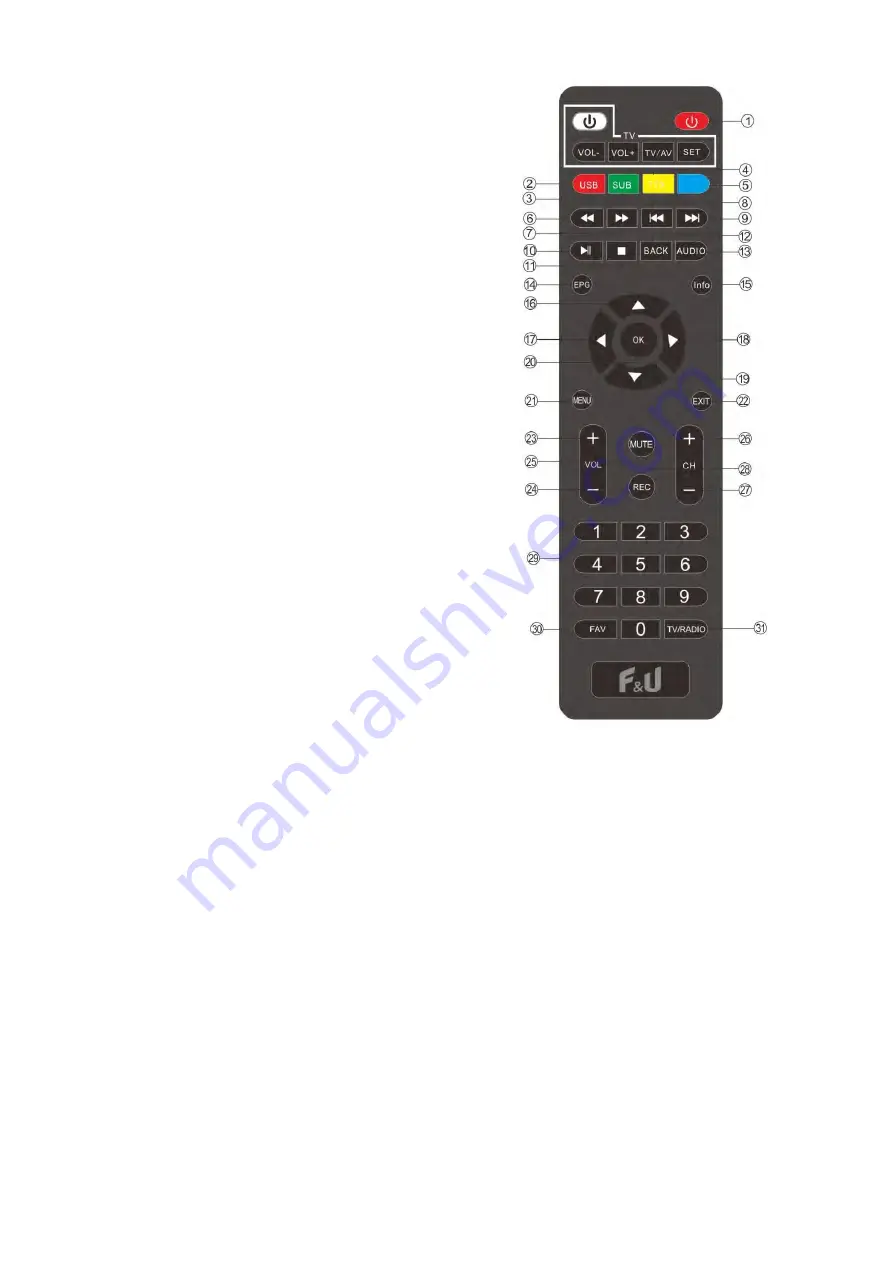
2.Learning remote control. Quick setup.


1. STANDBY: Switch to Standby Mode 
2. USB: Enter into the USB mode / RED 
3. SUB: Display the subtitles / GREEN 
4. TTX: Teletext / YELLOW 
5. BLUE 
6. REV: Backward movement 
7. FWD: Forward movement 
8. PREVIOUS 
9. NEXT 
10. PLAY/PAUSE 
11. STOP 
12. BACK: used as exit or to go to previous screen 
13. AUDIO: Choose Audio language Or Audio Mode   
14. EPG: Electronic Program Guide   
15. INFO: Show the Current Program Information 
16. Navigation key: UP 
17. Navigation key: LEFT 
18. Navigation key: RIGHT   
19. Navigation key: DOWN 
20. OK 
21. MENU: enter the system menu 
22. EXIT: to exit from the menu 
23. Volume UP 
24. Volume DOWN 
25. MUTE: to mute audio playback 
26. CH+: Movement to the next channel 
27. CH-: Movement to the previous channel 
28. REC: to start recording 
29. Number (0~9): Select A Channel or Setting   
30. FAV: Enter Favorite List 
31. TV/RADIO: Radio program 
 
·This remote control has 4 programmable buttons for controlling the TV: Power 
on/off, Vol+, Vol-, TV/AV. 
·Press and hold the SET button for 3 seconds, the remote control LED will turn red and 
start blinking. 
·When the light stops blinking and starts  lighting constantly,  place this  unit’s  learning 
remote control and the original remote control from the TV opposite to each other at a 
distance of 3~5cm. 
·Press and release the button on this remote control, which you want to program. 
·Press the  relative  button of the original remote control  that  you  want  to  be  copies. 
The LED should blink 2 times and light constantly, release the button. 
·When learning is completed, press the Exit button, the LED will turn off. 


Summary of Contents for MPF3473HU

Page 1: ...High Definition Digital Receiver MPF3473HU User Manual...

Page 2: ...age and stress 10 Only use attachments accessories specified by the manufacturer 11 Unplug this apparatus during lightning storms or when unused for long periods of time 12 Refer all servicing to qual...

Page 3: ...onic equipment at their end of life should be disposed of separately from your household waste Please dispose of this equipment at your local community waste collection recycling centre In the Europea...

Page 4: ...1 Control Elements Front Panel USB Port Rear Panel Aerial connection ANT IN HD OUT HDMI out SCART connection DC IN...

Page 5: ...next channel 27 CH Movement to the previous channel 28 REC to start recording 29 Number 0 9 Select A Channel or Setting 30 FAV Enter Favorite List 31 TV RADIO Radio program This remote control has 4 p...

Page 6: ...the batteries if the remote control is not going to be used for extended period of time Do not place the remote control under the direct sunlight or near sources of excessive heat Point the remote co...

Page 7: ...channels automatically INSTALLATION Auto Channels Scan Automatic searching and saving available TV channels Manual Channels Scan Manual searching for TV channels You can search the channel by number...

Page 8: ...OK and input the default password 0000 The channel will be marked with an icon Press the EXIT button to confirm changes The selected channel will be locked If you want to unlock a channel select it th...

Page 9: ...ttings the Channel Lists and all Settings will be deleted and restored to the initial factory ones Upgrade by USB The receiver is connected with the TV but in Standby Mode Copy the latest firmware int...

Page 10: ...htness default value is 50 Contrast default value is 50 Saturation default value is 50 Hue default value is 50 and Sharpness default value is 5 Local time setting Region Select your country GMT Usage...

Page 11: ...value is Off Favorite Press OK on a Favorite Group now you can rename the Favorite Channels List Other Antenna power Set to ON when having an active antenna without power adapter Set to OFF when havi...

Page 12: ...t This option is activated in lmage and Music Edit Press Blue button to edit the name of media Note When watching a video with subtitles from a USB drive it is possible to set the color and size of th...

Page 13: ...0 standard USB drives with low parameters may not be compatible with the device Large capacity USB connected drives may require external power supply RECORDING 1 Make sure the USB drive is connected...

Page 14: ...TROUBLESHOOTING...

Reviews: