

ASSEMBLY INSTRUCTIONS
PEDESTAL FAN
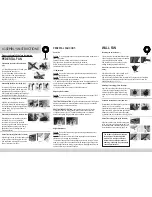
Assembling the base to the adjustable
pipe
1) While holding the base on its side, push
the pipe into the base (fig 1a).
2) Locate the 19mm bolt and washer and
attach it to the centre of the base weight.
Firmly tighten with a 19mm spanner (not
supplied) (fig 1b) (fig 1c).
Assembling the fan motor to the pipe
Locate the fixing hole on the motor locating
tube and align the hole with the hole in the
adjustable pipe. Push into place. (fig 2a)
Use the long bolt and washer, push it through
the lower hole and tighten. (fig 2b) (fig 2c)
Attaching rear safety grille to the motor
Align the rear safety grille to the motor
housing so that the fan grille securing hole
is at the bottom of the fan & aligns with the
4 screw holes. (fig 3a) Firmly tighten all 4
screws. (fig 3b)
Assemble the fan blade to the fan motor
Rotate the motor shaft until the flat area on
the shaft is in a ‘12 o’clock’ position.
Locate the lock screw in the fan blade
coupling. Align the screw & motor shaft then
push the fan blade onto the shaft. Firmly
tighten the screws by rotating them in a
clockwise direction.
Attach front safety grille to the fan motor
Align the top lock clip on the front safety grille
to the top of the rear safety grille. Lock the
side and bottom clips into place. Insert the
fixing screws and nuts (fig 5c).
Please read carefully before installation
PEDESTAL FAN CONT.
Operation
Caution - Prior to plugging in the unit for the first time ensure the switch is in
the off (0) position.
Located at the rear of the motor unit is the 3 speed switch.
Plug the unit into the wall socket and switch the socket on.
Rotate the speed dial to the desired speed. To turn the unit off rotate the
switch back to the (0) position.
Tilt Adjustment
Caution - Ensure the front and rear grille are securely assembled prior to
making any adjustments.
Caution - Ensure the unit is turned off and unplugged and the blades are
stationary prior to making any adjustments.
1) To adjust the fan tilt - hold the motor then loosen the bolt under the motor
and tilt the fan to the desired position. Re tighten the bolt FIRMLY once the
tilt is at the desired amount.
2) Plug the unit back in and turn on at the desired speed.
Adjusting the Oscillation
Caution - Prior to making any adjustments ensure the unit is turned off and
unplugged. Ensure the blades are completely stationary.
TO ACTIVATE OSCILLATION - Align the oscillation bar and the locking knob
with the outer screw hole in the oscillation cam block (fig 6a). Then tighten
the locking knob in a clockwise position.
DEACTIVATING OSCILLATION - Unscrew the locking knob. Align the
oscillation bar and the locking knob with the centre screw hole in the
oscillation cam block (fig 6b). Tighten the locking knob in a clockwise
direction and tighten the grub screw in the oscillation cam block.
Height Adjustment
Caution - Ensure the front and rear grille are securely assembled prior to
making any adjustments.
Caution - Ensure the unit is turned off and unplugged and the blades are
stationary prior to making any adjustments.
To adjust the fan height loosen the locking ring located on the pipe. This will
allow you to move the head up and down to the desired height. Once at the
desired height secure the locking ring ensuring it is firmly tightened. Plug the
unit in and turn it on at the desired speed.
WALL FAN
Mounting the unit to the wall
1) Determine the required installation location
and ensure that your wall structure is capable
of handling the load of the wall fan.
2) Mark three screw holes with a pencil by
holding the hanging bracket to the wall.
Note: Ensure the 2 holes are horizontal prior to
drilling.
3) Drill the holes at the 3 pencil marks to suit
the anchor being used (not supplied)
4) Mount the hanging bracket onto the wall with 3 fixing anchors (not supplied).
5) Hang the motor assembly onto the fan fixing bar then fix this bar onto the
hanging bracket (fig 1a, 1b, 1c).
Attaching rear safety grille to the motor
Align the rear safety grille to the motor housing
so that the fan grille securing hole is at the
bottom of the fan & aligns with the 4 screw
holes. (fig 2a) Firmly tighten all 4 screws (fig
2b).
Assemble the fan blade to the fan motor
Rotate the motor shaft until the flat area on the
shaft is in a ‘12 o’clock’ position.
Locate the lock screw in the fan blade coupling.
Align the screw & motor shaft then push the fan
blade onto the shaft. Firmly tighten the screws
by rotating them in a clockwise direction (fig 3a, 3b).
Attach front safety grille to the fan motor
Align the top lock clip on the front safety grille
to the top of the rear safety grille (fig 4a). Lock
the side and bottom clips into place (fig 4b, 4c).
Insert the fixing screws and nuts (fig 4d, 4e).
The screws to fix the wall bracket on
the wall are not included with this
product. This is because different
walls will require different means of
attaching / anchoring. If unsure please
consult a professional


