background image

89

This CMS supports Mac OS X 10.6.8 or later.
For the first installation, you have to log in your Mac with an administrator account. If you 
log in with other account, it would be not installed t 

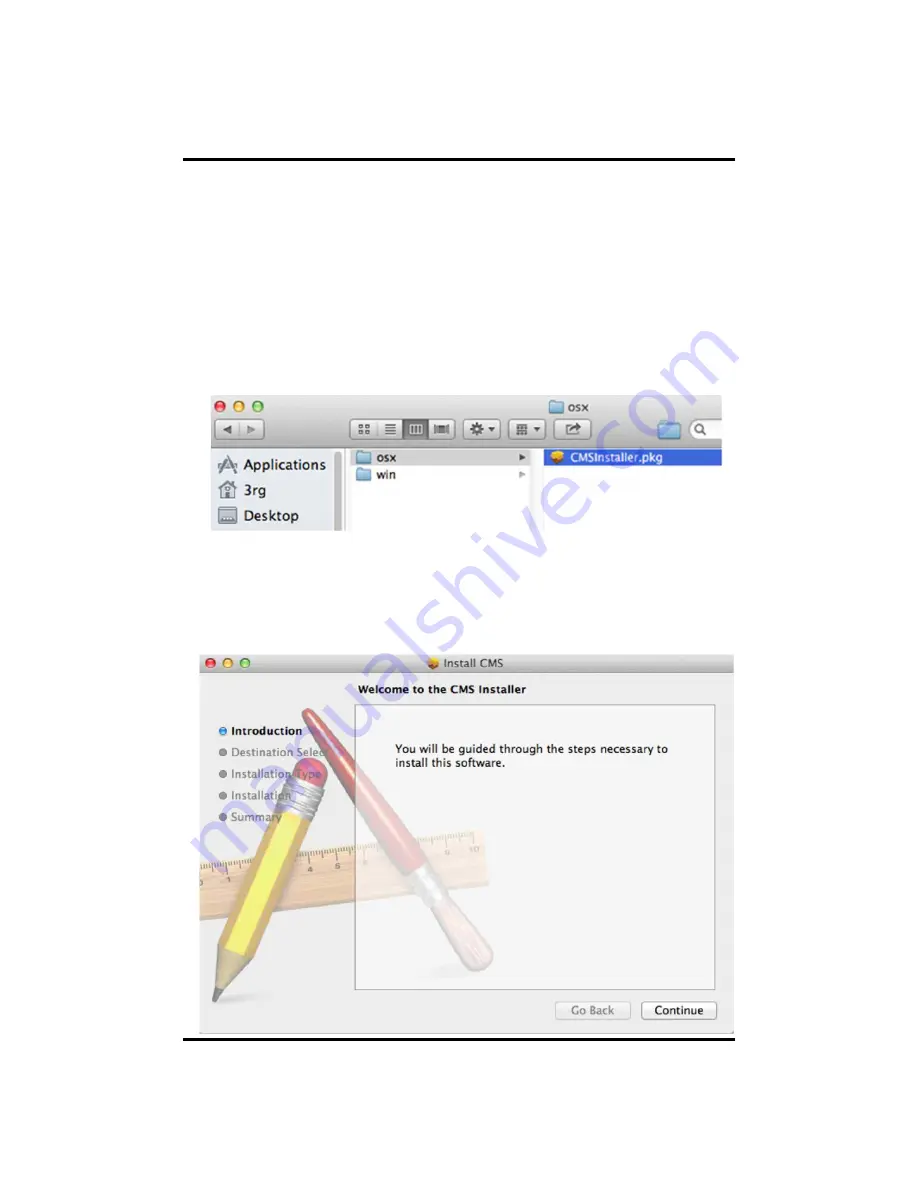
A-2. Mac CMS Installation

Insert the enclosed CD and double click CMSInstaller.pkg. CMS installer program is 

operated. 

Click Continue for installation. 

Appendix. A

Summary of Contents for EYE-ON 04/08

Page 1: ...1 Digital Video Recorder User s Manual EYE ON 04 08 16 16R...

Page 2: ...nding Users should read this user s manual carefully for proper use 3 Contents in this manual may be changed according to the specification change and feature improvement without any notification 4 Th...

Page 3: ...2 Product Installation 22 2 2 1 Power Connection 22 2 2 2 Connecting External Device 22 CH 3 How to Use 3 1 General Usage Information 26 3 2 Live Mode 27 3 2 1 Live mode control 27 3 2 2 Live mode fea...

Page 4: ...4 CONTENTS Trouble Shooting 80 Warranty 81 Appendix A CMS Client Management Software 82 Appendix B Catcheye for Android mobile 120 Appendix C Catcheye for iPhone 126 Contents...

Page 5: ...VR This converts the analog video and audio signal to the digital signal and saves on HDD Adapter This 12V adapter supplies power to the product Power Cable This connect the adapter and the power sour...

Page 6: ...verts the analog video and audio signal to the digital signal and saves on HDD Adapter This 12V adapter supplies power to the product Power Cable This connect the adapter and the power source Program...

Page 7: ...erating System Embedded Linux OS Display Speed Real Time Resolution Pixel 1280X1024 1280X720 1920X1080 Split screen 1 4 1 4 6 8 9 1 4 6 8 9 13 16 Recording CODEC H 264 JPEG for 3G Dual CODEC Resolutio...

Page 8: ...system IE MAC Web Browser Internet Explorer Safari Chrome Firefox Smart phone App Android iPhone for live and search Backup Interface USB 2 0 X 2 USB 2 0 X 3 Backup device External HDD CD DVD RW Netw...

Page 9: ...solution Pixel 1280X1024 1280X720 1920X1080 Split screen 1 4 1 4 6 8 9 1 4 6 8 9 13 16 Recording CODEC H 264 JPEG for 3G Dual CODEC Resolution Pixel 720p 1080p 1080i 960H 720H Mixed Picture quality 4...

Page 10: ...rotocol TCP IP HTTP DHCP Application Windows 2000 XP 7 8 PC Client system IE MAC Web Browser Internet Explorer Safari Chrome Firefox Smart phone App Android iPhone for live and search Backup Interface...

Page 11: ...usly 5 Selectable recording setup For recording methods users can select the frame rate resolution and video quality individually in order to be appropriate for user s environment 6 Remote monitoring...

Page 12: ...You can monitor and playback the video and control the PTZ camera by internet explorer 15 Built in S M A R T You can automatically check the health of the hard disk drives 16 Language pack Basically...

Page 13: ...n Lit on connecting the network 3 Function keys 1 MENU It will move to the setup screen from the live mode 2 SEARCH It will change to the playback mode from the live mode 3 BACKUP It will move to the...

Page 14: ...apted both live and play mode 5 SWITCHING It will change to switching mode except 20 splitting 6 ZOOM It will go to the digital zoom directly 7 PTZ It will change to the pan tilt and zoom control mode...

Page 15: ...rs 10 Audio In RCA audio in terminals You can record four channels at the same time 11 Audio Out RCA audio out terminal 12 HDMI HDMI output for HD monitor 13 VGA Extender option Connect EXTEND FTP cab...

Page 16: ...This terminal blocks connect external electric devices to the product Warning Lamp and others 9 Sensor In This terminals can be connected to external sensors 10 Audio In RCA audio in terminals You ca...

Page 17: ...Out Real HD 1920X1080 output for high resolution monitor 11 VGA port video output for VGA display 12 Sensor Alarm RS485 For external sensor and external electric devices to these terminal block There...

Page 18: ...product wipe surface with dry towel Using chemical agent or cleaner may change the color and unpeel paint Do not put several plugs at same time May cause electric shock If there is smoke or strange s...

Page 19: ...ric shock In case of using extension cord do not use several devices at same time May cause fire with abnormal heating of extension When there are dirt on power plug pin or power outlet clean it nicel...

Page 20: ...he modifications are expressly approved in the instruction manual The user could lose the authority to operate this equipment if an unauthorized change or modification is made This device complies wit...

Page 21: ...the user s manual In case power higher than the rated voltage is supplied it may cause damages on product 2 2 2 Connecting External Device CH 2 Installation Method and Cautions Connect it when power o...

Page 22: ...s You can see the cameras connected with DVR on Device menu The figure above shows that the camera is 1080P 30fps NTSC 2 Change camera type that you want to use on your camera You can choose the type...

Page 23: ...he DVR can use this as a trigger to start alarm sensor based recording Sensor Out Connecting external electrical devices The relay output terminal does not provide power and functions only on an ON OF...

Page 24: ...as shown at following figure RS485 CABLE VIDEO CABLE SPEED DOME 5 Installing Hard disk drive In case of installing the hard disk drive open the upper case and install the hard disk drive on the hard...

Page 25: ...ode Search Mode In Search Mode the user will be able to review all recorded footage in the case that an event must be reviewed using a calendar or event based search Backup Mode In Backup Mode the use...

Page 26: ...Use 3 2 1 LIVE Mode Control Recording indicator Event recording indicator Motion detection indicator Sensor activation indicator POS indicator 1 Live View Status You may use the Live Menu Bar located...

Page 27: ...CH 3 How to Use 3 Live Popup Menu By Right Clicking anywhere on Live Screen you may view the Live Popup Menu By using the Live Popup Menu you can quickly jump to the necessary configuration and settin...

Page 28: ...is very convenient function to catch the abrupt accident During live viewing you can go directly to the playback screen If you choose the Instant Replay the DVR goes to the PLAY with the present time...

Page 29: ...n the live screen and the second one is that enter directly from Search upon playback If you choose the backup from the live menu below backup screen appears CH 3 How to Use You can set the backup dev...

Page 30: ...Connection Using PTZ camera and CH 3 4 3 Device CH 3 How to Use 7 Snapshot You can save the live snapshot by this menu All channel will be saved individually to the USB memory by JPG format You shoul...

Page 31: ...lear a preset set Exit Exit Exit preset mode v How to use Preset 1 Make sure that PTZ camera is connected to DVR 2 Click the right mouse button and choose PTZ from a live pop up menu 3 After you move...

Page 32: ...r Choose a preset from upper left to right If you use not specified presets it automatically skip the tour CH 3 How to Use Camera You can choose the PTZ camera with mouse or 0 buttons on the remote co...

Page 33: ...annel It can be 8x zoom and also control the position by mouse dragging CH 1 x2 CH 3 How to Use Camera You can choose the camera for zoom with mouse or 0 buttons on the remote controller Zoom You can...

Page 34: ...Video Loss Check Sensor ON OFF Motion Detection Check Recording Status and Schedule Feature Usage As you press INFO button once more GUI disappear OSD disappear GUI appear OSD appear will happen seque...

Page 35: ...35 15 Alarm Control You can control all alarms connected and the DVR system buzzer CH 3 How to Use...

Page 36: ...OS transaction data Thumbnail Play the specific channel by user defined interval Panorama Play the specific channel continuously 3 3 1 Search Selection Type 1 Time Based search selection Select the Da...

Page 37: ...hosen date Preview pane above the Event Log will show preview of currently selected video 3 POS Search Select search date from calendar POS transaction data will be displayed according to the chosen d...

Page 38: ...e from bar or typing The selected channel will be played individually by interval time difference 5 Panorama Search Select search date from calendar Choose the channel and time from bar or typing The...

Page 39: ...rnal USB device Playback recorded data from external USB device Move to Live video mode Load playback data to full screen mode You may click on Refresh Option Backup Import Exit Full Screen for additi...

Page 40: ...Sequence 3 FB Fast Backward FB 2 4 8 16 32 64 times faster 4 Playback Backward normal speed 5 SB Slow Bacward SBx1 2 SBx1 4 6 STILL Pause Frame advance 7 SF Slow Forward SFx1 2 SFx1 4 8 Play Forward n...

Page 41: ...gure OSD Main Display Color Control setting 1 OSD 3 4 SETUP Mode Date Format YYYY MM DD MM DD YYYY DD MM YYYY Time Format 24HR 12H AM PM Language Select system language Alpha Blending Adjust transpare...

Page 42: ...HDMI Sequence dwell time 1 sec 60 sec Brightness Adjust brightness Contrast Adjust contrast Saturation Adjust saturation Hue Adjust hue You can use dual monitors that show same image by setting VGA HD...

Page 43: ...HDMI None Mode Split Screen 1 4 9 16 Screen Sequence dwell time 1 60 sec Switching You can program the sequence time If you want to just see ch1 you set all box to 1 You can make any useful sequence b...

Page 44: ...4 9 16 Screen Sequence dwell time 1 60 sec Switching You can program the sequence time If you want to just see ch1 you set all box to 1 You can make any useful sequence by this map CH 3 How to Use 4...

Page 45: ...ightness Contrast Adjust contrast Saturation Adjust saturation Hue Adjust hue Default Return to factory default settings Apply All Apply changes to all channels CH 3 How to Use 5 Analog Color Adjust c...

Page 46: ...10 7 6 5 4 3 2 1 fps Quality Super High Med Low v Event Resolution 1920x1080 1280x720 960x540 FPS 30 15 10 7 6 5 4 3 2 1 fps Quality Super High Med Low v Duration 5 60 sec v PreAlarm 0 4 sec v Total...

Page 47: ...event recording time v Pre alarm is to set pre event recording time v Total shows total fps of all channels If total fps is more than supported it turns red If it turns red you need to set a lower res...

Page 48: ...reduce recording of unnecessary time period In Scheduler window days and channels are displayed and recording information for each channel is displayed at bottom of window v How to set the weekly sch...

Page 49: ...49 CH 3 How to Use 4 Holiday With this menu you can add the holidays Use the Add button for adding the holiday and use the Delete or Delete All buttons for removing the existing holidays...

Page 50: ...set Motion Detection and Sensor Setting to On in Event menu if Event Input in Rec Menu is set to None it only detects and does not record v Summary regarding as Event Recording Event In OSD Sensor Mo...

Page 51: ...input is detected automatically Detected Detected camera video type Name You can set the camera name Disable Disable current camera It is useful when the signal is bad Convert Hide current camera fro...

Page 52: ...hide some part of the picture for privacy you can choose the area by dragging the mouse The selected area will be changed to black screen All Off All off the private zone Apply All Apply the setting...

Page 53: ...YE ON 04 08 Audio 1 4 Assign audio input to a video channel EYE ON 08R Audio 1 8 EYE ON 16R 16R Audio 1 16 All Series Audio Out Select which channel will be heard during Live View CH 3 How to Use 3 Au...

Page 54: ...n detection of the all area All Off This will deactivate the motion detection of the all area Apply All Apply the setting to whole channel CH 3 How to Use 4 Motion Detection Change settings for Motion...

Page 55: ...tion such as Relay Popup and Buzzer Alarm Out Each type can have separate Duration value and also linked to selected camera 5 1 Sensor Type Selectable option is N O Normally Open N C Normally Close EY...

Page 56: ...ay buzzer sound pop up spot pop up and HD spot pop up Also you can choose more than one action Choose a sensor connected to a channel If a sensor does not work please check again the sensor type Alarm...

Page 57: ...r sound pop up spot pop up and HD spot pop up Also you can choose more than one action Furthermore you can set the preset position number by motion detection If you push the setup you can see the pres...

Page 58: ...58 5 4 POS You can choose the action after POS transaction or video loss between relay buzzer sound pop up spot pop up and HD spot pop up Also you can choose more than one action CH 3 How to Use...

Page 59: ...59 5 5 Video Loss You can choose the action after motion detection between relay buzzer sound pop up spot pop up and HD spot pop up Also you can choose more than one action CH 3 How to Use...

Page 60: ...60 5 6 Duration You can choose the duration time from 5 to 60 seconds after motion detection between relay buzzer sound pop up spot pop up HD spot pop up and preset CH 3 How to Use...

Page 61: ...manufacturer Address Choose address to be suitable for PAN TILT Camera manufacturer Baudrate Choose baudrate to be suitable for PAN TILT Camera manufacturer You have to set Comport value according to...

Page 62: ...h can be supported Please contact the tech support to want to know the other cameras Driver Baudrate PELCO D type 2400 9600 PELCO P type 2400 PANASONIC 2400 19200 ORIENTAL 2400 Fixed LPT A100L 9600 Fi...

Page 63: ...trol ID v Remote controller ID setup Use the ID setup and number key to set the ID of remote control on the remote controller You may check the ID by pressing the remote control key The ID should be t...

Page 64: ...Type a start word of transaction End Word Type a end word of transaction Text will be embedded into the picture between start word and end word Ignore Word Type a word which you want ignore during tex...

Page 65: ...first you should know the setting values of the POS You can get the information from the POS setting screen POS DVR USB USB 3 If your setting is correct you can see the below DVR screen on transactio...

Page 66: ...t whether you want to use DHCP or not On Off If you connect LAN after setting it to On IP is allocated automatically If you set it to Off you have to input IP DHCP is a protocol that allows managers t...

Page 67: ...from 8000 to 9999 If you activate uPNP Universal plug and play box DVR connects the router automatically with these port number You don t have to setup the router Watch Type the port 8000 9999 Search...

Page 68: ...he IP of DVR to URL This product supports the automatic DDNS service using manufacture s internal server Also you can choose Dyndns v If you choose dvrinside com DDNS the domain name is http xxxxxx dv...

Page 69: ...sender SMTP Server Type the SMTP server of the email account Port Type the port of the email account Authentication Set whether you want to use authentication or not On Off SSL Set whether you want to...

Page 70: ...Loss Detect a video loss POS Send inserted text of POS to the email S M A R T Send checked HDD S M A R T result to the email System log Send system log to the email Add Image Send a snapshot of events...

Page 71: ...0x1080 1280x720 960x540 FPS You can adjust the frame rate 1 30 fps Quality Set picture quality Super High Med Low Bandwidth It shows the video transmission of the high resolution Low Resolution It is...

Page 72: ...ction MAC Address This displays MAC address of DVR Connected IP This displays all the connected IP Watch User This displays how many connection for live viewing Search User This displays how many conn...

Page 73: ...ng time automatically Date Time This sets product time Input time by pressing number buttons after moving cursor with direction buttons Be careful to move to backward The overlapped data will be delet...

Page 74: ...Z network and camera control ID Type an ID Password Type a password Setup Authorizes the setting of the system Search Authorizing the search of the system Backup Authorizing backup of the system PTZ A...

Page 75: ...drive as a backup drive by mirroring The mirrored disk size will be the same or greater than master HDD Auto Deletion You can select the holding period of the data If you choose OFF the DVR keep the...

Page 76: ...M A R T S M A R T On Set whether you want to use S M A R T or not On Off Check Day Determine the date to perform the S M A R T Boot Message The number of message of showing the errors Temperature Che...

Page 77: ...ll System administration log from Setup System System Log Also you can export the system log and easily send it to technical support for trouble shooting Refresh Refresh the system log Export Export t...

Page 78: ...e and additionally Export Import and Default DVR Configuration Firmware version Show the firmware version Upgrade Upgrade the firmware Export Export system settings Import Import system settings Defau...

Page 79: ...t NetDownLoader Please execute this Net Downloader Program to upgrade the firmware of the DVR CH 3 How to Use After typing the IP and password of the DVR click the Connect button You can check the mod...

Page 80: ...be deleted After upgrading DVR will reboot automatically Before rebooting do not operate manually CH 3 How to Use When you connect the DVR click the open button on the NetDownloader Program and select...

Page 81: ...to USB memory root directory 2 Put this memory to USB slot 3 Choose Upgrade button in MENU SYSTEM Configuration 4 You can see the below screen will appear 5 Double click the desired file with mouse a...

Page 82: ...een DVR and camera normal Isn t another user using same IP Isn t it too bright or too dark Isn t camera installed too far away Is it set to True Color Are PC specifications and VGA Card specifications...

Page 83: ...om external condition other than the product B If malfunction is cased because user tried to reassemble the product C If malfunction is caused by natural disasters such as fire water disaster thunder...

Page 84: ...h LAN This program is supporting for Windows XP 32bit 7 32 64bit and 8 32 64bit Client PC s CPU and VGA affect absolutely in work of CMS You have to use verified VGA because it affects other parts Pro...

Page 85: ...e in case of Favorite CPU share will be more occupied Available VGA Video Cards that support OpenGL 2 0 Support for DirectX 9 0 or higher Support for 1280X720 1920X1080 If you use the lower chipset S3...

Page 86: ...to CD ROM Drive and operate installer file CMS Installer 32 64 msi to operate the installer program Click the Next for installation If you don t choose a directory to install program it will be locate...

Page 87: ...87 Click the Next for installation When CMS installation program is processing you can see the message that CMS is being installed on the screen Appendix A...

Page 88: ...88 Click the Close after done with all installation tasks CMS installation is completed Appendix A...

Page 89: ...u have to log in your Mac with an administrator account If you log in with other account it would be not installed t A 2 Mac CMS Installation Insert the enclosed CD and double click CMSInstaller pkg C...

Page 90: ...90 Type your password to install CMS program Appendix A Configuring the installation TVLogic...

Page 91: ...91 After the installation click the close button Appendix A...

Page 92: ...is a client program using web browser It supports IE8 or higher A 3 CMS Web installation CMS for windows Open internet browser on PC Type the internet address to connect the DVR you want to connect A...

Page 93: ...93 When you try to connect it at first Plug in message will be pop up Click the Ok Click run or save to install the set up file Appendix A...

Page 94: ...94 After done with Plug in installation close the internet browser and open it again Appendix A...

Page 95: ...g web browser It supports latest versions of safari and Firefox but it doesn t support chrome A 4 CMS Web installation CMS for Mac Open internet browser on PC Type the internet address to connect the...

Page 96: ...96 When you try to connect it at first Plug in message will be pop up Click the Ok Click save to install the set up file Appendix A...

Page 97: ...97 Move to the path the file is downloaded from Finder Double click the file Click Continue for installation Appendix A...

Page 98: ...98 Type your password to install CMS plug in and click Install Software Configuring the installation Appendix A TVLogic...

Page 99: ...99 Click Restart to finish installing the software Appendix A...

Page 100: ...to run the CMS double click the icon on the desktop Type ID and password to log in A 5 How to use CMS v There is no limit the number of concurrent connections on CMS in theory However if there are too...

Page 101: ...101 The initial screen of CMS Live view The initial screen of CMS Search view Appendix A...

Page 102: ...102 CMS Composition Widget Tab Toolbar View Screen Status bar Appendix A...

Page 103: ...dd DVR devices Delete DVR devices Connect a DVR List The Device window will pop up when you click the DVR add button You can delete DVR devices added Current connected DVR Show a DVR List Disconnected...

Page 104: ...ected Calendar Widget Show the recorded data of date Calendar shows the recorded data of date on a DVR Device If there is existed data on the date it will turn sky blue If there is no data on the date...

Page 105: ...et Memorize a position of a number that you want to use from 1 to 256 with the Set button Go Move the camera to the position of the number that you want to use with the Go button Clear Clear the posit...

Page 106: ...icon A Search View is created when you click the icon All the devices registered are showed up on Device Tree Widget You can also choose the devices that is currently connected The screen will switch...

Page 107: ...icon on the time area Time Line Bar a vertical orange bar is the position where is playing now and moving depend on status of the recorded data If you move the position of Time Line Bar with the mous...

Page 108: ...ion of the device will be loaded as shown in the figure You can choose the channel and device to be stored on the PC via combination box If you change the time and date to be stored automatically the...

Page 109: ...the playback with Time navigation Widget that can play pause play speed and so on Set up play speed 16 16 Play Pause the recorded data Play individual frames during a pause Set up play speed Play Paus...

Page 110: ...figuration Add Delete favorite view state of the current device Add a favorite with button and delete a favorite with button form combination box The View is changed to the state of view that you chos...

Page 111: ...han video channels Rotate pages the current split screen to click the number of page but only the number of current split screen has less than video channels Sound Set sound of the selected channel Ea...

Page 112: ...112 A 5 4 Configuration Click the icon and Configuration window will be pop up 1 Localization Language settings will apply after CMS program restart if you change to other language Appendix A...

Page 113: ...connected devices and is able to add and delete Add devices with Add button as Device Tree Widget If you change setting on Device Connect Device Tree Widget is also immediately updated Connect the se...

Page 114: ...evice OSD Device OSD Select options and colors used for Event Status Date Time Frame Rate Device Camera Name and Resolution If you change setting on Device OSD it is immediately updated on screen Appe...

Page 115: ...115 4 Rotation Touring Rotation Touring Set the rotate time of pages It skips empty pages if you check Skips empty pages Appendix A...

Page 116: ...s use the same setting to have Device Favorite View and Client Configuration when other users import the exported setting Export Export a set file to path Import Import a exported file Log in the impo...

Page 117: ...117 6 Account Account Add Delete a user account You can modify added account when you double click it Auto Login Connect a account that connected account at the last Appendix A...

Page 118: ...118 7 Snapshot Directory Snapshot Directory Set a path to be saved a Screen Capture Image format Set a image format BMP or PNG Appendix A...

Page 119: ...119 8 Backup Directory Backup Directory Set a path to be saved a backup file Backup format Set a backup format Avi or Exe If you choose Auto it will be Exe Appendix A...

Page 120: ...by number of split screen if you set a change streaming to 4 split screen as default you will see a video with high resolution supporting devices up to 4 spit screen If you set a split screen more th...

Page 121: ...121 A 5 5 Status Bar Status Bar Show a status of CMS current connected account kind of view Language date and time from the left Appendix A...

Page 122: ...ON Live View 1 4 16 division Channel switching Server management PTZ control Digital zooming Snapshot Search The functions operated by Touch Single touch switch channel Pan Tilt Multi touch Digital Z...

Page 123: ...rver Name Name that you want to associate with the DVR server IP address IP address or a DDNS name Server Port Port number watch port in DVR setup User Name Username default is admin Password User pas...

Page 124: ...ify the sever setting 3 Live Viewing Tap the DVR server information The app will show Please wait as below Wait Until it receives DVR channel data it will take a few seconds depending on the network e...

Page 125: ...ing If you tap buttons sliding view will appear in live view so that you can change the channel or division that you want Max channel depends on server s max channel and division type is 1 4 and 16 di...

Page 126: ...ind in the phone s Gallery menu 5 Image Saving 6 PTZ Control Mode If the PTZ camera is set on the DVR PTZ button will appear automatically and allow you to control PTZ camera Every PTZ function is con...

Page 127: ...finger touch and dragging like a smart phone zooming 8 Search If you tap the button you can search the recorded file Select the wanted date Drag the blue time bar as you wanted time Also you can see...

Page 128: ...EYE ON Live View 1 4 16 division Channel switching Server management PTZ control Digital zooming Snapshot Search The functions operated by Touch Single touch switch channel Pan Tilt Multi touch Digit...

Page 129: ...Name that you want to associate with the DVR server IP address IP address or a DDNS name Port Port number watch port in DVR setup Username Username default is admin Password User password Server Type...

Page 130: ...Live Viewing Go ahead and tap the DVR server item in EYE ON screen when you register DVR server The app will show loading circle icon as below Until it received DVR channel data it takes a few seconds...

Page 131: ...el 4 Multi Channel Viewing If you tap button you can choose 4 8 and 16ch viewing in live view and you can change channel and division mode Max channel depends on server s max channel and division type...

Page 132: ...TZ Control Mode If the PTZ camera is set on the DVR PTZ button will appear automatically and allow you to control PTZ camera Every PTZ function is controlled by touch You can also control zoom in zoom...

Page 133: ...rch If you tap the button you can search the recorded file Select the wanted date from the calendar Drag the blue time bar as you wanted time Also you can see the multi channel playback by choosing th...

Reviews: