


6
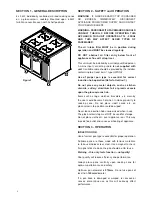
SECTION 3 - COOKING HINTS
1. Before use, ensure hob surface is clean, dry and free
of grease. Remove any burnt on food debris.
2. Familiarise yourself with cooking area and control
settings.
3. Each cooking zone has a power capacity of 5kW.
4. Each zone is governed by individual energy regulator.
5. Control setting is from 1 to 10. (1 - lowest setting,
10 - highest).
6. Boiling, steaming, poaching, stewing, pot roasting,
deep and shallow frying can be achieved on the hob.
7. Ferritic cooking vessels must be used.
8. To boil liquid, follow this procedure:
Fill and position pan centrally within cooking zone.
Turn appropriate switch dial to 10.
When boiling occurs, reduce setting and continue to
cook by simmering.
9. The lower setting is dependent on amount and density
of liquid and also starch content.
10. Skill is required to control simmering and the ability
to select a corresponding temperature setting will
improve with practice.
11. Any spillage should be cleaned from hob surface as
soon as practically possible.
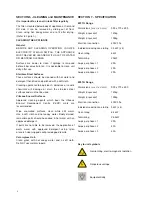
Failure to clean filter regularly may cause problems
that will not be covered by warranty
.
The air intake filter MUST ALWAYS be in place during
operation.
Wipe glass-ceramic hob clean using a damp cloth and
warm, soapy water. For heavy stains, use a scraper while
cooking zone is still warm. Wipe down with a damp cloth
when zone is cool.
Chef's Tips
Always pre-heat oven to desired temperature.
Use appropriate trays and NEVER overload oven.
Place food centrally upon the shelves.
Avoid opening oven doors during cooking process.
If removing food from oven, ensure doors are fully open.
Cooking times are dependant upon the following:
Pre-heat temperature
Food temperature
(e.g. frozen, chilled or ambient)
Shelf load / Oven load / Size and weight of food
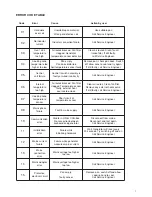
SECTION 4 - INDUCTION ERROR CODES
DO NOT remove or attempt to repair/replace ANY
component or part of this unit other than the air filter.
If an error occurs, the control panel LEDs will flash to
indicate an error code.
One LONG flash will be followed by a series of shorter
flashes. The number of
“short”
flashes corresponds to a
value in the
“code”
column of the following table.
ie. 5 short flashes corresponds to Error Code:
05 - Control Unit Failure
SECTION 5 - TROUBLESHOOTING
If a fault occurs during use, an error code will be
displayed in a series of flashes.
These correspond to the numbers in code column of the
table on Page 7.
For example, 6 short flashes followed by an extended
flash indicates error code 06
(Generator internal
temperature too high).
The codes are provided to diagnose possible faults and
the action required to remedy any such condition.
Note: Most faults can be rectified by simply
switching the unit off for 10 seconds. After this time,
turn power back on at mains supply.
If fault continues to occur after this action then
please refer to the table. It will provide the solution
to rectify the condition.
SUPPLY PROTECTION DEVICE
The appliance is fitted with a miniature circuit breaker
(MCB)
as additional protection against over current.
If unit fails to operate or show any operational indicators,
Follow details in Error Code Table before calling a
service engineer. The symptoms may indicate a failed
induction generator.
Summary of Contents for E3913i
Page 9: ...9...


