Faicom A Series Use And Maintenance Manual Download Page 8

I

4 -  INSTALLAZIONE

.

WICHTIG: Der Schlauchaufroller muss an einer Wand mindestens 2.5 m ab Fussboden

montiert werden. Nur dadurch ist die Sicherheit gewährleistet.

Unter besonderen Umständen, ist eine Montage am Fussboden oder als Zubehör über einer anderen

Maschine möglich, jedoch nur fix montiert. Zwischen den 2 vorgeschlagenen Möghlichkeiten (s. Abb.

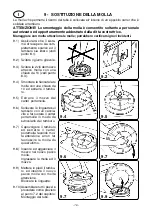
A - B) die beste Position für den Ausgang des Schlauches wählen.

Der komplett ausgestattete Schlauchaufroller darf nur an widerstandsfähigen Orten mit 4 Dübeln 10

mm montiert werden. Zur Montage mit dem drehbaren Bügel werden 2 Dübel 10 mm verwendet.

ACHTUNG: Der Hersteller lehnt jede Haftung für Schäden ab, welche aus unsachgemässer

Installation des Schlauchaufrollers entstehen.

D

4  -  INSTALLATION

IMPORTANT: L'enrouleur doit être fixé à paroi à une hauteur minime du carrelage de

2,50 m afin d'éviter d'accidents lors des travaux.

En cas particuliers il est possible de le fixer à carrelage ou comme accessoire sur d'autres machines

seulement en plaçant une protection fixe.

Choisir la position la plus adaptée pour la sortie du tuyau entre les deux proposées (voir ill. A - B).

Monter l'enrouleur déjà équipé du tuyau sur parois rigides et consistantes, par l'intermédiaire de 4 trous

diamètre 10 mm. Le montage avec le support pivotant (disponible en option) doit être effectué par

l'intermédiaire de 2 trous diamètre 10 mm.

ATTENTION! Le constructeur décline toute responsabilité pour d'eventuels accidents

corporels ou pour objets endommagés à cause d'un montage incorrect de l'enrouleur.

F

4 -  INSTALLATION

IMPORTANT: The hose reel has to be wall mounted at a minimum height of the floor of

2.50 m in order to prevent accidents during work operations.

In particular cases it is possible to mount it on the floor or on other machines as accessory, only if complete

with a fixed support. Choose the most suitable position for the outlet of the hose between the 2

alternatives suggested (see pictures A - B). Mount the hose reel already complete with hose on stiff and

consistent walls, using 4 dowels of 10 mm diameter. The assembly with the revolving stand (optional) shall

be carried out using two dowels of 10 mm diameter.

WARNING! The manufacturer declines any responsibility for injuries to people or damages

to things caused by a wrong assembly of the hose reel.

  GB

4  -  INSTALLATION

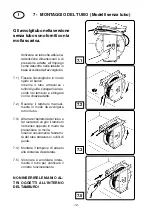
IMPORTANTE: L'avvolgitubo deve essere collocato a parete ad un'altezza minima dal pavi-

mento di 2,50 m per evitare incidenti durante le operazioni di lavoro.

In casi particolari é possibile il montaggio a pavimento o come accessorio su altre macchine soltanto se

viene applicata una protezione di tipo fisso. Scegliere, tra le 2 alternative proposte, la posizione più

idonea per l'uscita del tubo (vedi figure A - B).

A - AX - (AL) - (ALX)

optional

Montare l'avvolgitubo

già completo di tubo

su pareti rigide e

consistenti impiegan-

do 4 tasselli diametro

10 mm.

Il montaggio con la

staffa girevole (optio-

nal) va eseguito im-

piegando 2 tasselli

diametro 10 mm.

ATTENZIONE! La dit-

ta costruttrice de-

clina ogni respon-

sabilità per danni a

persone o cose

causate da un mon-

taggio non corret-

to dell'avvolgitubo.

A

B

- 8 -

Summary of Contents for A Series

Page 1: ...AL AX ALX MANUALE USO E MANUTENZIONE USE AND MAINTENANCE MANUAL NOTICE D UTILISATION ET D ENTRETIEN GEBRAUCHSANWEISUNG 09 COSTRUZIONI MECCANICHE TORINO RENATO S Chiaffredo Strada antica di Cuneo 43 12...

Page 2: ...n planned in conformity to the present EEC rules and namely UNI EN 292 1 EN 292 2 Safety of the machines General design methods UNI EN 294 Safety of the machines Safety Distances to prevent danger zon...

Page 3: ...pr cis ment UNI EN 292 1 EN 292 2 S curit de la machinerie El ments fondamentaux de projet UNI EN 294 S curit de la machinerie Distances de s curit pour emp cher l approche de zones dangeureses par l...

Page 4: ...reels supplied without hose are provided with the unloaded spring Follow the instructions described at the chapter HOSE ASSEMBLY Um eine lange Lebensdauer zu gew hrleisten sind die Schlauchaufroller M...

Page 5: ...CQUA WATER EAU WASSER 40 C Max OLIO OIL HUILE OEL ARIA AIR AIR LUFT 18 Bar A183820ST G 3 8 F 20 m GRASSO GREASE GRAISSE FETT 400 Bar A4G1415ST G 1 4 F 15 m ACQUA 150 C WATER 150 C EAU 150 C WASSER 150...

Page 6: ...3 8 R1 1 2 R1 1 2 R1 10 m 15 m 10 m 15 m GRASSO GREASE GRAISSE FETT 400 Bar A4G1410 A4G1415 G 1 4 F G 1 4 F 1 4 R2 1 4 R2 10 m 15 m ACQUA 150 C WATER 150 C EAU 150 C WASSER 150 C 400 Bar A4H3810 A4H38...

Page 7: ...lauchaufroller nicht in der N he und im Kontakt mit Lebensmittelprodukten plaziert werden Les enrouleurs modeles AX ALX sont construits enti rement en acier inox AISI 304 l exception de quelques compo...

Page 8: ...pour objets endommag s cause d un montage incorrect de l enrouleur F 4 INSTALLATION IMPORTANT The hose reel has to be wall mounted at a minimum height of the floor of 2 50 m in order to prevent accid...

Page 9: ...er Ainsi on peut viter de possibles pertes de fluide du joint tournant enrouleur pour haute pression Conform ment aux normes sur la ligne d alimentation l enrouleur appliquer une vanne boisseau sph ri...

Page 10: ...eventuali sostituzioni di pezzi si consiglia di interpellare la casa costruttrice Dopo ogni operazione di manutenzione ripristinare le eventuali protezioni I 6 USO E MANUTENZIONE The automatic device...

Page 11: ...ich an den Hersteller zu wenden D 6 GEBRAUCH UND WARTUNG f r den Schlauch Le cliquet d arr t fonctionne sur une zone correspondante un demi tour du tambour Pour d bloquer le tuyau exercer une courte t...

Page 12: ...so i rullini di guida collegarlo al rac cordo nel tamburo e stringere con la chiave adatta 7 2 Ruotare il tamburo manual mente in modo da avvolgere tutto il tubo 7 3 Afferrare l estremit del tubo e fa...

Page 13: ...le raccord avec la cl adapt e 7 2 Tourner le tambour manuellement pour enrouler compl tement le tuyau 7 3 Prendre l extremit du tuyau et tourner pour un tour le tambour dans le sens oppos pour pr char...

Page 14: ...bo 8 2 Svitare il giunto girevole 8 3 Svitare le 2 viti del mozzo attacco molla con una chiave da 10 mm 8 4 Smontare la fiancata lato molla con una chiave da 10 e srotolare completamen te il tubo dal...

Page 15: ...the spring is completely unloaded 8 2 Loosen the swivel joint 8 3 Loosen the two screws of the spring likage shaft by a 10 wrench 8 4 Disassemble the opening on the spring side and unwind completely t...

Page 16: ...el mozzo attacco molla con una chiave da 10 vedi punto 8 3 9 4 Smontare la fiancata lato molla con una chiave da 10 ed estrarre il tambu ro 9 5 Estrarre il mozzo dal carter portamolla 9 6 Sollevare le...

Page 17: ...9 4 Disassemble the opening on the spring side by a 10 mm wrench and take out the drum 9 5 Take out the shaft from the spring housing 9 6 Lift the tangs on the drum by a screwdriver and rotate the sp...

Page 18: ...10 1 PARTI DI RICAMBIO SPARE PARTS PIECES DETACHEES ERSATZTEILE Models A AX 18...

Page 19: ...MBOUR RESSORT 15m 18 bar RESSORT 15m 60 bar RESSORT 15m 400 bar RESSORT 20m 18 bar MOYEUDERESSORT VIS TE M 6x16 VIS TE M 6x10 BUTEE D 14 1 4 BUTEE D 17 3 8 BUTEE D 20 1 2 BUTEE D 23 5 8 MAMELON DOUBLE...

Page 20: ...Models AL ALX 10 2 PARTI DI RICAMBIO SPARE PARTS PIECES DETACHEES ERSATZTEILE 20...

Page 21: ...TE M 6x16 VIS TE M 6x10 BUTEE D 14 1 4 BUTEE D 17 3 8 BUTEE D 20 1 2 BUTEE D 23 5 8 MAMELONDOUBLE1 2 1 4 MAMELONDOUBLE1 2 3 8 MAMELONDOUBLE1 2 1 2 FLANC GAUCHE ECROUM6 FLANCDROIT TAMBOUR ENTRETOISEPO...

Page 22: ...l Code F r Modell Art Nr Pour modele Code A ASG15 AL ALSG20 AX Inox AXSG15 ALX Inox ALXSG20 60 Bar 12 mm Aria Air Air Luft Acqua Water Eau Wasser 40 C Max Olio Oil Huile Oel 400 Bar 11 mm A Grasso Gre...

Page 23: ...ISH SEAL WASHER BRASS WASHER SEAL SEAL WASHER SWIVEL SWIVEL SWIVEL SWIVEL SWIVEL WASHER SEAL SEAL FRANCAIS JOINT RONDELLE RONDELLELAITON JOINT JOINT RONDELLE RACCORD RACCORD RACCORD RACCORD RACCORD RO...

Page 24: ...methods UNI EN 294 Safety of the machine Safety distances to prevent danger zones being reached by the upper limbs We declare that the complete technical booklet for the hose reels in question is ava...

Reviews: