4.6 System Connectivity Test
At this stage it should be possible to test that the FaderMate system is connected together
correctly.
WARNING: Please do not power the system up before performing all of the steps
described so far in this section in order.
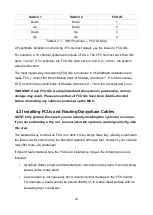
It is also necessary to double-check all of the power connectors to ensure that the
polarity has not been reversed. Powering the system up with the power supply
wires connected incorrectly may cause serious damage.
Connect the MCU to the mains using the supplied IEC cable. Turn the MCU power on
using the front panel rocker switch.
You should observe the following:
The MCU front panel indicator LEDs labelled
+12V
,
+5V
and
CPU
(Figure 4.5.1, red
box) should all light immediately
The MCU front panel indicator LED for each connected FCU (Figure 4.6.1, yellow
box) should light solid green
Figure 4.6.1 - MCU Front Panel Indicator LEDs
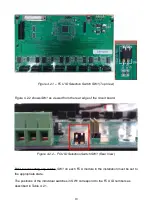
The LEDs labelled
+3V3
,
+5V
and
+12V
(locations shown in Figure 4.6.2) on each
FCU circuit board should all light immediately
27
Summary of Contents for Master Control Unit
Page 1: ...Product Fitting Guide v1 0 0 October 2018 2018 FaderMate All rights reserved 1...
Page 11: ...Figure 3 3 1 FCU Circuit Board Dimensions 11...
Page 23: ...Figure 4 4 4 Data Connections 23...
Page 26: ...Figure 4 5 4 Daisychain Power Connections Block Diagram 26...
Page 36: ...Version History Version Date Author Details 1 0 0 08 October 2018 AJN First release 36...


