


8
blockings are not available, it is required to build a supporting
structure behind the sheet rock for best weight support.
- Concrete wall: Use designated screws (not provided).
- Wood wall: Use at least 4 inches long wood screws (not provided).
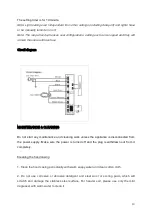
11. Place the mounting bracket (or air diverter) against the wall and align the holes from
mounting bracket (or air diverter) with holes from type A anchors, fasten two type B screws
through the holes onto the anchors as shown in below picture. Leave approximately 1/16
inches of gap between the wall and the mounting bracket (or air diverter).
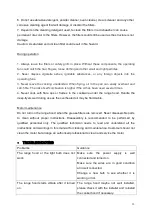
Fasten mounting bracket
Slide up and secure
Upper chimney flue to
Hold in position and
Secure lower chimney flue
to range hood
* The displayed figures maybe varied from the actual product.
12. Calculate the height of the ducting and extend approximately 6 inches longer than
required, connect the lower end of the ducting to the range hood and the upper end to the
outlet (or air diverter). Make sure the main electrical supply remains disconnected then
connect power plug to the electrical cord or wall socket.
13. Have one person carefully position both upper and lower chimneys on the cooker hood as
to allow another installer slide the sides of the chimney flues into the 1/16 inches gap. Fasten
both chimneys flues with four type C screws.
14. Install the oil cup back to its place and place the cone filters under the cooker hood.
15. The user may check the operation and performance of the cooker hood after the above
stated installation steps are done.
Summary of Contents for TORENTINO 90SS
Page 1: ...1 FORTE 90SS ...
Page 14: ...14 ...


