


51
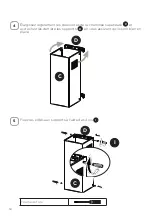
6
7
Installez la hotte de cheminée inférieure latéralement
B
sur le corps de la
hotte à l'aide des 2 vis
L
fournies.
N = 2x
Élargissez légèrement les deux côtés de la hotte inférieure
B
et accro-
chez-les entre la section supérieure et le mur, en veillant à ce qu'ils soient
bien logés.
C
B
B
L
Tournevis Torx
Summary of Contents for STILO
Page 6: ...6 RANGE HOOD DIMENSIONS DRAFT 27 AP 24 30 36 48...
Page 7: ...7 INSTALLATION HEIGHT REQUIREMENTS MIN 24 OVER ELECTRIC MIN 30 OVER GAS Min 24 Min 30...
Page 9: ...9 B A F C D E...
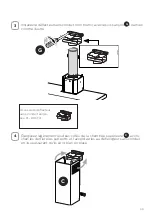
Page 16: ...16 8 Tighten the 2 screws H as shown H Phillips Screwdriver...
Page 17: ...17 CHOOSING VENTING METHOD VENTED RECIRCULATING Go to Pg 18 Go to Pg 22...
Page 30: ...30 WIRING DIAGRAM...
Page 36: ...36 DIMENSIONS DE LA HOTTE DRAFT 27 AP 24 30 36 48...
Page 39: ...39 B A F C D E...
Page 46: ...46 8 Serrez les 2 vis H comme illustr H Tournevis Phillips...
Page 47: ...47 CHOISIR LA M THODE D A RATION A RATION RECIRCULATION Allez la page 48 Allez la page 52...
Page 60: ...60 SCH MA DE C BLAGE...
Page 66: ...66 DIMENSIONES DE LA CAMPANA EXTRACTORA DRAFT 27 AP 24 30 36 48...
Page 69: ...69 B A F C D E...
Page 76: ...76 8 Apriete los 2 tornillos AL como se muestra AL Destornillador Phillips...
Page 90: ...90 DIAGRAMA DE CABLEADO...


