Faber MAESTRALE Installation Instructions Manual Download Page 8

Version 03/15- Page 8

PREPARE  THE  WALL

1.  Disconnect and move freestanding range from cabinet 

opening to provide easier access to upper cabinet and rear 

wall.  Put a thick, protective covering over cooktop, set-in 

range or countertop to protect from damage or dirt.

2.  It is recommended that the vent system be installed 

before hood is installed. Before making cutouts, make sure 

there is proper clearance within the ceiling or wall for exhaust 

vent. Check that all installation parts have been removed 

from the shipping carton. First, disconnect power. 

Then determine which venting method to use: roof, wall 

or rear exhaust.

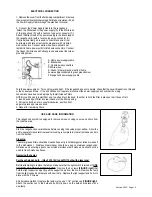
CHANGING HOOD TO OPTIONAL REAR EXHAUST

The hood comes from the factory with the exhaust 

collar on top of the hood. The hood exhaust may be directed out the rear of 

the hood through the exhaust collar. If you desire to have the hood exhaust 

out the rear, follow the procedure below.

1. From inside the hood, unplug wire attached to blower motor.

2. Turn the hood over and remove the screws holding the exhaust blower 

assembly to the hood.

A. Blower Motor

B. Blower motor plug

A. Blower Motor

B. Screws

3. Rotate the blower assembly so that the exhaust collar is

facing out the back of the hood.

4. Replace the screws holding the blower assembly 

to the hood.

5. Plug the blower motor wire back into the blower

motor.

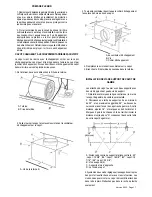
RANGE HOOD MOUNTING SCREWS INSTALLATION

The hood attaches to the wall with two mounting brackets 

with adjustment screws and four mounting screws.

1. Determine and mark the centerline on the wall where 

the canopy range hood will be installed.

2. Select a mounting height between a minimum of 30" 

and a suggested maximum of 36", above the

cooking surface and the bottom of the range hood. To this 

distance, add 16" and mark a horizontal line.

3. Mark 2 points on each side of the horizontal line the 

distance shown in “A” below (based on the size of your 

range hood).

A: Distance from center of mounting bracket to centerline: 

30" hood: 13 3/8" / 36" hood: 16 3/8" / 

42" hood: 19 7/16" / 48" hood: 22 3/8"

B: Mounting Screws (4)

C: Mounting brackets and adjustment screws

D: Bottom of hood 

4. Adjust the two adjusting screws on the mounting brackets 

to the lowest point and attach to the wall with the screws

provided. The screws provided for mounting this hood must 

be fastened into solid wood. Do not fasten into sheet rock

only.

A. Exhaust blower assembly

B. Screws

C. Exhaust collar

Summary of Contents for MAESTRALE

Page 1: ...IMISERLERISQUED UNFEUDEGRAISSESURLATABLEDECUISSON a Nejamaislaisser un l ment de la table de cuisson fonctionner sans surveillance la puissance de chauffage maximale un renversement d bordement de mat...

Page 2: ...and at the junction box When making the electrical connection cut a 1 1 4 hole in the wall A hole cut through wood must be sanded until smooth A hole through metal must have a grommet WARNING TOREDUCE...

Page 3: ...ns du fabricant et entre en communication avec lui pour toute information Fermez le courant avant tout entretien et veillez a ce qu il reste ferm Si on ne peut pas verrouiller le panneaux du service l...

Page 4: ...Y 10 DUCT TRANSITION PRODUCT DIMENSIONS DIMENSIONS DE PRODUIT COUVERTURE DE GRANDE LARGEUR FACULTATIVE DE CONDUIT CHEMIN E T LESCOPIQUE FACULTATIVE KIT ROND DE TRANSITION DE CONDUIT 12 5 8 4 1 16 30 4...

Page 5: ...isaminimumof 24 of straight duct between elbows if more than one is used Do not install two elbows together If you must elbow right away do it asfarawayfromthehood sexhaustopening as possible WARNING...

Page 6: ...6 OR 10 round vent Accessories Full Width Duct Cover Order Part Number FULL30 for 30 model Order Part Number FULL36 for 36 model Order Part Number FULL42 for 42 model Order Part Number FULL48 for 48 m...

Page 7: ...blower Rotate the filter clockwise to install and counterclockwise to remove FIGURE 3C Replace all grease filters There are 2 ways to recirculate the Maestrale 1 Use the Ductless Recirculating Kit sol...

Page 8: ...Blower Motor B Screws 3 Rotate the blower assembly so that the exhaust collar is facing out the back of the hood 4 Replace the screws holding the blower assembly to the hood 5 Plug the blower motor wi...

Page 9: ...Determine the location where the power supply cable will be run through the wall 3 Drill a 1 3 2 cm hole at this location 4 Pull enough power supply cable through the wall to allow for easy connection...

Page 10: ...ulb with glass lens Before attempting to replace the lamps make sure that the light switch is turned off USE CAUTION AS THE BULB MAY BE HOT Remove the 2 screws FIGURE right that hold the light support...

Page 11: ...e commutateur de ventilateur aux 0 positions pour tourner le ventilateur OUTRE DE Ajustement du ventilateur Leventilateura3commandesdevitesse D placezlecommutateur de vitesse de ventilateur dans 1 pos...

Page 12: ...Version 03 15 Page 12 This rangehood uses 20 watt Halogen Lamps Cette hotte utilise les ampoule halog nes de 20 W WIRING DIAGRAM DIAGRAMME DE C BLAGE...

Page 13: ...umbing 2 Service calls to repair or replace range hood light bulbs fuses or filters Those consumable parts are excluded from warranty coverage 3 Repairs when your range hood is used for other than nor...

Page 14: ...e Lesinstallationssansconduitrequi rentunKitPourConversionDuConduit disponible chez le marchand AVERTISSEMENT AVANT DE FAIRE UNE COUPE OU DES TROUS POUR L INSTALLATION D TERMINER QUELLE M THODE DE VEN...

Page 15: ...e rond Accessoires Pleine largeur conduit d a ration Num ro de commande Partie FULL30 30 mod le Num ro de commande Partie FULL36 36 mod le Num ro de commande Partie FULL42 42 mod le Num ro de commande...

Page 16: ...t de la soufflante Tourner le filtre dans le sens horaire dans le sens antihoraire installer et enlever figure 3C Remplacer tous les filtres graisse Il ya deux fa ons de recycler l Maestrale 1 Utilis...

Page 17: ...tenant le ventilateur d chappement sur le capot A Turbine B Prise de turbine A Vis de la turbine B 3 Tournez le ventilateur de sorte que le collier d chappement fasse face dehors au dos du capot 4 Rem...

Page 18: ...on d nergie sera courez par le mur 3 Forez un 1 de de de 3 2 cm trou cet endroit 4 Tirez assez de c ble d alimentation d nergie par le mur pour tenir compte du raccordement facile dans le coffret d ex...

Page 19: ...limentation d nergie et v rifiez que le c blage des rapports ont t tablis correctement Installez les filtres de graisse NOTE Utilisez 2 mains pour installer le filtre un pour tirer et tourner le bouto...

Page 20: ...les de votre maison ou pour corriger votre c blage ou votre syst me de plomberie 2 Les appels de service pour remplacer ou r parer les ampoules les fusibles ou les filtres de votre hotte de cuisini re...

Reviews: