


EN
1
12
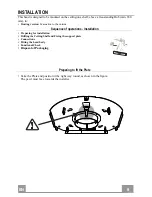
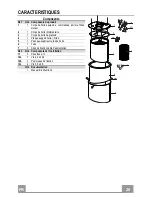
FIXING THE PLATE
• Lift up the Fixing plate and fit the slots onto the two
screws previously inserted in the ceiling, and turn un-
til they are at the centre of the adjustment slot.
Warning:
The plate must be facing in the direction
shown in the figure
• Tighten the two screws completely and screw in the
other two provided; before locking the screws
completely it is possible to make adjustments by
turning the piece, making sure that the screws do not
come out of the adjustment slot.
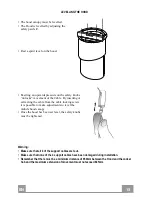
• The unit must be securely fastened both due to the
weight of the Hood and the stress caused by
occasional sideways pressure on the Appliance when
in position. Once the unit has been fixed, make sure
that the plate is stable.
• In all cases where the Ceiling is not sufficiently
strong at the point of suspension, the Installation
technician must strengthen it with suitable plates and
counterplates, anchored to structurally sound
elements.
• Check that the plate is level on the ceiling.
• Should it be considered advisable, the hood can be
fixed to the wall using 3 more screws and wall plugs.
Summary of Contents for LI_991.0426.991
Page 3: ...3 3 I ERIKLER TAVSIYELER VE NERILER 118 ZELLIKLER 121 MONTAJ 123 KULLANIM 133 BAKIM 135 TR...
Page 8: ...EN 8 8 Dimensions...
Page 27: ...FR 2 27 Encombrement...
Page 46: ...DE 4 46 Platzbedarf...
Page 65: ...ES 6 65 Dimensiones...
Page 80: ...GR 8 80 650 mm 120 mm 0 04 mbar 2...
Page 81: ...GR 8 81 3 mm 8...
Page 82: ...GR 8 82 2 4...
Page 83: ...GR 8 83 1 1 2 1 3 1 4 1 5 1 6 1 7 3 11 7 10 12a 7 4 2 x 44 4 12b 3 12c 4 3 5 x 9 5 1 6 7...
Page 84: ...GR 8 84...
Page 85: ...GR 8 85 650 mm...
Page 86: ...GR 8 86 20 mm 10 mm 11 15 mm 7 mm 10 mm 4 5 mm 20 mm 12h...
Page 87: ...GR 8 87 1 2 5 5 1 4 12c 1 2 12c a b 1 2 5...
Page 88: ...GR 8 88 3...
Page 89: ...GR 8 89 650 mm 4 3 a b c c b 645mm a b c...
Page 90: ...GR 9 90 a b 4 4...
Page 91: ...GR 9 91 C 4 4 650mm 645mm...
Page 92: ...GR 9 92 7 A B 3 mm 7 A B...
Page 93: ...GR 9 93 150...
Page 94: ...GR 9 94 3 3 12b 3 3 12b...
Page 95: ...GR 9 95 L T1 L T1 2 Led T1 2 Led T1 Led T1 250ms Led T1...
Page 97: ...GR 9 97 2 LED 1M EN 60825 1 1994 A1 2002 A2 2001 439nm 7 W...
Page 98: ...GR 9 98 10 11 12 A...
Page 99: ...RU 9 99 650 I 120 0 04 2...
Page 100: ...RU 1 100 3 8...
Page 101: ...RU 1 101 2 4...
Page 102: ...RU 1 102 1 1 2 1 3 1 4 1 5 1 6 1 7 3 11 7 10 12a 7 4 2 x 44 4 12b 3 12c 4 3 5 x 9 5 1 6 7...
Page 103: ...RU 1 103...
Page 104: ...RU 1 104 650...
Page 105: ...RU 1 105 20 10 11 15 7 10 4 5 20 12h...
Page 106: ...RU 1 106 1 2 5 5 1 4 12c 1 2 12c a b 1 2 5...
Page 107: ...RU 1 107 3...
Page 108: ...RU 1 108 650 4 3 a b c c b 645 a b c...
Page 109: ...RU 1 109 a b 4 4...
Page 110: ...RU 1 110 C 4 4 650 645...
Page 111: ...RU 1 111 7 A B 3 7 A B...
Page 112: ...RU 1 112 150...
Page 113: ...RU 1 113 3 3 12b 3 3 12b...
Page 114: ...RU 1 114 L T1 L T1 2 T1 T1 2 T1 250 T1...
Page 115: ...RU 1 115 1 5 LR03 AAA 2 2 2 24h 10 10 1 24h 30 0 5 2 24H 24 10 24 2...
Page 116: ...RU 1 116 2 1M EN 60825 1 1994 A1 2002 A2 2001 439nm 7...
Page 117: ...RU 1 117 13 A 14 15 A...
Page 122: ...TR 1 122 Boyutlar...
Page 137: ......
Page 138: ......
Page 139: ......
Page 140: ...436005932_02...


