


83
EN
77
INSTALLATION
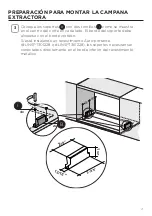
Fitting the Hood canopy
BEFORE FITTING THE HOOD TO THE WALL UNIT, PROCEED AS FOLLOWS:
• Disconnect the wires to the Commands at the connectors.
• Disconnect the wires to the Light at the con-
nectors.
• The Hood can be installed directly on the
underside of the wall unit (Minimum 650 mm
from the Cooker Hob).
• Create an opening in the bottom of the wall unit,
as shown.
• Insert the hood until the side supports snap into
place.
• Fasten using the 10 screws
12a
provided.
• Lock in position by tightening the screws
Vf
from
underneath the hood.
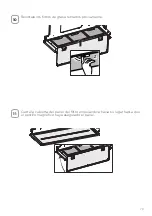
• Open the suction panel by turning the specific knob.
• Disconnect the panel from the hood canopy by sliding the
fixing pin lever.
• Remove grease filters.
• Screw the Frame into place
using the 6 screws
12f
, re-
connect the wires to the
Commands and Light, re-
place the metal grease filter
and the Panel.
260
13
495 - 675
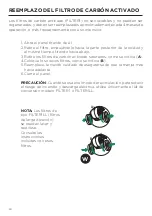
CUIDADO DE LOS FILTROS
LIMPIEZA DE LOS FILTROS DE GRASA METÁLICOS
Los filtros de grasa metálicos se pueden limpiar en solución de detergente
caliente o lavarse en el lavavajillas. Se deben limpiar cada 2 meses de uso, o
más frecuentemente si el uso es particularmente pesado.
1. Abra el panel tirando de él.
2. Retire el filtro, empujando la palanca hacia la parte posterior de la
unidad y al mismo tiempo tirando hacia abajo.
3. Lave el filtro sin doblarlo, deje que se seque completamente antes
de reemplazarlo (si la superficie del filtro cambia de color con el
tiempo, esto no tendrá ningún efecto sobre su eficiencia).
4. Reemplace, asegurándose de que la manija mire hacia adelante.
5. La limpieza en el lavavajillas puede estropear el acabado del filtro
de grasa metálico.
6. Cierre el panel.
7. Seque completamente los filtros antes de volver a instalarlos en
la campana. No debe quedar agua atrapada en el filtro antes de
reinstalarlo.
Z
Summary of Contents for INLT21SSV
Page 6: ...6 RANGE HOOD DIMENSIONS DRAFT 19 JUN 2020 14 46 21 28 35 21 28 35 DRAFT 19 JUN...
Page 7: ...7 INSTALLATION HEIGHT REQUIREMENTS MIN 24 OVER ELECTRIC MIN 30 OVER GAS Min 24 Min 30...
Page 9: ...9 A D E F Z B...
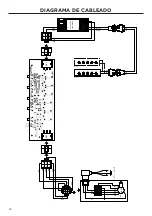
Page 28: ...28 120V 60Hz WIRING DIAGRAM...
Page 35: ...35 DIMENSIONS DE LA HOTTE DRAFT 19 JUN 2020 14 46 21 28 35 21 28 35 DRAFT 19 JUN...
Page 38: ...38 A D E F Z B...
Page 57: ...57 120V 60Hz SCH MA DE C BLAGE...
Page 64: ...64 DIMENSIONES DE LA CAMPANA EXTRACTORA DRAFT 19 JUN 2020 14 46 21 28 35 21 28 35 DRAFT 19 JUN...
Page 67: ...67 A D E F Z B...


