


15
"KD@MHMFLDS@KFQD@RDkKSDQR
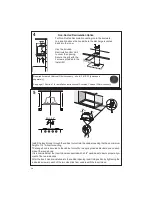
7KHPHWDOJUHDVH¿OWHUVFDQEHFOHDQHGLQKRWGHWHUJHQWVR
-
lution or washed in the dishwasher. They should be cleaned
every 2 months, or more frequently if use is particularly heavy.
•
5HPRYHWKH¿OWHUSXVKLQJWKHOHYHUWRZDUGVWKHEDFNRI
the unit and at the same time pulling downward.
•
:DVKWKH¿OWHUZLWKRXWEHQGLQJLWOHDYHLWWRGU\WKRURX
-
JKO\EHIRUHUHSODFLQJLIWKHVXUIDFHRIWKH¿OWHUFKDQJHV
color over time, this will have absolutely no effect on its
HI¿FLHQF\
• Replace, taking care to ensure that the handle
faces forward.
•
&OHDQLQJLQGLVKZDVKHUPD\GXOOWKH¿QLVKRIWKH
PHWDOJUHDVH¿OWHU
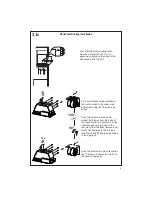
Replacing Activated Charcoal Filter
The Activated Charcoal Filters are not washable
and cannot be regenerated, and should be replaced
approximately every 4 months of operation, or more
frequently with heavy usage.
•
5HPRYHWKHFKDUFRDO¿OWHUE\URWDWLQJLWFORFNZLVHEDFNZDUGV
until it unlocks from the motor housing and pull off sideways.
•
7RUHLQVHUWHDFKFKDUFRDO¿OWHUSODFHXSDJDLQVWWKHVLGH
of the blower and push it inward. Then turn the charcoal
¿OWHUFORFNZLVHIRUZDUGXQWLOLW¿WVLQWRSODFH
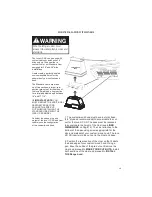
Replacing the two 35W Halogen GU10 bulbs
• Turn off electrical supply before replacing bulbs, and make
sure bulbs are cool to touch before proceeding.
&DUHIXOO\UHPRYHWKHVQDSRQODPSFRYHUXVLQJDÀDW
head screwdriver by levering it down from under the
metal ring.
• After the snap-on lamp cover is down remove the halogen
lamp at the base and turn slightly to the left and the pull
out from the connector and turn slightly to the left.
• Replace the lamp with a new one of the same type,
making sure that you insert the two pins properly into the
housings on the lamp holder.
• Replace the snap-on lamp cover.
• Once the bulb pins are in place turn slightly to the right
to secure.
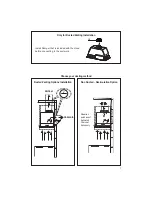
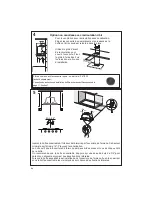
• Remove grease filters.
• Screw the Frame into place
12f
, re-
A
B
Summary of Contents for INHC29SS600-B
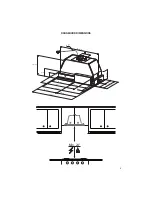
Page 5: ...5 RANGEHOOD DIMENSIONS Min 24 47 ...
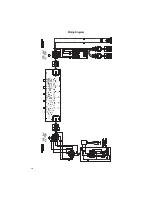
Page 16: ...16 Wiring Diagram ...
Page 21: ...21 Min 24 DIMENSIONS DE LA HOTTE 47 ...
Page 32: ...32 Schéma de câblage ...
Page 34: ...34 ...
Page 35: ...35 ...
Page 36: ... B B ...


