


10
7
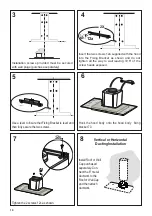
3
4
5
6
I = 6x
I = 6x
2X
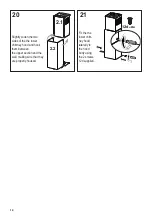
12a
Installation screws provided must be secured
with wall plugs (purchase separately).
Insert the two screws 12a supplied with the hood
into the Fixing Bracket as shown and do not
tighten all the way to wall leaving 3/16" of the
screw heads exposed.
Use a level to insure that Fixing Bracket is level and
then fully secure the two screws.
Hook the hood body onto the hood body fixing
bracket 7.3.
I = 6x
11
8
Install Roof or Wall
Cap purchased
separately. Con-
nect the 6" metal
ductwork to the
Roof or Wall Cap
and then attach
ductwork.
Vertical or Horizontal
Ducting Installation
12c
Tighten the 2 screws 12c as shown.
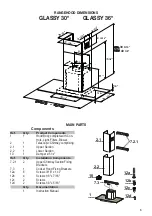
Summary of Contents for GLASSY 30
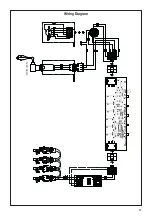
Page 17: ...17 Wiring Diagram 120V 60Hz...
Page 34: ...34 Sch ma de c blage 120V 60Hz...
Page 51: ...51 Wiring Diagram 120V 60Hz...
Page 53: ......
Page 54: ......
Page 55: ......


