


7
5) Electrical requirements
1. The electrical work should be carried out by a suitably qualified and authorized professional
in strict accordance with the current local and national safety regulations.
2. Make sure the appliance is not connected to the power supply while during the installation.
3. Do not connect the appliance to the extension lead of a power socket as this will not
guarantee safety of using this appliance.
4. Check the power supply of the house and make sure it is match with the appliance. The
connection data is listed on data plate on the cooker hood.
5. Install this appliance with a proper 3 pins plug that match local and national safety standard
and make sure the power is easily accessible after the appliance has been completely built in.
6. Make sure the cooker hood is properly grounded.
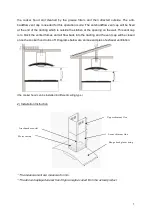
6) Installation steps
1. Please take note of the user who use this range hood most often and make sure there is
enough space to cook comfortably under the range hood and able to reach the control panel
easily at the same time.
2. As this appliance is heavy, please make sure that the supporting or framework being used
is stable and secured enough in the wall.
3. Mark the locations of the support mounting bracket holes, ducting cut out (if used) and
power supply cable cut out on the ceiling and then use drill and saber saw or other tools to cut
the openings for power supply cable and ducting.
4. Please seal the exterior wall or roof openings under the exhaust ventilation installation.
5. Turn off the main electrical supply, prepare and run the wires through ceiling or wall. Leave
approximately about 12 inches of electrical cord hanging from the ceiling. Do not restore
power until the wiring is complete.
6. For glass cooker hood, please handle it with extra care and remove the glass before
installation if possible. Do not put excessive pressure onto the glass.
7. Measure the distance between cook top and the bottom of cooker hood and make sure the
right distance between the cook top and the bottom of range hood for different hobs.
8. Make sure the range hood is level horizontally and not tilted. Mark the locations of it.
9. Place the mounting bracket directly above the range hood, level it, and mark the locations
of the mounting bracket holes on the wall.
10. Place aside all equipments and locate marked regions and then drill holes. Attach the
range hood to the wall using anchors recommended for your type of wall:
- Sheet rock wall: Attach range hood to stud blockings if possible. If stud
Summary of Contents for FORTE 90SS
Page 1: ...1 FORTE 90SS...
Page 14: ...14...


