


10
2.1
2.2
7
9
10
8
Slightly widen
the two sides
of the upper
chimney and
hook them
behind the
brackets 7.2.1,
making sure
that they are
well seated.
Secure the sides to the brackets by using the 4
screws 12b.
Only for the
recirculation
version, push fit
the connection
Ductless Divert-
er (purchased
separately)
onto the
hood body air
outlet.
12
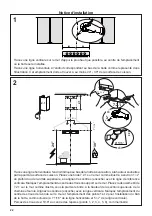
Fix the bracket
7.2.1 using the
screws 12a
supplied.
11
Slightly widen the two
sides of the lower section
and hook them between
the upper section and the
wall, making sure that they
are properly housed.
Install Roof or Wall
Cap purchased
separately. Con-
nect the 6" metal
ductwork to the
Roof or Wall Cap
and then attach
ductwork.
Vertical or Horizontal
Ducting Installation
Non-Ducted Recirculation Option
L = 4x
12a
N = 4x
12b
2.1
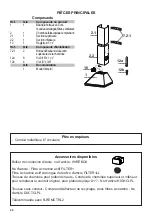
Summary of Contents for CLASSICA PLUS CLPL30SSV
Page 5: ...5 RANGEHOOD DIMENSIONS 0 1 0 Min 30 Min 24...
Page 14: ...14 Wiring Diagram 120V 60Hz...
Page 19: ...19 0 1 0 DIMENSIONS DE LA HOTTE Min 30 Min 24...
Page 28: ...28 Sch ma de c blage 120V 60Hz...
Page 33: ...33 DIMENSIONES DE LA CAMPANA 0 1 0 Min 30 Min 24...


