


76
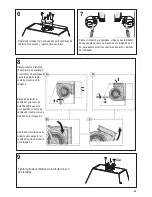
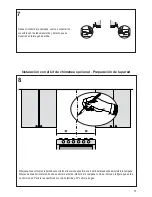
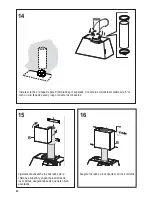
Vuelva a asegurar la placa de cubierta
como se muestra con los tornillos retirados
previamente.
6
5
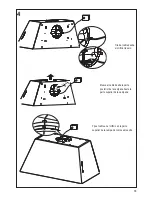
'HVDWRUQLOOHORVWRUQLOORVTXHVRVWLHQHQHOYHQWLODGRU\GHVEORTXpHORGHVGHODSRVLFLyQLQLFLDOFRPRVHPXHVWUDHQOD
Imagen a.
E
F
D
G
[
[
'HVSXpVGHUHWLUDUHOYHQWLODGRUJLUHFRPRVHPXHVWUDKDVWDTXHHVWpHQODSRVLFLyQFRUUHFWDGHYHQWLODFLyQWUDVHUD
como se muestra en la Imagen b-c.
Use los dos tornillos (Posi-Drive) que se quitaron para asegurar el ventilador como se muestra en la Imagen d.
Summary of Contents for Chloe
Page 6: ...6 Min 24 Min 30...
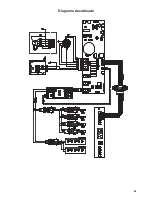
Page 28: ...28 Wiring Diagram U B...
Page 34: ...34 Min 24 Min 30...
Page 56: ...56 Sch ma de c blage U B...
Page 62: ...62 M n 24 M n 30...
Page 84: ...84 Diagrama de cableado U B...
Page 86: ...86...
Page 87: ...87...


