EN
2
24
L
T1
T2
T3
T4
S1
L
S1
T1
T2
T3
T4
L
T3
S1
T2
T1
T4
USE
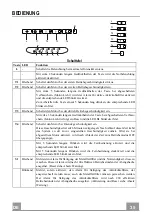
Control panel
Button
Led
Function
L
-
Turns the lights on/off at maximum strength.
Press and hold the button for approximately 2 seconds to turn the Courtesy Lights
On/Off.
T1
Fixed Turns
the
motor
on/off at speed one.
T2
Fixed
Turns the Motor on at speed two.
Press and hold the button for approximately 3 seconds, with all the loads turned
off (Motor and Lights), to turn the Activated Charcoal Filter alarm on. The
relevant LED flashes twice to confirm.
To turn the alarm off, press the button again and hold for at least 3 seconds. The
relevant LED flashes once.
T3
Fixed
Turns the Motor on at speed three.
Press and hold the button for approximately 3 seconds, with all the loads turned
off (Motor and Lights), to perform a reset of Filter saturation alarm. The LED
S1
flashes three times.
T4
Fixed
Turns the Motor on at INTENSIVE Speed.
This speed is timed to run for 6 minutes. At the end of this time, the system
returns automatically to the speed that was set before. If it is activated with the
motor turned off, the hood will switch to OFF at the end of the time.
Press and hold for 3 seconds to enable the remote control, indicated by the LED
flashing twice.
Press and hold for 3 seconds to disable the remote control, indicated by the LED
flashing just once.
S1
Fixed
Signals the Metal Grease Filter saturation alarm, indicating that it is necessary to
wash the filters. The alarm is triggered after the Hood has been in operation for
100 working hours. (Reset see the parag. Maintenance)
Flashing When this is activated, it signals the Activated Charcoal Filter saturation alarm,
indicating that the filter must be changed; the Metal Grease Filters must also be
washed. The Activated Charcoal Filter saturation alarm comes
into operation after the Hood has been working for 200 hours. (Activation and
Reset see the parag. Maintenance)
Summary of Contents for 110.0255.544
Page 3: ...3 3 70 73 75 79 80 81 84 86 90 91 RU SA...
Page 8: ...IT 8 8 Ingombro Min 500mm Min 650mm...
Page 19: ...EN 1 19 Dimensions Min 500mm Min 650mm...
Page 30: ...DE 3 30 Platzbedarf Min 500mm Min 650mm...
Page 41: ...ES 4 41 Dimensiones Min 500mm Min 650mm...
Page 52: ...PL 5 52 Wymiary Min 500mm Min 650mm...
Page 59: ...GR 5 59 650mm 120mm...
Page 60: ...GR 6 60 0 04mbar 8...
Page 61: ...GR 6 61...
Page 63: ...GR 6 63 Min 500mm Min 650mm...
Page 64: ...GR 6 64 21 20 mm 10 mm 11 7 mm 10 mm 4 5 mm 20 mm 12h 12g 22 23...
Page 65: ...GR 6 65 2 7 2 2 1 2 1 o150 mm 150...
Page 66: ...GR 6 66 Novastick Novastick 16 4 12f M6 x 10 3 3 12f...
Page 67: ...GR 6 67 L2 L1 L2 a b L1 L1 L1 L2 L2 L2 L1 L2 a b L1 1 2 3 L2 L1 L2 2 3 L1 1 3 mm...
Page 69: ...GR 6 69 3 V CR2032 Led S1 2 T3 3 Led...
Page 70: ...RU 7 70 650 I 120...
Page 71: ...RU 7 71 0 04 8...
Page 72: ...RU 7 72...
Page 74: ...RU 7 74 Min 500mm Min 650mm...
Page 75: ...RU 7 75 21 20 10 11 7 10 4 5 20 12h 12g 22 23...
Page 76: ...RU 7 76 2 7 2 2 1 2 1 150 150...
Page 77: ...RU 7 77 Novastick Novastick 16 4 12f 6 10 3 3 12f...
Page 78: ...RU 7 78 L2 L1 L2 a b L1 L1 L1 L2 L2 L2 L1 L2 a b L1 1 2 3 L2 L1 L2 2 3 L1 1 3...
Page 80: ...RU 8 80 3 CR2032 S1 2 T3 3...
Page 81: ...SA 8 81 650 I 120...
Page 82: ...SA 8 82 0 04 8...
Page 83: ...SA 8 83...
Page 85: ...SA 8 85 Min 500mm Min 650mm...
Page 86: ...21 20 10 11 7 10 4 5 20 12 H 4 4 12 G 22 23...
Page 87: ...SA 8 87 7 2 2 1 2 1 150 150...
Page 88: ...SA 8 88 16 4 12f M6 x 10 3 3 12f...
Page 89: ...SA 8 89 L2 L1 L2 a b L1 L1 L1 L2 L2 L2 L1 L2 a b L1 1 2 3 L2 L1 L2 2 3 L1 1 3...
Page 91: ...SA 9 91 S1 T3 3 3...


