background image

E045S 

21 

532373 - Rev.A

Tr

ansla

tion of the orig

inal instruc

tions

ENGLISH

8.2  XF RADIO MODULE

E045S  is  fitted  with  an  OMNIDEC  integrated  two 

channel decoding system that can memorise, via the 

XF radio module, FAAC radio controls that use the 

following types of radio code:  SLH/SLH LR, LC/RC, DS.


i

The three types of radio codes can coexist simultane-

ously.

A maximum of 255 codes can be memorised.

The memorised codes act as OPEN A or OPEN B/CLOSE 

commands.

The radio controls and the XF radio module must have 

the same frequency. 

When memorising the codes, keep the radio control 

approximately one meter from the XF radio module.

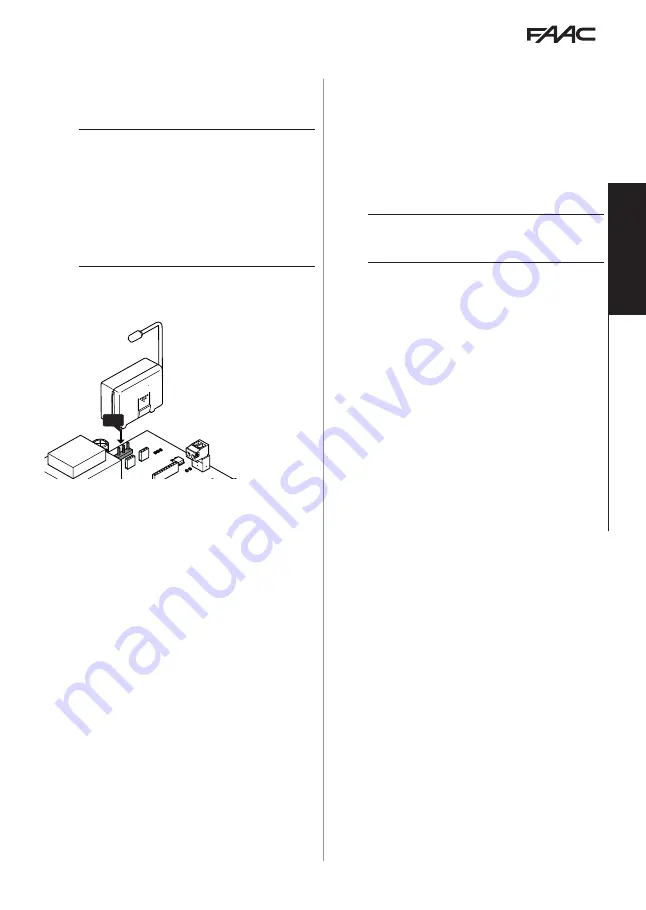
1.  Insert the XF radio module into the 

J5

 connector, 

being careful to insert it in the right way round and 

with the mains power switched off.

J5

2.  Turn power on to the board.

3.  Memorise the radio controls.

RADIO CONTROLS SLH/SLH LR

Memorise the first radio control, MASTER, on the 

board.  Then add other radio controls that are re-

quired following the learning procedure that doesn’t 

require you to access the board.

To check if the radio control is a MASTER device, press 

and hold a button and watch the LED:

- flashes  briefly,  then  the  light  becomes

steady  =  MASTER

-  turns on immediately with a steady light  =  NON 

MASTER


i

Whenever a new master is memorised on the board,

any SLH/SLH LR radio controls that are already in 

use are disabled.


Memorising the first radio control

1.  On the board, press the 

++

 button (memorize OPEN 

A) or the

--

 button (memorize OPEN B/CLOSE) and 

release it when the corresponding RADIO Led 

(

RADIO1

 or 

RADIO2

) starts to flash for 20 s (time 

available for the next steps).

2.  Press buttons 

P1

 and 

P2

 simultaneously on the

radio control and release them when its LED starts 

to flash for 8 s (time available for the next step).

3.  Press and release the button on the radio control 

to be memorised.  The corresponding RADIO LED 

on the board becomes steady for 1 s, then switches 

off (memorisation complete).

4.  Release the button.

When using the memorised button for the first time, 

press it twice in succession to obtain the command.


Adding radio controls 

1.  Press buttons 

P1

 and 

P2

 simultaneously on the

already memorised MASTER radio control and 

release them when its LED starts to flash for 8 s 

(time available for the next step).

2.  Within 8 seconds, press and hold the button that 

has already been memorised, the LED lights up

with a steady light.

3.  Bring  the  radio  control  that  has  already  been 

memorised, into contact face to face with the new 

one to be memorised.

4.  Press the button to be memorised on the new radio

control and make sure that its LED flashes twice 

before turning off.

5.  Release all buttons.

When using the memorised button for the first time, 

press it twice in succession to obtain the command.

Summary of Contents for E045S

Page 1: ...E045S...

Page 2: ...Alle vermelde namen en merken zijn eigendom van de respectievelijke fabrikanten Deklantenmogenkopie nmakendieenkelvooreigengebruikbestemdzijn Dez handleiding werd in 2020 gepubliceerd Copyright FAAC S...

Page 3: ...PUTTING INTO SERVICE 17 7 1 Final checks 17 7 2 Close the enclosure 17 7 3 Final operations 17 8 ACCESSORIES 17 8 1 BUS 2easy devices 17 Connection 17 BUS 2easy photocells 17 BUS 2easy sensitive edge...

Page 4: ...particular that you adoptthesafetycriteriaanddevicesindicated without exception including the dead man function This manual also contains general information and guidelines whicharepurelyillustrative...

Page 5: ...tion 1 1 LED off LED on LED flashing LED flashing quickly PERSONAL PROTECTIVE EQUIPMENT Personal protective equipment must be worn to protect against hazards e g crushing cutting shearing etc Obligati...

Page 6: ...stallation and other activities adhering to the sequences provided in the instructions manual Alwayscomplywithalltherequirementscontainedin the instructions and warning tables at the beginning of the...

Page 7: ...rposes other than operating gates Uses other than the intended use are prohibited It is prohibited to install the E045S on smoke and or fire doors ItisprohibitedtoinstalltheE045Sinenvironments in whic...

Page 8: ...ththeautomation withmodesspe cificfortheinstalleroruser SimplyConnectrequires an accessory connectivity module to be plugged in which is chosen according to technology used XMB GSM for mobile Bluetoot...

Page 9: ...exible conduits either above or below ground Use separate conduits for the power supply and the 12 24 V control devices accessories cables Check buried cable plans to ensure that there are no other el...

Page 10: ...t J3 Removable terminal board for connecting control devices J5 Connector 3 pin for FAAC XF radio module J8 USB A port J9 Removable terminal board for accessories power supply J10 Removableterminalboa...

Page 11: ...act connectapush buttonoranothertypeof pulse generator which by opening a contact causes the automation to stop LThe board is supplied with the STOP is bridged with the common contacts If the input is...

Page 12: ...5Aelectriclockwithamaximumcurrentof3A XF RADIO MODULE J5 ThequickinsertionconnectorJ5isspecificallyforFAAC model XF radio modules Insert as shown in the figure To memorize radio control codes see Acc...

Page 13: ...to the board 2 Check that the status of the LEDs is correct 3 Configure the number of motors Basic program ming Mn 4 Enable the encoders if present Basic program ming En 5 Check the leaf movement Bas...

Page 14: ...sconnected before they have been saved 1 Press and hold down the F F button then the button as well Alternatively scroll through the programming menu until you reach the last function St 2 Select Y sa...

Page 15: ...er assists the closing of the electric lock DO NOT enable the function if there is not a me chanical closing stop fitted no disabled Y enabled 3 s no Od LEAF OPENING DELAY 2 s displayed only if Mn 2 T...

Page 16: ...e automation is open causes it to close OPEN during opening stops the gate and the next OPEN command closes it OPEN during closing causes it to reopen The triggering of the photocells during movement...

Page 17: ...travel andotherleafparameters TheSETUPprocedurealso registers the BUS 2easy devices that are present SETUP needs to be carried out when S0 flashes on the display e g when the automation is first put i...

Page 18: ...tomations to prevent interference between leaves and to handle any overlap 6 6 ADJUSTING THE ANTI CRUSHING SYSTEM Anti crushing protection is obtained by limiting the staticforceexertedbytheoperator i...

Page 19: ...ACCESSORIES 8 1 BUS 2easy DEVICES ItispossibletoconnectFAACBUS2easydevices pho tocells sensitive edges control devices to this board LIf no BUS 2easy accessories are used leave connector J10 free Do n...

Page 20: ...can be complete if iP no in programming partial 2 s if iP Y in programming 1 Assign an address to the device electronics by setting the four DIP switches LNo two devices should have the same DIP swit...

Page 21: ...l Devices Key 0 OFF 1 ON DIP switch 5 enables the device for 1 OFF command or 2 ON commands 0 0 0 0 0 Open A_1 0 0 0 0 1 Open A_1 Open B_1 0 0 0 1 0 Open A_2 0 0 0 1 1 Open A_1 Open B_2 0 0 1 0 0 Open...

Page 22: ...here are no devices registered no willappearonthedisplay otherwise segment 13 will be lit 6 Press the and simultaneously for at least 5 s The display flashes then Y appears registration complete 2 Rel...

Page 23: ...ster is memorised on the board any SLH SLH LR radio controls that are already in use are disabled Memorising the first radio control 1 Ontheboard pressthe button memorizeOPEN A or the button memorize...

Page 24: ...he board becomes steady for 2 s to confirm the memorization It then starts to flash again and an otherradiocontrolcanbememorisedwithin20s The procedure ends after 20 s if no further radio con trols ar...

Page 25: ...buttons TheprocedureendswhenY appearsonthedisplay If there are errors no appears on the display and the red ERROR LED lights up To display the error code press buttons and simultaneously The error me...

Page 26: ...PROGRESS 02 STATIONARYTHEN OPENS 08 CHECK Bus 2easy 03 STATIONARYTHEN CLOSES 09 PREFLASHING BEFORE OPEN ING 04 IN PAUSE 10 PREFLASHING BEFORE CLOS ING 05 OPENING 10 4 LEDS CHECK 9 boldindicatesthecon...

Page 27: ...Configuration Error Checktheboardconfiguration basic and advanced programming and if necessary carry out the SETUP procedure 17 Encoder1failure Make sure that the encoder is con nected properly If th...

Page 28: ...correctly when an obstacle is detected 6 Check that each pair of photocells is working correctly 6 Checkthatthereisnooptical lightinterferencebetweenthe pairs of photocells 6 Check the force limitatio...

Page 29: ......

Page 30: ......

Page 31: ......

Page 32: ...FAAC S p A Soc Unipersonale Via Calari 10 40069 Zola Predosa BOLOGNA ITALY Tel 39 051 61724 Fax 39 051 09 57 820 www faac it www faacgroup com E045S 27 532373 Rev A...

Reviews: