F-S Electronics 2016©
2
Step by Step Instructions:
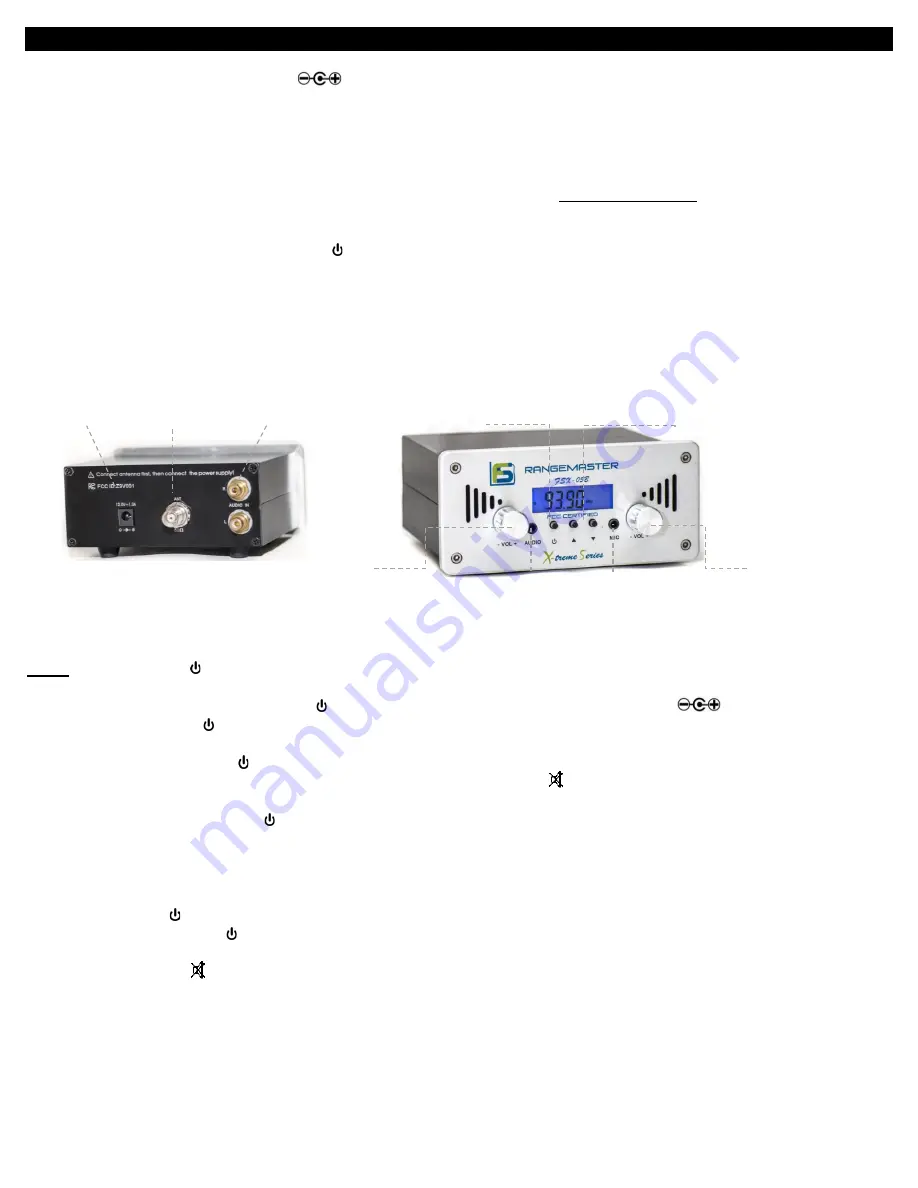
1. Connect antenna to Antenna Port (B). If using upgraded antenna, connect the antenna to the cable and the cable to the transmitter Port (B).
2. Connect power adapter to the Power Jack
(A).
3. Connect to source device using 3.5mm male x 3.5mm male or RCA x 3.5 mm male audio cable or RCA Male x RCA Cable. Connect one end
to Audio Input (D), RCA Inputs (B), or both (B&D)
on the transmitter and the other end of the cable to device’s RCA/3.5mm output jack e.g. MP3
player, iPod, PC, MAC, PDA, DVD player, etc. Please note that both B&D are controlled by Audio Volume Control (F).
4. Optional
–
transmitting from a microphone: You may transmit audio from a microphone by connecting a stereo plug-type microphone to the
MIC Input (E). This transmitter is equipped with a MIC Preamp
—
one of the best MICs is one used for your PC/MAC.
5. Pre-scan your local FM frequencies on FM radio to find vacant frequencies or refer to www.radio-locator.com for best unused frequencies.
6. Optional
–
Tune your antenna upgrade by referring to Antenna Tuning Section--Proceed to Step 8 if purchased with stock black rubber duck
antenna.
7. Power unit ON using by pressing Power Switch (H). LCD Displaywill light up.
8. Set transmitting frequency according to Step 5
’s selected frequency
using the ▲/▼ Frequenc
y Toggle Buttons (I).
9. Set volume level on the audio source device (ie: MP3 player, iPod, PC, MAC, PDA, DVD player, etc.) Optimal audio level varies for each type
of device and recorded audio volume. Generally you should set audio level on input device and transmitter at about 50% and slowly increase to
optimal level
10. Set volume level on FM transmitter using Audio and MIC Volume Controls (F&G) and then on radio receiver: When the source audio level is
optimized you should be able to have full audio level range with the FM receiver radio without any distortion and crystal clear audio. If audio
sound is distorted you should lower the volume level at the source device, step 9.
Power Adjustment Menu
–
Toggle from (High) 0.5 Watts to (Low) FCC Compliant
power (H):> 0.5W / 500mW
(Default)
; Low-power (L): <0.02W / 20mW
NOTE: The power switch (H) is actually like an Enter button when in the Power Adjustment Menu. Proceed through all steps, if you
have any issues after toggling the power level, please refer to these steps and set to the defaults and try again.
1. First press and hold the Power Switch/MENU (H) while inserting the power adapter into the Power Jack
(A).
2. Release the power switch (H) after LCD screen displays the "H" or "L". Use
the Frequency Toggles ▲/▼ (
I
). Press ▲or ▼ to toggle the
LCD screen display between H or L. Again, "H" is the output power > 500mW, and "L" is. the output power <100mW.
3. Press the Power Switch/ENTER (H).
4. The LCD screen displays the default setting of "107.90 MHz" and the Mute Symbol will be displayed meaning it is not transmitting and
this will be displayed through Step 7. This is the Highest Frequency the transmitter will display
. Through the ▲/▼
(I).
5. Press the POWER SWITCH/ENTER (H).
6. Now the LCD screen displays the default setting of "88.10 MHz". This is the lowest frequency the transmitter will display. Again, through the
▲/▼
(I).
NOTE: The lowest frequency high-end cannot be higher than the highest frequency selected in Step 4. Some customers
“
LOCK IN
”
the frequency they choose by setting the High and Low Frequencies to the same MHz.
7. Press power switch (H). Wait 3 seconds to exit the Power Adjustment Menu and LCD screen will display "OFF".
8. Again press the power switch " (H) and the transmitter will power on and transmitter will begin transmitting. Now reselect the broadcast
frequency. If the broadcast frequency is locked and you cannot toggle, repeat all steps and reset the High and Low Frequencies to defaults!
Please note that if you see , you are still in programming mode and it is not broadcasting!
POWER JACK
(A)
ANTENNAPORT
(C)
AUDIO INPUT
(D)
MIC VOLUME
CONTROL
(G)
FREQUENCY TOGGLES/POWER SELECTOR
(I)
AUDIO VOLUME
CONTROL
(F)
POWER SWITCH/MENU/ENTER
(H)
MIC INPUT
(E)
RCA INPUTS
(B)


