background image

2

Si raccomanda prima di 

installare il prodotto di 

spurgare accuratamente i tubi di 

alimentazione.

It is suggested to purge the 

inlet tubes before to install 

the product.

On recommande de purger 

les tubes d’alimentation 

avant de placer le produit.

Enjaguar con mucha 

atencion los tubos de 

alimentacion antes de conectar el 

producto.

Es ist empfohlen bevor den 

Artikel zu installieren die 

Zuleitungsrohre zu spülen.

IT

EN

FR

SP

DE

Summary of Contents for 83891

Page 1: ... a l utilisateur final Conservar con diligencia Entregar a l utilizador final Halten mit sorgfalt Werden an den Endverbraucher gegeben ISTRUZIONI PER INSTALLAZIONE ED USO INSTALLATION AND USE INSTRUCTIONS INSTRUCTIONS D INSTALLATION ET UTILISATION INSTRUCCIONES PARA LA INSTALLACION Y USO MONTAGE UND BETRIEB ANLEITUNGEN SHOWER PROGRAM ...

Page 2: ...aire Indice Inhaltsverzeichnis pag 3 ART 90912 90913 pag 20 ART 90908 pag 42 ART 90924 pag 55 art 90924 A pag 9 ART 90909 90910 pag 33 ART 90911 pag 58 art 90915 pag 74 ART 83891 pag 78 ART 90605 90607 pag 70 PULSANTIERA ...

Page 3: ...ed to purge the inlet tubes before to install the product On recommande de purger les tubes d alimentation avant de placer le produit Enjaguar con mucha atencion los tubos de alimentacion antes de conectar el producto Es ist empfohlen bevor den Artikel zu installieren die Zuleitungsrohre zu spülen IT EN FR SP DE ...

Page 4: ...n acero inoxidable empotrado a techo 40x40 cm Kalkschutze UP Brause aus Edelstahl Decke Montage 40x40 cm Soffione anticalcareo in acciaio inox da incasso a soffitto Ø40 cm Ø40 cm stainless steel anticalcareous ceiling mounted shower Douche anticalcaire en acier inoxydable au plafond Ø40 cm Rociador anticalcareo en acero inoxidable empotrado a techo Ø40 cm Kalkschutze UP Brause aus Edelstahl Decke ...

Page 5: ...ART 90912 Hydraulic system layout art 90912 Schéma du système hydraulique art 90912 Esquema de el sistema hidraulico art 909012 Hydraulische Anlage Layout art 90912 Controsoffitto False ceiling Faux plafond Falso techo Doppeldecke ...

Page 6: ...T 90913 Hydraulic system layout art 90913 Schéma du système hydraulique art 90913 Esquema de el sistema hidraulico art 909013 Hydraulische Anlage Layout art 90913 5 Controsoffitto False ceiling Faux plafond Falso techo Doppeldecke ...

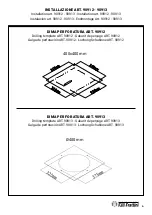
Page 7: ...age Art 90912 90913 400x400 mm Ø400 mm DIMA PER FORATURA ART 90912 Drilling template ART 90912 Gabarit de perçage ART 90912 Galga de perforación ART 90912 Lochung Schablone ART 90912 DIMA PER FORATURA ART 90913 Drilling template ART 90913 Gabarit de perçage ART 90913 Galga de perforación ART 90913 Lochung Schablone ART 90913 ...

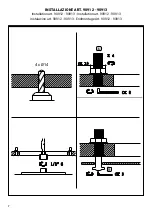
Page 8: ...7 INSTALLAZIONE ART 90912 90913 Installation art 90912 90913 Installation art 90912 90913 Instalacion art 90912 90913 Endmontage Art 90912 90913 4 x Ø14 ...

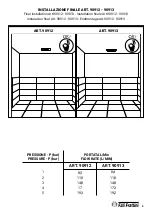
Page 9: ...0912 90913 Installation finale Art 90912 90913 Instalacion final Art 90912 90913 Endmontage Art 90912 90913 ART 90912 ART 90913 8 4 11 8 14 8 17 3 19 2 ART 90913 PRESSIONE P bar PRESSURE P bar 1 2 3 4 5 8 3 11 9 14 8 17 19 3 ART 90912 PORTATA L Min FLOW RATE L MIN ...

Page 10: ...cke Montage 40x40 cm Regenfall und Farbtherapie mit Leuchten Betätigung innen der Duschkabine 7 5x15 cm Soffione anticalcareo in acciaio inox da incasso a soffitto Ø42 5 cm pioggia e cromoterapia dotato di pulsantiera 7 5x15 cm controllo luci interno al box doccia Ø42 5 cm stainless steel anticalcareous ceiling mounted shower with rainfall and chromo therapy with light control push button panel in...

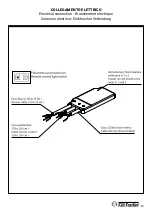
Page 11: ...10 COLLEGAMENTO ELETTRICO Electrical connection Branchement electrique Conexion electrica Elektrischer Verbindung ...

Page 12: ...COURANT ELECTRIQUE 220V DENTRO LA ZONA ZONA 0 ZONA 1 ZONA 2 NUNCA SE DEBE LA CORRIENTE ELECTRICA 220V INNEN DEN GEBIET ZONA 0 ZONA 1 ZONA 2 KEINE STROMVERSORGUNG 220V EN IT FR SP DE Posizionare Trasformatore all esterno della zona 2 nella zona 3 Place the electrical transformer outside the ZONA 2 in the ZONA 3 Positionner le transformateur électrique au dehors de la zone 2 dans la zone 3 Posiciona...

Page 13: ...0 V 12 V BOX CROMO 9 CAVO LUCI LED RGB CONNETTORE IP65 4 poli CAVO 4x0 5 H05VVF Diam est 6 mm max 12V CAVO 4x0 5 H05VVF Diam est 6 mm max 12V CONNETTORE IP65 4 poli cavo pulsantiera PULSANTIERA COLLEGAMENTO ELETTRICO Electrical connection Branchement electrique Conexion electrica Elektrischer Verbindung ...

Page 14: ...ternal Diameter Ø6 mm 12V TRANSFORMER LED LIGHTS SWITCH SHOWER MAIN SWITCH 220 V 220 V 12 V POWER SUPPLY BOX CROMO 9 CAVO 4x0 5 H05VVF Diam est 6 mm max 12V CONNECTOR IP65 4 poles cable remote control REMOTE CONTROL 13 COLLEGAMENTO ELETTRICO Electrical connection Branchement electrique Conexion electrica Elektrischer Verbindung ...

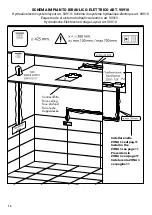
Page 15: ...ique art 90909 Esquema de el sistema hidraulico electrico art 90909 Hydraulische Elektrische Anlage Layout Art 90909 14 Installare nella ZONA 3 vedi pag 11 Install in the ZONA 3 see page 11 Placer dans la ZONA 3 voir page 11 Instalar en la ZONA 3 ver pagina 11 Controsoffitto False ceiling Faux plafond Falso techo Doppeldecke ...

Page 16: ...ctrique art 90910 Esquema de el sistema hidraulico electrico art 90910 Hydraulische Elektrische Anlage Layout Art 90910 Controsoffitto False ceiling Faux plafond Falso techo Doppeldecke Installare nella ZONA 3 vedi pag 11 Install in the ZONA 3 see page 11 Placer dans la ZONA 3 voir page 11 Instalar en la ZONA 3 ver pagina 11 ...

Page 17: ...acion art 90909 90910 400x400 mm Ø425 mm DIMA PER FORATURA ART 90909 Drilling template ART 90909 Gabarit de perçage ART 90909 Galga de perforación ART 90909 Lochung Schablone ART 90909 DIMA PER FORATURA ART 90910 Drilling template ART 90910 Gabarit de perçage ART 90910 Galga de perforación ART 90910 Lochung Schablone ART 90910 ...

Page 18: ...17 INSTALLAZIONE ART 90909 90910 Installation art 90909 90910 Installation art 90909 90910 Installation art 90909 90910 Instalacion art 90909 90910 4 x Ø14 ...

Page 19: ...18 INSTALLAZIONE ART 90909 90910 Installation art 90909 90910 Installation art 90909 90910 Installation art 90909 90910 Instalacion art 90909 90910 ...

Page 20: ...allation art 90909 90910 Installation art 90909 90910 Installation art 90909 90910 Instalacion art 90909 90910 8 5 12 14 8 17 5 19 7 ART 90910 PRESSIONE P bar PRESSURE P bar 1 2 3 4 5 8 6 12 2 15 5 17 4 20 ART 90909 PORTATA L Min FLOW RATE L MIN ...

Page 21: ... Douche anticalcaire en acier inoxydable au plafond 70x40 cm avec 3 fonctions pluie et deux cascades Nébulisation avec chromothérapie avec bouton poussoir commande lumières à l intérieur du box de douche 7 5x15 cm Rociador anticalcareo en acero inoxidable empotrado a techo 70x40 cm 3 función lluvia y 2 cascadas pulverización con cromoterapia con pulsadores para el control de la luz interno de la c...

Page 22: ...COLLEGAMENTO ELETTRICO Electrical connection Branchement electrique Conexion electrica Elektrischer Verbindung ...

Page 23: ...COURANT ELECTRIQUE 220V DENTRO LA ZONA ZONA 0 ZONA 1 ZONA 2 NUNCA SE DEBE LA CORRIENTE ELECTRICA 220V INNEN DEN GEBIET ZONA 0 ZONA 1 ZONA 2 KEINE STROMVERSORGUNG 220V EN IT FR SP DE Posizionare Trasformatore all esterno della zona 2 nella zona 3 Place the electrical transformer outside the ZONA 2 in the ZONA 3 Positionner le transformateur électrique au dehors de la zone 2 dans la zone 3 Posiciona...

Page 24: ...0 V 12 V BOX CROMO 9 CAVO LUCI LED RGB CONNETTORE IP65 4 poli CAVO 4x0 5 H05VVF Diam est 6 mm max 12V CAVO 4x0 5 H05VVF Diam est 6 mm max 12V CONNETTORE IP65 4 poli cavo pulsantiera PULSANTIERA COLLEGAMENTO ELETTRICO Electrical connection Branchement electrique Conexion electrica Elektrischer Verbindung ...

Page 25: ... External Diameter Ø6 mm 12V TRANSFORMER LED LIGHTS SWITCH SHOWER MAIN SWITCH 220 V 220 V 12 V POWER SUPPLY BOX CROMO 9 CAVO 4x0 5 H05VVF Diam est 6 mm max 12V CONNECTOR IP65 4 poles cable remote control REMOTE CONTROL COLLEGAMENTO ELETTRICO Electrical connection Branchement electrique Conexion electrica Elektrischer Verbindung ...

Page 26: ...ctrique art 90908 Esquema de el sistema hidraulico electrico art 90908 Hydraulische Elektrische Anlage Layout Art 90908 Controsoffitto False ceiling Faux plafond Falso techo Doppeldecke Installare nella ZONA 3 vedi pag 11 Install in the ZONA 3 see page 11 Placer dans la ZONA 3 voir page 11 Instalar en la ZONA 3 ver pagina 11 ...

Page 27: ...26 INSTALLAZIONE ART 90908 Installation art 90908 Installation art 90908 Installation art 90908 Instalacion art 90908 ...

Page 28: ...27 INSTALLAZIONE ART 90808 Installation art 90808 Installation art 90808 Installation art 90808 Instalacion art 90808 ...

Page 29: ...28 INSTALLAZIONE ART 90808 Installation art 90808 Installation art 90808 Installation art 90808 Instalacion art 90808 ...

Page 30: ...29 INSTALLAZIONE ART 90808 Installation art 90808 Installation art 90808 Installation art 90808 Instalacion art 90808 ...

Page 31: ...30 INSTALLAZIONE ART 90808 Installation art 90808 Installation art 90808 Installation art 90808 Instalacion art 90808 ...

Page 32: ...31 INSTALLAZIONE ART 90908 Installation art 90908 Installation art 90908 Installation art 90908 Instalacion art 90908 ...

Page 33: ...ALLAZIONE FINALE ART 90908 Installation art 90908 Installation art 90908 Installation art 90908 Instalacion art 90908 PRESSIONE P bar PRESSURE P bar 1 2 3 4 5 6 5 9 8 12 4 14 6 16 6 PORTATA L Min FLOW RATE L MIN ...

Page 34: ...hower with 3 functions rainfall waterfall and nebulizer Douche anticalcaire en acier inoxydable au plafond 55x40 cm avec 3 fonctions pluie cascade et nébulisation Rociador anticalcareo en acero inoxidable empotrado a techo 55x40 cm 3 función lluvia cascada y pulverización Kalkschutze UP Brause aus Edelstahl Decke Montage 55x40 cm mit 3 Funktion Regen Wasserfall und Zerstäubung ART 90911 ...

Page 35: ...ulic electric system layout art 90910 Schéma du système hydraulique électrique art 90911 Esquema de el sistema hidraulico electrico art 90911 Hydraulische Elektrische Anlage Layout Art 90911 Controsoffitto False ceiling Faux plafond Falso techo Doppeldecke ...

Page 36: ...35 INSTALLAZIONE ART 90911 Installation art 90911 Installation art 90911 Installation art 90911 Instalacion art 90911 ...

Page 37: ...36 INSTALLAZIONE ART 90911 Installation art 90911 Installation art 90911 Installation art 90911 Instalacion art 90911 ...

Page 38: ...37 INSTALLAZIONE ART 90911 Installation art 90911 Installation art 90911 Installation art 90911 Instalacion art 90911 ...

Page 39: ...38 INSTALLAZIONE ART 90911 Installation art 90911 Installation art 90911 Installation art 90911 Instalacion art 90911 ...

Page 40: ...39 INSTALLAZIONE ART 90911 Installation art 90911 Installation art 90911 Installation art 90911 Instalacion art 90911 ...

Page 41: ...40 INSTALLAZIONE ART 90911 Installation art 90911 Installation art 90911 Installation art 90911 Instalacion art 90911 ...

Page 42: ...TALLAZIONE FINALE ART 90911 Installation art 90911 Installation art 90911 Installation art 90911 Instalacion art 90911 PRESSIONE P bar PRESSURE P bar 1 2 3 4 5 8 3 11 7 14 5 17 19 2 PORTATA L Min FLOW RATE L MIN ...

Page 43: ... shower head with Bluetooth self powered from water flow Douche Ø 29cm anticalcaire en acier inoxydable avec commande Bluetooth autoalimenté par le passage de l eau Rociador Ø29 cm anticalcareo en acero inoxidable con comando Bluetooth auto alimentación para el pasaje del agua Ø29 cm Kalkschutze Brause aus Edelstahl mit Bluetooth Betätigung vom Wasser Fluss selbst ernährt ...

Page 44: ...precher Box 2 Microfono Microphone Microphone Micròfono Mikrophon 3 LED funzioni LED functions fonctions LED funciones LED LED Funktionen 4 Nicchie per chiave montaggio smontaggio Niches for assembly disassembly Niches pour le montage démontage Nichos para montaje y desmontaje Nischen für Ein oder Abbau ...

Page 45: ...ues sans utiliser aucune batterie ou chargeur Le signal est géré par le branchement Bluetooth avec un dispositif tel que smartphone Tablet laptop mobile phone ou autre appareil NB Pour la mise en œuvre ou après une période d inactivité de la pomme de douche on recommande de laisser fonctionner la pomme de douche sans branchement Bluetooth pour un temps de 15 20 minutes Los rociadores se caracteriz...

Page 46: ...ONO FUNZIONE TELEFONO max 1 metro DISPOSITIVI ABBINABILI CONTEMPORANEAMENTE 1 x ogni cartuccia NON TOGLIERE LA VALVOLA LIMITATRICE distanza fra il soffione e dispositivo fonte distanza fra il soffione e utilizzatore SPEAKER Dimension 1 5 inch SUPERBASS Power 2 Watts Intensity 78 db Frequency from 65 to 20 KHz Waterproof YES ELECTRONIC CARD Characteristics of the Bluetooth version 4 0 Characteristi...

Page 47: ... ENLEVER LA VALVE LIMITATRICE distance entre le pomme de douche et l appareil de départ distance entre le pomme de douche et l utilisateur ALTAVOZ Tamaño 1 5 pulgadas SUPERBASS Potencia 2 Vatios Eficiencia 78 dB Frecuencia entre 65 y 20 KHz Waterproof SÍ TARJETA ELECTRÓNICA Características de la versión Bluetooth 4 0 Características de la Batería 3 7 V 150mA h recargable USO PRESIÓN DEL AGUA DE US...

Page 48: ...AUCHSDRUCK WASSER IDEALFALL 3 Bar DURCHFLUSSMENGE IDEALFALL 12L MIN ZEIT IN BETRIEB NACH ZUDREHEN WASSER 5 Minuten ENTFERNUNG BLUETOOTH VERBINDUNG max 4 Meter ENTFERNUNG LAUTSPRECHER MIKROFON max 1 Meter TELEFON FUNKTION GLEICHZEITIG KOMBINIERBARE GERÄTE 1 Gerät pro Patrone DAS ÜBERSTROEMVENTIL NICHT ENTFERNEN Entfernung zwischen dem Duschkopf und dem Quellengerät Entfernung zwischen dem Duschkopf...

Page 49: ...izzo dispositivo come telefono Dopo aver eseguito i passi 1 accensione ON e 2 1 Dal proprio dispositivo selezionare la funzione telefono e setterla in modalità ON 2 Dal proprio dispositivo regolare il volume funzione telefono 3 Fare la doccia 4 Arrivo chiamata 5 Risposta automatica dopo 3 squilli 6 Conversazione 7 Fine della telefonata chiusura della linea ad opera di chi chiama 8 Spegnere acqua f...

Page 50: ...atic answer after 3 rings 8 Conversation 9 End of call hang up by the caller 10Automatic reset of the audio track sound paused during the call 11Turn off the water the telephone and audio functions will remain active for a 5 minutes before they automatically switch off OFF SOUND 1 Mise en route arrêt de l appareil Fonction ON Pour faire démarrer le produit SOUND il suffit d ouvrir l eau de l insta...

Page 51: ...emente el agua en la instalación Comprobar que el LED 3 se encienda en configuración LED ROJO apagado sistema en fase de apagado LED AZUL destellante rápido conexión Bluetooth activa El producto queda encendido activo durante 5 minutos después del cierre del agua después de transcurrir este tiempo el producto se apaga completamente OFF 2 Conexión del producto al dispositivo En el dispositivo activ...

Page 52: ...USIK FUNKTION nur zum Hören von Tonspuren Nach Durchführung der Schritte 1 Einschalten ON und 2 1 Auf Ihrer Vorrichtung die Tonspur wählen 2 Auf Ihrer Vorrichtung die Klanglautstärke einstellen Klang der vom Lautsprecher 1 und nicht von dem Quellengerät wahrgenommen wird 3 Die Telefon Funktion auswählen falls auf Ihrer Vorrichtung vorhanden und diese auf den Modus OFF einstellen Beispiele Modus OF...

Page 53: ...s as below Check if minimum requirements are fulfilled RESET function or substitute cartridge RED LED SWITCHED OFF After opening the water flow LED light of the SOUND is as below Check if minimum requirements are fulfilled RESET function or substitute cartridge RED LED SWITCHED ON BLUE LED SWITCHED OFF Bluetooth function deactivated After opening the water flow LED light of the SOUND is as below C...

Page 54: ...emiers 5 minutes après l ouverture de l eau le dispositif active la fonction SLEEP MODE il faudra donc attendre 30 secondes avant de pouvoir rétablir automatiquement la connexion F SP SLEEP MODE Si el producto no se conecta dentro de los primeros 5 minutos desde la apertura del agua el dispositivo activa la función SLEEP mode por lo tanto esperar 30 segundos para poder reactivar la conexión automá...

Page 55: ... Quellenvorrichtung eingeschaltet ist Patrone auswechseln SLEEP Funktion ROTE LED Leuchte an BLAUE LED Leuchte an die Vorrichtung funktioniert nicht Das Bluetooth Signal schaltet sich aus oder es gibt Klangverzerrungen beim Hören Prüfen ob die Entfernung zwischen den 2 Vorrichtungen richtig ist Die Vorrichtungen annähern Auf andere vorhandene Störsignale prüfen Ton fehlt oder zu leise Prüfen ob di...

Page 56: ...reous shower head with chrome therapy self powered from water flow Douche Ø 29cm anticalcaire en acier inoxydable avec chromo thérapie autoalimenté par le passage de l eau Rociador Ø29 cm anticalcareo en acero inoxidable con cromoterapia auto alimentación para el pasaje del agua Ø29 cm Kalkschutze Brause aus Edelstahl mit Farbtherapie vom Wasser Fluss selbst ernährt ...

Page 57: ...vue sans utiliser aucune batterie ou chargeur LED WHITE LED RAINBOW CARTRIDGE MINIMUM WORKING PRESSURE 0 7 bar PRESSION DE L EAU IDEALE 3 bar MINIMUM FLOW RATE 7 L min WATERPROOF CARTRIDGE YES DEBIT IDEALE 12 L MIN LED RAINBOW SEQUENCE GREEN RED BLUE YELLOW 100 sec LED FUNCTION WORKING DURING THE WATER FUNCTION El cartucho patentado utiliza una turbina que con el flujo del agua genera toda la ener...

Page 58: ...edi figura Use the proper key to unscrew and replace the LED cartridge see the picture En cas de remplacement de la cartouche LED dévisser la cartouche avec la clé en dotation voir image En caso de necesidad de sustitución del cartucho LED proceder como se indica en la figura destornillando el cartucho mismo con la llave correspondiente que se ha entregado Austausch der LED Patrone wenn nötig verw...

Page 59: ...ulic connections use with nebulization suggested Kit Aromathérapie pompe poussoirs boitier électronique et branchements hydrauliques à utiliser avec la nébulisation Kit de aromaterapia bomba pulsador caja de distribucion y conexión hidráulica aconsejada utilisación con pulverización Aromatherapie Kit Pumpe Betätigung Schalkasten und Hydraulisches Verbindung Verwendung mit Zerstäubung empfohlen ...

Page 60: ...INSTALLAZIONE Installation Installation Instalación Instalacion 59 ...

Page 61: ... The pump has 2 hoses suction hose 1Mt delivery hose 5Mt The delivery hose has to be connected preferably to the outlet of the nebulized jet by connection G1 2 male and a T connection allowing the delivery when the jet is operating The push button control of the Aroma Therapy can be installed inside the shower cabin La pompe doit être installée en vertical avec son support en dotation Pour fixer l...

Page 62: ...ación de la aromaterapia puede instalarse en el interior de la ducha Die Pumpe muss vertikal installiert werden mit entsprechendem ausgestattet Halter Bohren Sie 2 vertikalen Löcher in die Wand mit 53mm Abstand Spannen Sie den Bügel auf der Halter mit die ausgestattet Dübel Sichern sie die Pumpe auf den Bügel Der Schaltkasten und die Pumpe müssen auf dem Bezirk der Badezimmer installiert werden we...

Page 63: ...s Ne pas laisser l appareil ouvert et exposé aux agents externes Toutes interventions sur ces appareils doivent être faites par du personnel qualifié En cas de problèmes ou d anomalies en cours de fonctionnement débrancher l appareil et contacter le SAV L ensemble de l installation électrique doit être conforme aux normes locales en vigueur La température ambiante d utilisation ne doit pas dépasse...

Page 64: ...nda en la presión y la liberación del tubo A montado sobre unos rodillos B y portarrodillo C La presión y liberación del tubo con la rotación de los rodillos aspira el líquido y lo empuja hacia delante El caudal depende de la velocidad del motor y de la sección del tubo Principio de funcionamiento El principio de funcionamiento de la bomba peristáltica se funda sobre la presión y la liberación suc...

Page 65: ...étroites dans les tuyaux de refoulement et d aspiration parce qu ils pourraient compromettre les performances et la durée de la pompe Aspiration Lier le tuyau d aspiration b au raccord d aspiration a Fermer l embout c Refoulement Lier le tuyau de refoulement e au raccord de refoulement d Fermer l embout f Conexión hidráulica ATENCIÓN Evitar estrangulamientos o curvas muy estrechas en los tubos de ...

Page 66: ...and C Jonction electrique Pour la jonction électrique faire attention au model acheté Pompe version IP54 Le câble électrique d alimentation de la pompe est celui qui sort de la caisse de la pompe C en illustration Conexión eléctrica Alimentar la bomba observando los valores de tensión y absorción que se indican en la etiqueta de identificación de la misma Versione IP54 El cable de alimentacion sal...

Page 67: ...uement le niveau du réservoir qui contient la solution à doser afin d éviter que la pompe ne marche à vide Contrôler que les tuyaux d aspiration et de refoulement ne contiennent pas d impuretés parce que celles ci pourraient endommager le tuyau du corps de la pompe et engendrées une anomalie dans le refoulement Contrôler régulièrement le fonctionnement de la pompe en contrôlant l état du filtre do...

Page 68: ...sed the hose near the suction part Hivernage de la pompe Le tube de la pompe est l élément à protéger lors de la mise en hivernage de l installation Il est préférable de pomper de l eau claire pour rincer le tube pour éviter l attaque chimique au repos Afin de ne pas presser le tube dans la partie qui aspire le produit veuillez si nécessaire tourner le porte galet dans le sens horaire pour l orien...

Page 69: ...uvercle transparent en dévissant les deux vis sur le frontail Enlever le vieu tuyau en débloquant d abord le raccordement de gauche en tournant dans le sens de la flèche le porte galet de façon à libérer le tuyau jusqu au raccordement de droite Cambio del tubo peristáltico Quitar la tapa transparente destornillando los dos tornillos que se encuentran en la parte frontal Quitar el tubo viejo desblo...

Page 70: ...cor izquierdo en el tubo nueve en su asiento prestando atención a que la parte redondeada se posicione hacia el interior Girar el portarodillo en el sentido de las agujas del reloj de forma que el tubo ocupe su sede natural Den Schlauch Anschluss aus link in seinem Sitz verbinden achten Sie dass den runde Teil nach innen ist Drehen den Rollen Halter Uhrzeigerrichtung so dass den Schlauch in seinem...

Page 71: ...sh button panel with waterproof button Poussoir à installer à l intérieur de la cabine de douche poussoir en acier inoxydable avec poussoir totalement étanche waterproof Panel de boton a instalar en la ducha Boton en acero inoxidable resistente a l agua Knopf Paneel innen den Dusch Kabine Knopf Panel aus Edelstahle mit Wasserdicht Knop Correlata agli Matching with Se combine avec Relacionado con l...

Page 72: ...sition it properly Placer la boite de dérivation en dotation dans le mur et la positionner par l aide d un niveu Introducir en la pared la caja de derivación que se ha entregado y con el auxilio de un nivel posicionarla correctamente Stecken den Gehäuse in den Wand und mit eine Libelle richtig positionieren INSTALLAZIONE Installation Installation Installation Instalacion A EN IT FR SP DE 71 ...

Page 73: ...h the plate Fig B1 or at a maximum of 15 mm Fig B2 Appliquer le revêtement et vérifier afin que la boite de dérivation soit au fil du revêtement fig B1 ou 15mm au maximum Fig B2 Aplicar el revestimiento y comprobar que la caja de derivación se encuentre en el borde del revestimiento Figura B1 a máximo 15 mm Figura B2 Den Verkleidung anbringen und prüfen dass den Gehäuse nivelliert mit den Verkleid...

Page 74: ...INSTALLAZIONE Installation Installation Installation Instalacion C D OK 73 ...

Page 75: ...ART 83891 ART 83891 Soffione cascata a lama filo parete Wall mounted shower with cascade flow Douche au mur à cascade Rociador a cascada de pared Wasserfal Brause 74 ...

Page 76: ...75 INSTALLAZIONE ART 83891 Installation art 83891 Installation art 83891 Installation art 83891 Instalacion art 83891 ...

Page 77: ...76 INSTALLAZIONE ART 83891 Installation art 83891 Installation art 83891 Installation art 83891 Instalacion art 83891 ...

Page 78: ...SCHEMA CADUTA Drop scheme Schéma de la chute Esquema de caída Fall Plan 77 PRESSIONE P bar PRESSURE P bar 1 2 3 4 5 6 9 10 12 2 14 3 16 PORTATA L Min FLOW RATE L MIN ...

Page 79: ...Shower head with rain and cascade flow Tête de douche double fonction pluie et cascade Rociador a doble función lluvia y cascada Schwall und Wasserfall Brause 78 ART 90605 Soffione a pioggia a parete Shower head with rain flow Tête de douche à pluie Rociador a lluvia Schwall Brause ...

Page 80: ...79 INSTALLAZIONE Installation Installation Installation Instalacion 45 mm 6 OK OK OK ART 90607 ART 90607 ART 90605 ART 90605 ...

Page 81: ...80 INSTALLAZIONE Installation Installation Installation Instalacion ART 90607 ART 90607 ART 90605 ART 90605 ...

Page 82: ...81 INSTALLAZIONE Installation Installation Installation Instalacion 12 12 ART 90607 ART 90607 90605 ART 90605 ...

Page 83: ...82 INSTALLAZIONE Installation Installation Installation Instalacion 6 ART 90607 ART 90605 ...

Page 84: ...83 INSTALLAZIONE Installation Installation Installation Instalacion 2 5 2 5 ART 90607 ART 90607 ART 90605 ART 90605 ...

Page 85: ...84 INSTALLAZIONE Installation Installation Installation Instalacion ART 90607 PRESSIONE P bar PRESSURE P bar 1 2 3 4 5 8 9 12 5 13 4 14 1 14 4 PORTATA L Min FLOW RATE L MIN ...

Page 86: ...n the surfaces leaving spots and forming deposits In order to avoid limestone deposits clean and dry the product immediately after use It is possible to prevent limestone deposits on nozzles by regularly rubbing with a damp cloth La durée de la surface extérieure du robinet est déterminée par un bon soin et nettoyage On recommande de nettoyer les surfaces chromées dorées laiton satin et colorié av...

Page 87: ...86 ...

Page 88: ...inetteria Made in Italy da oltre 50 anni Rubinetterie F lli Frattini S p A Via Roma 125 C P 107 28017 San Maurizio d Opaglio NO Italy Tel 39 0322 96127 96128 Fax 39 0322 967272 info frattini it export frattini it www frattini com ...

Reviews: