background image

4

5

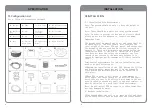
SPECIFICATION

INSTALLATION 

Ⅲ.INS

TALLA

TION

A1:SPA

pool 

B1:Pump 

E1:Hose

C1: Pool cover 

C2:PVC

inflatable

cover 

(optional)

G1:

Valve

wrench 

J1:Back

water

cover 

N1: Repair material 

Manual

D1:Inflation


tube

H1: Plug lock  H2: Key

K1: Hosel 

L1: Waterproof 
repair patch

F1:Filter


Cartridge

I1:Blocker 

M1:Instruction

Ⅱ.Configuration List

Note: Check all accessories included

3.1

Installation

Site

Requirements 

Note:

The

ground

should

be

able

to

bear

the

weight

of


the pool.

Note:

There

should

be

a

water

draining

system

around 

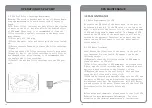
Note: In order to prevent the danger of electric shock, 

please do not use the adaptor to connect the pump. 

Important

Tips:

The ground shall be smooth and flat, and there shall be 

no sharp objects. The user should also consider the 

total

weight

of

the

user,

SPA

and

water,

and

ensure

that


the ground in the use area has Sufficient strength to 

support it. There is a good drainage system beside the 

installation area. If the SPA is installed in a place 

that

does

not

meet

the

safety

requirements,

any

loss


caused

is

not

covered

by

the

warranty

because

it

is


caused by improper use by consumers.1) Indoor installa-

tion:

Some

special

requirements

for

indoor

installation

that


need to be paid attention to:

◎During

the

installation

of

the

SPA,

during

the

filling


and

draining

water,

water

may

spill

on

the

ground.So


floor drains and moisture-proof must be installed in 

this place.

◎When

SPA

is

used,

it

will

bring

a

large

amount

of


water

vapor,

and

there

should

be

no

articles

and

appli

-

ances

that

are

easy

to

be

affected

with

damp

in

the

use


area.In

order

to

ensure

air

quality

and

user

comfort,

it


must be installed in a good ventilated environment.

Note: Do not install SPA on carpets or other items that 

are

easy

damaged

by

water.

2) Outdoor installation: 

◎The

ground

where

spa

pool

is

on

must

be

flat

and

there


are no sharp objects such as branches and stones nearby.

Summary of Contents for 104074

Page 1: ...Ezy Spa Hot Tub Instruction Manual Important safety guidelines for hot tub use Please read understand prior to using your hot tub ezyspa ...

Page 2: ... 15 water Temperature 650W 5 5m Style European regulations Product number Capacity Water capacity Outer diameter Inner diameter Height Bubble jets Rated power Heater power Bubble jet power Power cord length Filter pump specifications 4 Persons 800L 211gal Φ180 68CM Φ71 26 7 Φ140 68CM 55 26 7 650W 5 5m AC 12V 35W 1880L 420gal H Pool cover AC 12V 50W 2300L 600gal H Φ142 20cm Φ142 20cm 1540W 15 water...

Page 3: ...ficient strength to support it There is a good drainage system beside the installation area If the SPA is installed in a place that does not meet the safety requirements any loss caused is not covered by the warranty because it is caused by improper use by consumers 1 Indoor installa tion Some special requirements for indoor installation that need to be paid attention to During the installation of...

Page 4: ...ure 6 Deflation open the cap of valve press the middle red point on the down position let the air slowly out from the chamber Do not use in an environment with the temperature below 10 degrees Celsius 50 degrees Fahrenheit It will affect the heating effect of SPA Also do not expose SPA to the sun for a long time which will shorten the service life of SPA There should be a good drainage system near...

Page 5: ...e make sure that the children use the pool under the supervision of adults When not in use please cover the pool and lock the buckle to prevent children from entering the pool 3 5 Replacement pumps Before replacing the pump cover the inlet and outlet on the inner wall of the pool with a backwater cover to prevent the water from flowing out as shown in figure 11 3 4 Connecting the pump to the pool ...

Page 6: ...ff press this key to turn on the bubble function If you need to make bubble again you just press this key again the bubble function 2 When the filtering function is turned on press the bubble function key again during the bubble process the 3 function are turned on press the bubble function key to start the bubble function The heating and filtering function are automatically stopped function key d...

Page 7: ...g key again and both heating and filtering functions are turned off at the same time 3 When the bubble function is turned on neither the filtering function nor the heating function can be turned on by pressing the filtering key and the heating key 4 1 5 Heating on off key 1 When both the heating and filtering functions are turned off press the heating key Both filtering and heating function are st...

Page 8: ...ffect the service life of the pool and pump of SPA and bring harm to human health The damage of SPA caused by the PH value of the water quality will not be covered by the warranty Therefore we suggest that cus tomers can use PH test paper to test the water quality before using it 5 2 SPA Water Treatment Note Ensure the cleanliness of the water in the pool is very important for your health We sugge...

Page 9: ... must be dried otherwise peculiar smell will be caused by deterioration of water quality Abuse of SPA or improper use of chemicals resulting in SPA damage and life injury will not be covered by the warranty After each use of the SPA pool we recommend that you use bromine reagents and the chemical floaters to disinfect the water in the pool First open the cap of chemical floaters then add some brom...

Page 10: ...ot work Disconnect the plug and wait for the pump to cool before starting The temperature Protec tion 30 Minutes are automat ically turned off SPA automatic pump protection Restart Bubble button If it cannot be start ed please contact after sales service Check power supply Reset RCD Or the power cord load is not up to 2000W Or 10A If you can still work normally please contact the after sales servi...

Page 11: ...ezyspa Ezyspa Home Stores Group Unit B1 B3 The Rise Moat Way Ind Est Barwell Leicestershire LE9 8EY ...

Reviews: