background image

1

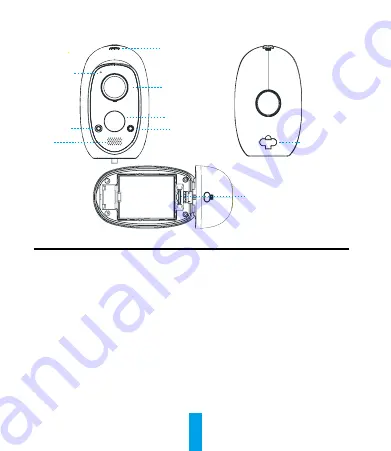
Camera


SD Card Slot

Name

Description

SYNC Button

Use to synchronize the base station.

PIR

With the PIR (Passive Infrared), the device can detect a human body to 
determine when there is a possible break in and begins to record footage.

LED Indicator

• 

Steady Red: The camera is starting.

• 

Slow-Flashing Blue: The camera is starting to synchronize or the device is 
updating. 

• 

Fast-Flashing Blue: The synchronization is complete.

• 

Fast-Flashing Red: The synchronization failed.

Photoresistor

Detects the environment's light conditions to activate the Day/Night switch 
function.

SD Card

Recommended compatibility: Class 10, Max.128GB. Format it before using.

Power Interface

For charging the battery or powering up the camera.

Microphone

LED Indicator

Lens

SYNC Button

Louderseaker

Photoresistor

Power Interface

PIR

Summary of Contents for CS-CV316

Page 1: ...ezBattery Camera...

Page 2: ......

Page 3: ...IMUM EXTENT PERMITTED BY APPLICABLE LAW IN NO EVENT SHALL EZVIZ S TOTAL LIABILITY FOR ALL DAMAGES EXCEED THE PURCHASE PRICE THE PRODUCT EZVIZ does not undertake any liability for personal injury or pr...

Page 4: ...ct and if applicable the supplied accessories too are marked with CE and comply therefore with the applicable harmonized European standards listed under the Radio Equipment Directive 2014 53 EU the EM...

Page 5: ...n gain maximal ou inf rieur approuv pour l metteur par Industrie Canada Dans le but de r duire les risques de brouillage radio lectrique l intention des autres utilisateurs il faut choisir le type d a...

Page 6: ...lue The camera is starting to synchronize or the device is updating Fast Flashing Blue The synchronization is complete Fast Flashing Red The synchronization failed Photoresistor Detects the environmen...

Page 7: ...rnet Flashing Blue Memory card is formatting or device starting synchronization with the camera Main Button Press to start synchronization with the camera The synchronization lasts 2 mins Power Button...

Page 8: ...the button as shown below to open battery cover Insert the battery Close the battery cover Use the execlusive charger to charge the battery Step 2 Power on the Base Station Wait until the LED indicat...

Page 9: ...ress the Main Button on the Base Station The circular LED indicator flashes Blue 2 Press and hold the Sync button on the camera for 6 seconds The LED indicator will slowly flash blue When flashing blu...

Page 10: ...EZVIZ Log in the EZVIZ App At the Home screen tap on the upper right corner to go to the scanning QR code interface Scan the QR Code on base station or manually enter the Serial Number to add base st...

Page 11: ...degree viewing angel Position your cameras to make sure the scene you want to video is in the cameras field of view Your camera motion sensor is far more sensitive to side to side movement across thei...

Page 12: ...Network Cable x1 Battery x1 Metal Plate x1 Base Station x1 Power Adaptor x2 Charge the Battery The battery is fully charged when it leaves the factory 1 Install the battery into the camera 2 Connect...

Reviews: