BEFORE BEGINNING,SEE THE ASSEMBLY INSTRUCTION VIDEO ON
EZTRUNK.NET
Vehicle Hard Top Lift Aid
Ver A_06/8/22
CUSTOMER SERVICE: [email protected]
Text & Call : 203-901-0055 / Call 203-591-9060
Page
4
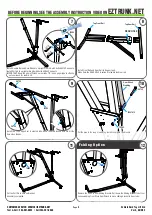
Install Front Rail and Rear Rail to Support part.
Make Sure the REAR HOLE location first and install rear rail.
8
Install the Top Support set to slanted tube. Keep the plate locked with Pin all the
time when stands.
9
Put the pipe in the loop of webbing. Install the pipe in the Bracket.
10
Install Handle Bar and Gear Winch to Upright Pillar #A with bolts #08702 and nuts.
Install Part #A to upright pillar #B with bolts # 08652 and nuts.
IMPORTANT: Keep the gear of Winch on low side. TIP: Use a paper tape to attach a
nut on wrench for lower bolt.
7
08702
#A
#B
08652
08702
19007415
Gear Winch
Webbing
08702
Top Front Rail
Top Rear Rail
REAR HOLE
10082
10082
18600
10082
28720
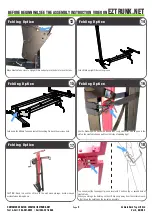
Put the Pull Pin in hole on Bracket.
Assembly completed.
11
F o l d i n g O p t i o n
Remove the Pull Pin from Sliding Bracket. Roll down the Sliding Bracket to bottom.
Loose webbing from Worn Gear Winch to move sliding bracket to base tube.
12


