


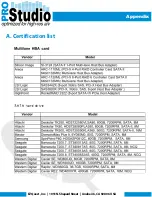

Chapter 4: System Installation
EZQuest, Inc. | 1051 N. Shepard Street | Anaheim, CA 92806 USA
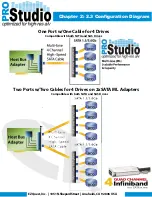
4.1.2 Connect Cables
Please see Figure 3.1.2 and Figure 3.2.2 as reference for cable connections.
Connect power cords.
(Both power cords need to be installed for redundant power supplies)
Connect External Multi-Lane cable to the host server.
4.2 Formatting and Partitioning the Pro Studio Series Multilane
Before the Pro Studio array can be fully utilized, it needs to be formatted. During this process, the array can also be
customized with partition. As you format the drive, you will have the opportunity to divide the hard drive into sections,
called partitions. A partition is a section of the hard drive’s capacity that is created to contain file and data.
4.2.1 Windows Users
After having followed the steps to install the Hard Drives, create an array by Multi-lane Host Bus Adapter and connect
the interface cable to the host computer, your Pro Studio must now be formatted and partitioned before it can be used.
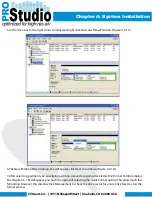
1. Right click My Computer and click Manage.
2. From the Computer Management window, select Disk Management.
3. If the Initialize and Convert Disk Wizard window appears, click Cancel.
4. Windows operation system will list all the hard drives that are installed on the system. Locate the Pro Studio drives
that are represented by the icon. Right click the icon and select Initialize.