EyeView SD-0400HL Quick Operation Manual Download Page 15

Quick Operation Guide of SD-0400HL, SD-0802HL, SD-1602HL    Series DVR 

14 

Table 3 Mouse Operation in Live View 

Name 

Description 

Menu


Enter the main menu of the system by right-clicking the mouse. 

Single Screen


Switch to the single full screen by choosing channel number from the dropdown list. 

Multi-screen


Adjust the screen layout by choosing from the dropdown list. 

Previous Screen


Switch to the previous screen. 

Next Screen


Switch to the next screen. 

Start/Stop 

Auto-switch


Enable/disable the auto-switch of the screens. 

Note: 

The 

dwell time

 of the live view configuration must be set before using 

Start 

Auto-switch

Start Recording 

Start all-day normal recording or motion detection recording for all channels. 

Quick Set 

Set the video output mode to Standard, Bright, Gentle or Vivid. 

All-day Playback


Play back the video of the selected channel. 

Aux Monitor


Switch to the auxiliary output mode and the operation for the main output is disabled.   

Note: 

If you enter Aux monitor mode and the Aux monitor is not connected, the mouse 

operation is disabled; you need to switch back to the Main output with the

 F1

 button on 

front panel or 

VOIP/MON

 button on IR remote control and then press the 

Enter

 button.

Note: 

If the corresponding camera supports intelligent function, the Reboot Intelligence option is included when 

right-clicking mouse on this camera. 

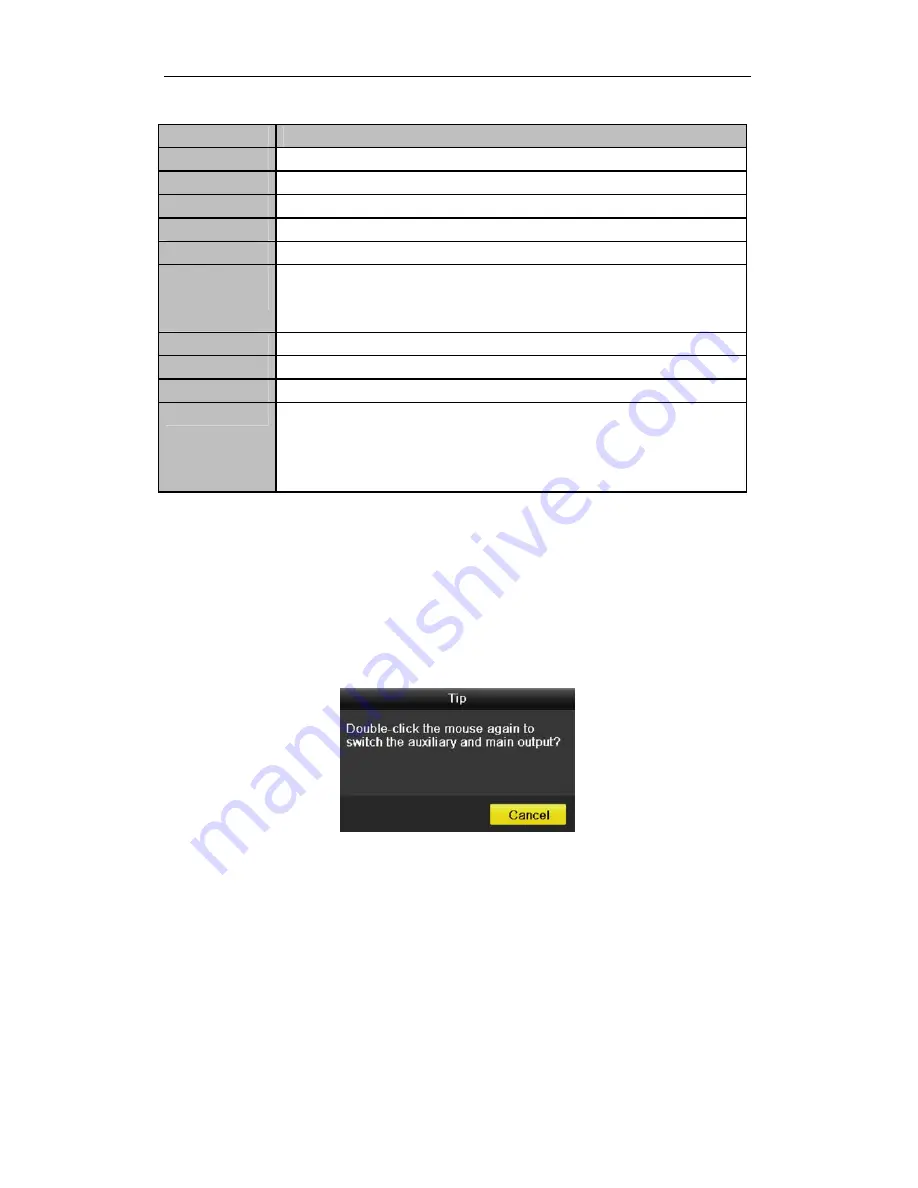
Main/Aux Output Switching     

When the HDMI/VGA output is configured as the main output, you can perform the following operation to switch 

to CVBS output as the main output.   

Steps: 

1.


Use the mouse wheel to double-click on the HDMI/VGA output screen, and the following message box pops 

up: 


2.


Use the mouse wheel to double-click on the screen again to switch to the Aux output, or click Cancel to 

cancel the operation. 

3.


Select the

 Menu Output Mode 

to 

Main CVBS

 from the right-click menu on the CVBS output screen.   

4.


On the pop-up message box, click 

Yes

 to restart the device to enable the CVBS output as the main output. 

Note: 

You can select the Menu Output Mode under Menu>Configuration>More Settings to Auto or HDMI/VGA 

and then restart the device to switch the main output back to HDMI/VGA output.   

PTZ Control   

Follow the procedure to set the parameters for PTZ. The configuring of the PTZ parameters should be done before 
you set the PTZ camera. 


Before you start, please check that the PTZ and the DVR are connected properly through RS-485 interface. 

In the Live View mode, you can press the PTZ Control button on the IR remote control, or choose the PTZ 

Summary of Contents for SD-0400HL

Page 1: ...960H WD1 Digital Video Recorder Quick Operation Guide...

Page 2: ...DVR 1 Use brackets for rack mounting 2 Ensure there is ample room for audio and video cables 3 When installing cables ensure that the bend radius of the cables are no less than five times than its dia...

Page 3: ...uide of SD 0400HL SD 0802HL SD 1602HL Series DVR 2 3 Connect the HDD to the motherboard of the DVR with the included data cable 4 Connect the power cable to the HDD 5 Re install the cover of the DVR a...

Page 4: ...l Buttons No Name Function Description 1 POWER POWER indicator turns green when DVR is powered up 2 STATUS STATUS indicator lights in red when data is being read from or written to HDD 3 Tx Rx Tx Rx i...

Page 5: ...e or USB flash memory devices 4 HDMI HDMI video output 5 VGA DB15 connector for VGA output Display local video output and menu 6 AUDIO IN RCA connector for audio input 7 AUDIO OUT RCA connector for au...

Page 6: ...ices e g pan tilt unit to the DVR Press and hold the orange part of the pluggable block insert signal cables into slots and release the orange part Ensure signal cables are in tight Note Make sure the...

Page 7: ...e rate 25 fps P 30 fps N Video bit rate 32 Kbps 3072 Kbps or user defined Max 3072 Kbps Audio output 1 ch RCA Linear 1 k Audio bit rate 64 Kbps Dual stream Support sub stream CIF QCIF Stream type Vide...

Page 8: ...t a fixed bit rate Bit Rate Storage Used 96K 42M 128K 56M 160K 70M 192K 84M 224K 98M 256K 112M 320K 140M 384K 168M 448K 196M 512K 225M 640K 281M 768K 337M 896K 393M 1024K 450M 1280K 562M 1536K 675M 17...

Page 9: ...me with the device s requirement and the ground connection is working properly Starting up the device Steps 1 Check the power supply is plugged into an electrical outlet It is HIGHLY recommended that...

Page 10: ...ault the Setup Wizard starts once the device has loaded Operating the Setup Wizard 1 Select the system resolution from the dropdown menu The default resolution is 1280 1024 60Hz Click Apply to save th...

Page 11: ...window 1 Enter the admin password By default the password is 12345 2 To change the admin password check the New Admin Password checkbox Enter the new password and confirm the password in the given fie...

Page 12: ...DHCP to automatically obtain an IP address and other network settings from that server Note The SD Series models provide one 10M 100M 1000Mbps self adaptive network interface 6 Click Next button to e...

Page 13: ...p Setup Wizard Live View Some icons are provided on screen in Live View mode to indicate different camera status These icons include Live View Icons In the live view mode there are icons at the right...

Page 14: ...Quick Operation Guide of SD 0400HL SD 0802HL SD 1602HL Series DVR 13 Using the Mouse in Live View In the live view mode use the mouse to right click on the window to access the following menu...

Page 15: ...IR remote control and then press the Enter button Note If the corresponding camera supports intelligent function the Reboot Intelligence option is included when right clicking mouse on this camera Ma...

Page 16: ...movement Light on off Wiper on off 3D Zoom Image Centralization Preset Patrol Pattern Menu Previous item Next item Start pattern patrol Stop the patrol or pattern movement Minimize windows Exit Recor...

Page 17: ...e Playback Play back the record files of a specific channel in the live view menu Instant playback by channel Choose a channel under live view using the mouse and click the button in the shortcut oper...

Page 18: ...w record files of the top left channel not masked will be played back 2 Playback management The toolbar in the bottom part of Playback interface can be used to control playing process The channel and...

Page 19: ...o various devices such as USB flash drives USB HDDs or a DVD writer To export recorded files 1 Click Menu Export to enter Video Export interface Choose the channel s you want to back up and click the...

Page 20: ...Quick Operation Guide of SD 0400HL SD 0802HL SD 1602HL Series DVR 19 3 Check backup result Choose the record file in Export interface and click the button to check it 0202031030416...

Reviews: