background image

37

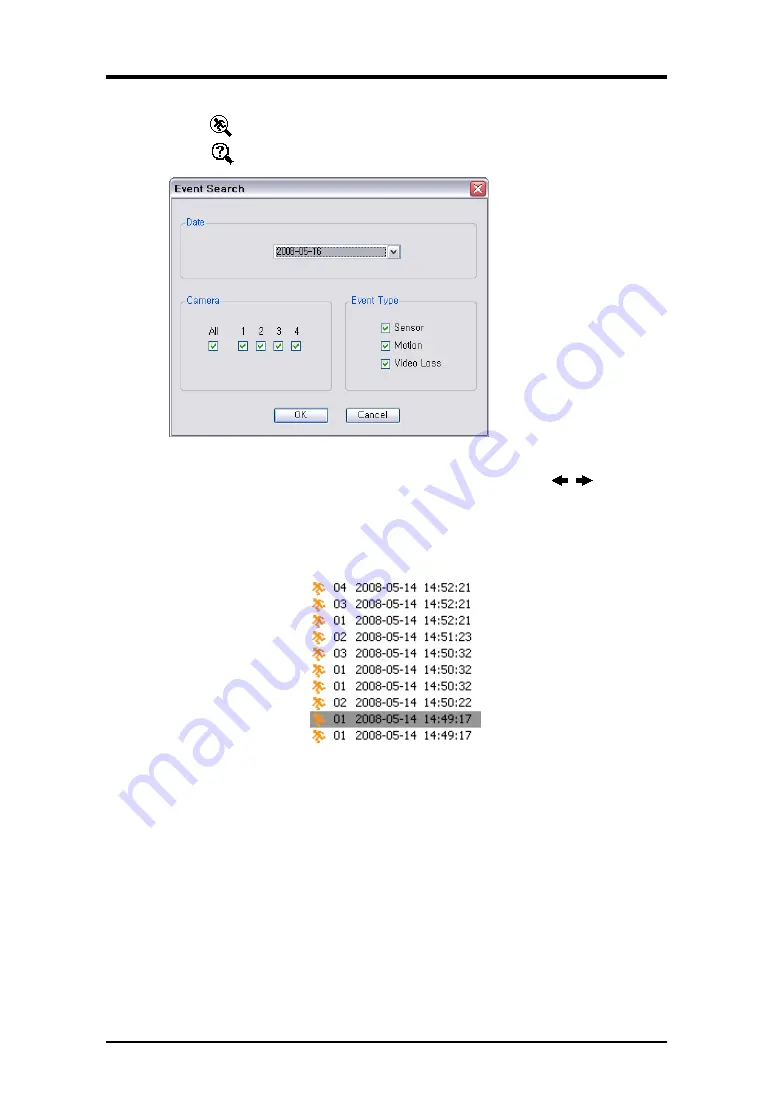
2-2. Event Search

-

Click          tap to display menu for 

Event

search

-

Click           to enter event query option.

Select an event from the list for playback. Search trough the list using                 buttons. 

Select the date of event search for from the Date list. Select All or specific camera numbers 
for related event search. Type of events can be selected from the list for detail and effective 
search.

Summary of Contents for DVST HSD804

Page 1: ......

Page 2: ...tion in this manual is prepared based on the current specifications for the product The manufacturer is currently adding new functions and will continue to upgrade the product with new technology All specifications may be changed without notice to individual users Cautions We strongly recommend that users read all safety cautions carefully before operating the product to operate the product approp...

Page 3: ...ower switch and remove the power cord from the power outlet Failure to do so may result in fire and electric shock Please use only the power cord supplied with the product Use of other power cords may result in fire and electric shock In case of smoke smell or noise immediately turn off the power switch and remove the power cord from the power outlet Continued operation of the product may result i...

Page 4: ...t may not work properly if the power source is unstable or and if electric shock occurs Make sure the correct rated power is available The product is designed to be proof against electric power failures however damage may occur as a result of power failure Current data may be damaged or data might not be recorded Make sure to use an Uninterruptible Power Supply UPS Since the product is designed to...

Page 5: ...9 Chapter 2 Using DVR 10 1 Basic Operation 10 1 1 Front Panel Remote Controller 10 1 2 Turning on the System 11 1 3 Menu Bar 11 1 4 Display Icons 11 1 5 User or Admin Login 11 1 6 The Main Menu 12 1 7 Contextual Menu 12 2 DVR Configuration 13 2 1 System 13 2 2 Device 17 2 3 Record 21 2 4 Display 24 2 5 Network 25 3 Playback 27 3 1 Display 27 3 2 Search Options 27 ...

Page 6: ...mote Software 31 1 Software CD 31 2 Start Installation 31 Chapter 5 Using Remote Software 33 1 Starting the Software 33 1 1 Site Set Up 33 1 2 Favorite Set Up 35 1 3 Play Backup Data 35 2 Remote Playback 36 2 1 Calendar Search 36 2 2 Event Search 37 3 Setup 38 3 1 Nemon Setup 38 3 2 Remote Setup 39 COMPLIANCE NOTICE OF FCC 40 ...

Page 7: ...D1 CIF Resolution Multi Operational System Display Recording Playback Networking Backup Dedicated DB System for Stability Offers Lower Bit Rates and Better Picture Quality Easy One Touch Backup Backup Upgrade Setup via USB and Network Superior Image Quality of H 264 in Low Bandwidth Interactive Setup for Easy Remote Control 4 Cameras In 1 Audio In Supports SATA HDD 3 Specification Video Signal For...

Page 8: ...USB HDD USB Flash Media APPROVALS FCC CEE MIC 4 Package Contents The following components are included in the product Wire Saddle HDD fastening screws Anti Shock pads Quick Guide Remote Controller CD User s Manual Network S W Power Cord DC Adaptor DVR Unit ...

Page 9: ...Connect a UTP CAT5 cable with an RJ 45 to the DVR connector Terminal Blocks RS 485 For control the PTZ cameras and external control keyboard Alarm Out This terminal blocks connect external alarms to the DVR Sensor In This terminal connects external sensors to the DVR Reset This reset switch will return all the settings to the original factory settings DC Power Jack DC12V 3 33A Wire Saddle Hole You...

Page 10: ... where exposed to rain and wind and water drop May cause fire electric shock and transformation Keep away from fire May cause fire Do not disassemble or remodel on your own May cause malfunction or electric shock Do not put next to flammable materials like flammable spray May cause fire Do not install it at a place with too much dirt May cause fire Do not install it on unstable places like shaking...

Page 11: ...s the Display Preset button to change display mode from Quad to Sequence or Sequence to Quad But the button can be also used to display menu to save PTZ preset under PTZ mode Display Camera no 1 Focus on far distance under PTZ mode Display Camera no 2 Focus on near distance under PTZ mode Display Camera no 3 Zoom In under PTZ mode Display Camera no 4 Zoom Out under PTZ mode Move forward by one fra...

Page 12: ...n when the HDD is set to be overwritten Turns on when the system is connected to the network Turns on when the Alarm is being activated 1 4 Display Icons Recording No Recording Event Recording Pre Event Recording Motion Detection Sensor Detection Sequence PTZ Camera 1 5 User or Admin Login Press MENU to enter main menu screen Login in screen appears to enter ID Admin or User and Password Password ...

Page 13: ... Note Please make sure the system log out is done when the system setting or operation completed to prevent any unauthorized changes of system settings or operations 1 7 Contextual Menu Additional Contextual Menu screen appears by clicking right button on the Mouse Display option allows changing Camera on the monitor Select All to display all cameras on the monitor For other menu options on Contex...

Page 14: ...evice is connected press Upgrade button to execute system upgrade Upgrade will take approximately 5 minutes DVR will reboot automatically when the upgrade is completed Note DO NOT remove USB Flash Memory or turn off the system during the upgrade Removing USB Flash Memory or Turning off the system during the upgrade may cause system malfunctioning Configuration System settings can be saved and load...

Page 15: ...stered time server Note NTP is not essential for DVR operation Any type of Standard Time Server can be used e g time windows com Time Synch might not be completed due to heavy traffic or delays from the Time Synch server 2 1 3 MENU SYSTEM Password In the Password Admin Password User Password and Auto Logout options can be selected Press Change and Password set up screen will appear to set or chang...

Page 16: ...ta S M A R T option allows checking the status of installed HDD Disk Status Shows the HDD s condition Temperature Show the HDD s current temperature Threshold Allow to set acceptable max HDD temperature Note If the HDD temperature exceeds the preset temperature under Threshold the system will activate an alarm to notify the change 2 1 5 MENU SYSTEM System Log In the System Log full list of system ...

Page 17: ... Select Camera number to be backup or All to backup all the data recorded during the selected period To back up recorded Audio with video data together select Audio Status shows capacity of the device being prepared for backup and it will show backup progress during backup Note The backup process could be slowdown if the system is being monitored playback on the remote using the client program dur...

Page 18: ... Title options can be selected USE Turn on or off connected cameras Covert If select Covert on no video images will be displayed on the monitor Title Name each Camera using virtual keyboard by pressing Note Even though it shows no video images on the monitor by selecting Covert on it still records the video images It only blocks the video images from being monitored by others ...

Page 19: ...iate Baud Rate from the list Press to drop down the list Speed Select PTZ speed from 1 to 10 using button Note Please refer to PTZ camera manual for appropriate setting values for PTZ settings PTZ control Select channel connected with PTZ camera Select PTZ from the contextual menu appears by clicking right mouse button Note PTZ can only be controlled in single screen mode Zoom Out Focus on near di...

Page 20: ...below option Use Turn Motion Detection On or Off Sensitivity Set system s sensitivity to motion View Display selected Motion Area on the monitor Area Define the area where motion to be detected Highlight and press Setup under area to set the area motion to be detected Motion setup screen will appear The blocks indicate the area is defined for motion detection Use mouse or Enter Channel 1 4 buttons...

Page 21: ...R has two alarm outs which can be associated with all or selected event types Set Alarm Duration time from 1 to 300 seconds using button Select event type to be synch with Alarm out The system has internal Buzzer can be synch with events Select event type to activate internal buzzer whenever the system detects events ...

Page 22: ...and continue recording when HDD is full Audio Record Select Audio Record option to record audio with video images Note Audio will be recorded but it will not be synched with specific channels Simplex Record Mode Selecting Simplex Record Mode will allow to perform full recording playback speed of 120ip 100ips but the system will stop recording during Playback Note To record data all the time even d...

Page 23: ...l recording options can be selected Day Various days can be selected for recording by Day Week MON to FRI Weekend SAT to SUN Holiday HOL and All From To Set desired recording time using button Time can be selected from 00 00 to 24 00 Mode Select recording mode by Time Event Time Event T E and No Record i Time Continuous Record Mode ii Event Record only when there is an event as preset iii Time Eve...

Page 24: ...buttons Note There are some Holidays fall on different days Therefore they have to be updated every year 2 3 3 MENU RECORD Event In the Event various event options of Pre Event Event REC Duration and Camera associations can be selected Pre Event sec Video Images occurred right before an Event can be recorded by setting Pre Event under Event Mode Duration Pre Event recording can be set using Pre Ev...

Page 25: ...ormat Select preferred Time Display Format from the list using button Language Select preferred Language from the list using button Status Bar If you mark Auto Hide the status bar disappears in 10 seconds while the system is not in use 2 4 2 MENU DISPLAY Monitor In the Monitor Sequence Duration sec and color control options can be selected Sequence Duration sec Set interval time for the camera seq...

Page 26: ...opriate port number for external access to the system Note Default TCP port is 10101 but it can be set from 8000 to 12000 if it is necessary Note Router or similar devices users need to open additional TCP ports for network connection Example 1 if system port is set as 10101 following ports need to be opened by 10101 10102 1 and 10103 2 in router Example 2 if system port is set as 8000 following p...

Page 27: ...w dyndns org offers free registrations or trial for DDNS service www dyndns org is recommended if other DDNS is not available Site Name Name the DVR or site where DVR is located using the virtual keyboard by pressing ID Password ID and Password are required for Authentication using the virtual keyboard by pressing Note Use ID Password registered in DDNS ...

Page 28: ...keep the status bar disappear from the screen If do not want to hear recorded audio select Mute Audio 3 2 Search Options Please select most convenient search options from the contextual menu 3 2 1 Go to Time Select Go to Time to search recorded data by time date Set time date using button Go to Beginning and End options are selectable to search the very first and last data recorded Once desired se...

Page 29: ...tion of recorded data on the selected date Move the indicator line to select specific recorded time of the selected date Once desired settings are completed press OK to begin search 3 2 3 Event Search Event Search provides easy search by event list recorded Select the date and type of event to find specific data All System displays every events Motion System displays every events related to Motion...

Page 30: ...tep Backward Go to the previous image Pause Freeze or Stop current image Step Forward Go to the next image Play Play the data at normal speed To control the backward and forward playback speed press on or repeatedly Playback speed can increase up to x32 ...

Page 31: ...res Remote monitoring for individual or multiple locations Remote system set up Remote search on registered locations 3 System Requirements Operating System Microsoft Windows XP Window Vista CPU Intel Pentium IV 1 0GHz or higher or other CPUs have similar performance RAM 512MB or higher VGA AGP Video RAM 64MB or higher 1024x768 16bpp or higher DirectX 7 or higher ETC Microsoft NET 2 0 or higher ...

Page 32: ...rt Installation 2 1 Double click on NemonSetup exe file to start installation procedure 2 2 When the following dialog box appears click Next 2 3 After selecting program folder and desired option click Next Everyone Allow all PC users to get access to Nemon software Just me Allow only private PC user access to Nemon sotfware ...

Page 33: ...32 2 4 When the following dialog box appears click Next 2 5 Click Close to complete installation procedure ...

Page 34: ...ve click the image to enter the live mode Playback click the image to enter the playback mode Display Mode select display modes single screen 2x2 3x3 4x4 and full screen Connect Disconnect click button for site setup and connect Setup click button for remote software setup Close click the image to close the software Click button to display registered remote locations or add new locations ...

Page 35: ...lly when start the software User Select the type of user from the list Admin allows full access to all the software functions User only allows limited access to the system monitoring only Password Enter the password of DVR Layout Select desired display layout for the site when it is connected Note Layout can be changed after begin connected using the display option on the menu Click OK to save inf...

Page 36: ...nd description Up to 16 different cameras or sites can be grouped and displayed together Select sites and cameras from the drop down list by clicking button Note sites should be registered under Site menu before setting the favorite 1 3 Play Backup Data Backed up data from the local site can be played on the remote site Select the location where the data is saved Select the file and click Connect ...

Page 37: ...ed in bold letter Select the date and use time table to select specific time Click play button to start playback Playback Control Button Rewind Reverse Play Beginning Step Backward Stop Step Forward End Play Fast Forward Go To Time Click on icon to display time search window Enter specific time to search the data Click on icon refresh and update the calendar info ...

Page 38: ...uery option Select an event from the list for playback Search trough the list using buttons Select the date of event search for from the Date list Select All or specific camera numbers for related event search Type of events can be selected from the list for detail and effective search ...

Page 39: ...of remote software Default Set default settings of remote software Click on display tap to enter remote display setup menu Use Alpha Blending Enables alpha blending effect to S W UI Note There are some graphic cards do not support such functions In this case unselect the option as it might result in abnormal system operation Language Select language option for the remote software Date Time Format ...

Page 40: ... connection multi sites please click camera or site on the monitoring screen and click button Note The remote software provides interactive setup system that allows easy local DVR settings from remote sites It gets exactly same menu and options as the local system Therefore please refer to 2 DVR Configuration and following chapters for the detail information ...

Page 41: ...CLASS OF DIGITAL APPARATUS MEETS ALL REQUIREMENTS OF THE CANADIAN INTERFERENCE CAUSING EQUIPMENT REGULATIONS WEEE Waste Electrical Electronic Equipment Correct Disposal of This Product Applicable in the European Union and other European countries with separate collection systems This marking shown on the product or its literature indicates that it should not be disposed with other household wastes...

Reviews: