Extron electronics TSC 100 User Manual Download Page 8

TSC 100 • Installation and Operation

TSC 100 • Installation and Operation

Installation and Operation, cont’d

2-5

2-4

Software for RS-232 or RS-422 control is included with the TSC
100.  See chapter 3, Serial Control for details.

6

Buffered loopout composite BNC connector


Connect one BNC female connector for buffered
composite loopout.

7

Buffered loopout S-video 4-pin mini-DIN connector
— 

Connect one 4-pin mini DIN connector for buffered

S-video loopout.

8

Output 4-pin S-video mini DIN connector

 — One

4-pin mini DIN connector for S-video output.

Cabling the TSC 100

Use high resolution cable for all video input and output
connections.  Refer to the Appendix.

To cable the TSC 100, connect the input and output devices to
the device using figure 3 as a guide.

NT

S

C VCR

PAL VCR

U

s

er 

s

elect

s


b

etween 

S

-video

or compo

s

ite inp

u

t

s


a

nd

b

etween NT

S

a

nd PAL

o

u

tp

u

t

s

s

elect

ab

le from

the front p

a

nel. Compo

s

ite

inp

u

t i

s


s

hown.

Extron
T

S

C 100

NT

S

C Monitor

B

u

ffered

Loop-O

u

t

R

S

-2

3

2/422

COMPO

S

ITE

COMPO

S

ITE

S

-VIDEO 

S

-VIDEO 

PO

WER

I

N
P
U
T

S

O
U
T
P
U
T

S

12V
1A MAX

Figure 3 — Example application

Operation

Connect power cords and turn on the display output devices
(projectors, monitors, VCRs), interface, and input devices (DSS,
cable box, DVD).  The system is ready for operation.

Select an input from the front panel button or the remote control
(RS-232).  The image should now appear on screen.  If not,
ensure that all devices are plugged in and receiving power.
Check the cabling and button settings, and make adjustments as
needed.  Select a different input to check for a picture.

If problems persist, see Troubleshooting in this chapter.  If the

troubleshooting tips do not help, call the Extron S

3

 Sales &

Technical Support Hotline.

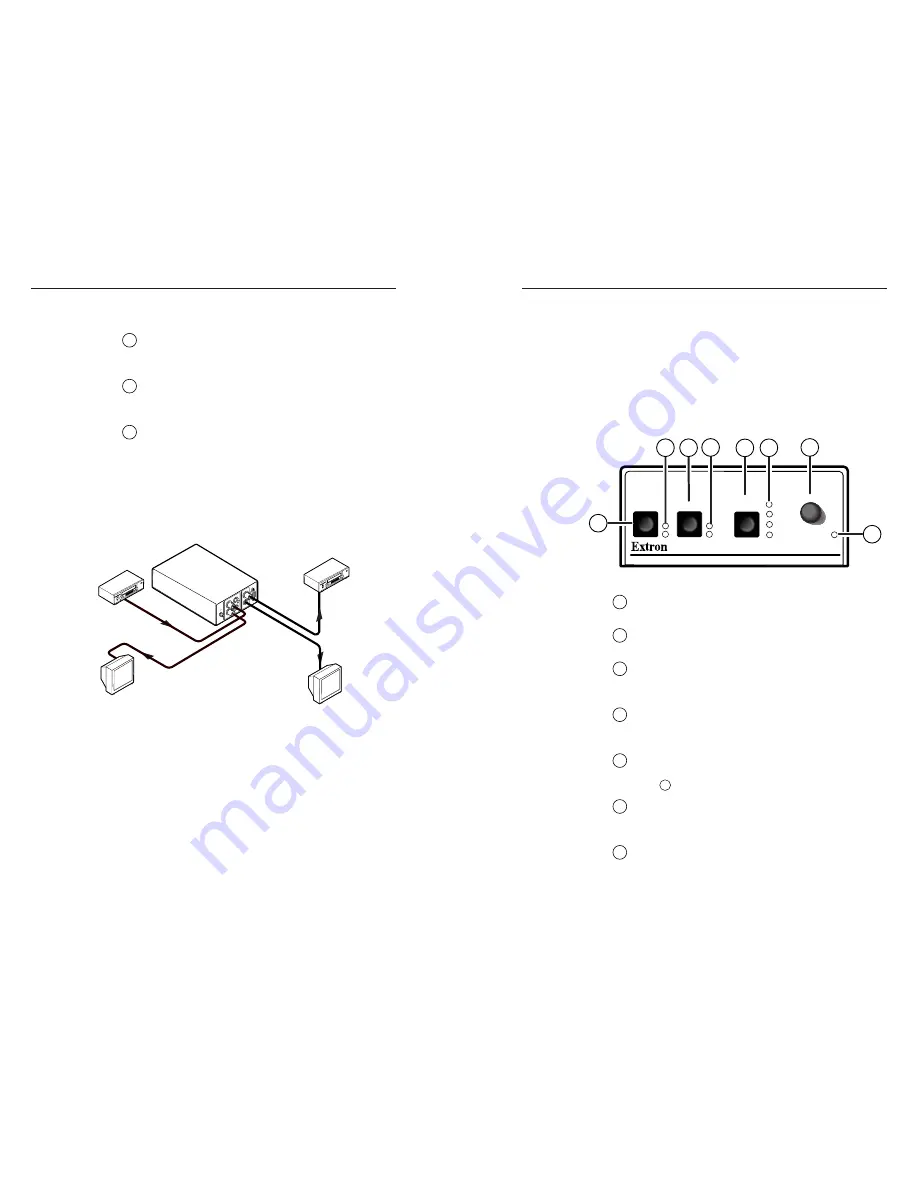
Front panel controls and indicators

The TSC 100’s controls and indicators are located on the front
panel (figure 4).  Push buttons are used to select the input
source, output standard, and picture controls (Color, Tint,
Bright, and Contrast), and LEDs indicate the options selected.
An Adjust knob is provided to make adjustments to the picture
control element selected.

T

S

C 100

TRAN

S

CODING 

S

TANDARD

S

 CONVERTER

1

2

NT

S

C

COLOR

TINT

BRIGHT

CONTRA

S

T

PAL

MAX

MIN/

ADJU

S

T

INPUT

OUTPUT

PICTURE

CONTROL

S

1

2

8

3

4

5

6

7

Figure 4 — TSC 100 front panel

1

Input selector button

 — Press this button to select

between input 1 (composite) and input 2 (S-video).

2

Input selection indicator LEDs

 — A green LED lights

to indicate which input is selected.

3

Output selector button —

 Press this button to select

between NTSC or PAL output on the composite or
S-video output connectors.

4

Output selection indicator LEDs —

 A yellow LED

lights to indicate which standard output (NTSC or
PAL) is selected.

5

Picture Controls button

 — Press this button to select

the element of the picture to be adjusted by the Adjust
knob 

7

 (either Color, Tint, Bright, or Contrast).

6

Picture Controls selection indicator LEDs

  A yellow

LED lights to indicate the element of the picture
selected for adjustment.

7

Adjust knob — 

 Rotate this knob to adjust the element

of the picture selected by the Picture Controls button
and indicated by the Picture Controls selection
indicator LED.

Summary of Contents for TSC 100

Page 1: ...33 453 4050 Extron Electronics Asia 135 Joo Seng Road 04 01 PM Industrial Building Singapore 368363 65 6383 4400 Fax 65 6383 4664 Extron Electronics Japan Daisan DMJ Building 6F 3 9 1 Kudan Minami Ch...

Page 2: ...artung Alle Wartungsma nahmen sollten nur von qualifiziertem Servicepersonal durchgef hrt werden Die internen Komponenten des Ger tes sind wartungsfrei Zur Vermeidung eines elektrischen Schocks versuc...

Page 3: ...E COMPOSITE S VIDEO S VIDEO 1 2 POWER I N P U T S O U T P U T S 9V 1A MAX Power Connection Composite Video Input S Video Input Composite Video Output Composite Video Loopout S Video Loopout S Video Ou...

Page 4: ...heir respective owners QS 2 Step 6 Select an input and an output standard using the front panel buttons or the RS 232 controller Step 7 The picture should now appear If not ensure that all devices are...

Page 5: ...ii TSC 100 Table of Contents Table of Contents cont d TSC 100 1 Chapter One Introduction About the TSC 100 Features...

Page 6: ...deo when active RS 232 RS 422 activated Factory aspect ratio presets Three predetermined sizing and centering settings for PAL and NTSC output are stored in the TSC 100 and are selectable through RS 2...

Page 7: ...lso be rack mounted To rack mount the TSC 100 follow the installation instructions below For optional rack mounting mount the TSC 100 on a standard 19 1U Rack Shelf Extron part 60 190 01 figure 1 in o...

Page 8: ...and button settings and make adjustments as needed Select a different input to check for a picture If problems persist see Troubleshooting in this chapter If the troubleshooting tips do not help call...

Page 9: ...receiving power The TSC s front panel LEDs light if the device is receiving power and an active sync signal 3 Check the cabling and grounding and make adjustments as needed 2 7 NTSC PAL PAL PAL NTSC...

Page 10: ...TSC 100 Installation and Operation Installation and Operation cont d TSC 100 3 Chapter Three Serial Control Programmer s Guide for Serial Communication Control Software for Windows 2 8...

Page 11: ...en a local event such as an input selection occurs the TSC 100 responds by sending a message to the host No response is required from the host The device initiated message is shown below underlined C...

Page 12: ...put standard X6 Rte X6 Set the video output standard to X6 Example 1 1 Video output type is 1 NTSC View video type X6 Output video type is X6 Color Specific value X7 C Col X7 Select color value X7 0 1...

Page 13: ...value Horizontal size Specific value X2 Hsz X2 Sets horizontal size to X2 0 255 Increase size Hsz X2 Widen the picture Decrease size Hsz X2 Make the picture narrower View Hsz X2 View the horizontal si...

Page 14: ...1 Center Horizontally Preset 2 Scale Down Vertically Preset 3 Scale Up Horizontally NTSC NTSC NTSC Command ASCII Command Response Additional description host to TSC 100 TSC 100 to host Miscellaneous...

Page 15: ...rol software will look for the interface at that port and read its configuration The control program window shown below will appear and display current settings Figure 8 Control program window Using t...

Page 16: ...lbs 2 kg Vibration ISTA 1A in carton International Safe Transit Association Listings UL CUL Compliances CE FCC Class A VCCI AS NZS ICES MTBF 30 000 hours Warranty 3 years parts and labor All nominal l...

Page 17: ...ries Accessories Part number Through desk mounting bracket kit 70 077 02 19 1U Universal Rack Shelf 60 190 01 Cables Cables Part number S video cable up to 100 various lengths 26 316 xx Superflex SHR...

Reviews: