User’s Guide
Compact Full Range Surface Mount Speakers
68-1261-01
Rev. A
11 07
SI 3 System INTEGRATOR
™
Page 1: ...User s Guide Compact Full Range Surface Mount Speakers 68 1261 01 Rev A 11 07 SI 3 System INTEGRATOR...
Page 2: ...SI 3 speaker packaging details Pa rt No XX X XX X 01 Install 206W Ceiling Speaker 33 XX XX 01 RE V Thick Single Wall Packing Bottom Foam Speakers each plastic wrapped Hex Tool plastic wrapped Top Foam...
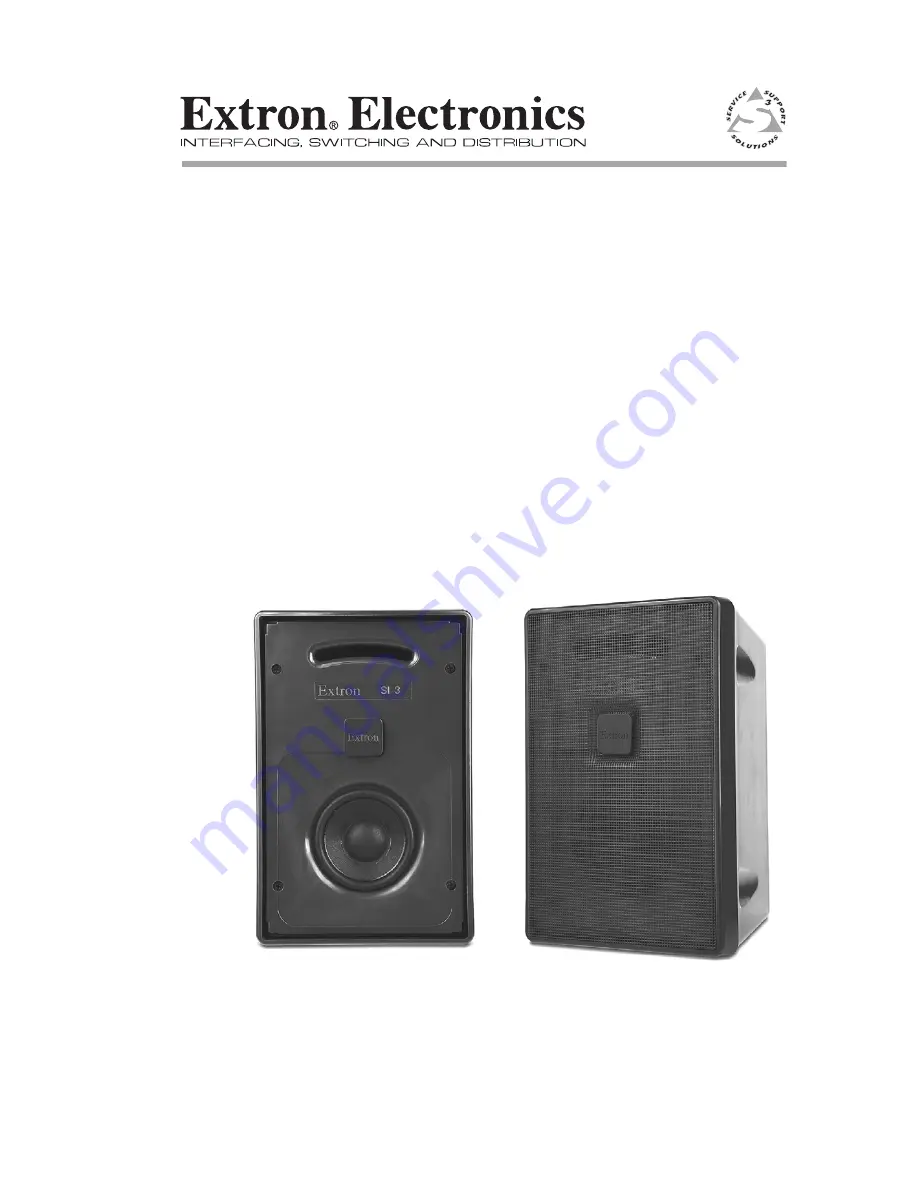
Page 3: ...ominal impedance 16 watts continuous pink noise 32 watts continuous program Internal driver overload protection circuit Figure 2 SI 3 speakers with front grille removed N Refer to packaging informatio...
Page 4: ...with paper cone d Grill and enclosure may be painted to match environment e Weather resistant construction f Push down spring terminals g Wall mount assembly with unique V Lock system included h Back...
Page 5: ...VE L MO NO AU DIO AU DIO LIN EO UT AU X MIX AD JU ST 42 dB TO 2 4d B L R L R L R 1 2 3 INPU TS OU TP UT S VIDE O H V B G R Y 1 2 3 INPU TS MO NITO R OU T 4 5 6 C RIGH T LE FT AM PL IFI ED OU TP UT R E...
Page 6: ...section approximately 90 degrees to the rear mounting plate as shown in figure 5 and tighten the hex cap screw to lock the front section in position This makes the next steps easier to perform Fasten...
Page 7: ...is to remain hidden behind the wall follow the stud to where the small access hole has been cut and feed about two feet of wire out through the hole into the room If necessary bend the wire behind th...
Page 8: ...e hex cap screw clockwise to tighten it 9 Repeat steps 1 through 8 for the second assembly mount Preparing the speaker for mounting 1 If the back covers were installed previously remove them by carefu...
Page 9: ...e wall mount assembly and gently slide the speaker box bracket down into the V Lock groove see figure 10 until it locks into place Lift the speaker up to the wall mount assembly V Lock Groove Box Brac...
Page 10: ...terminals at the back of the speaker and insert the wires Release the springs to secure INPUT Extron Extron Positive Wire Negative Wire Figure 11 Inserting wiring into the terminals 3 Turn on the aud...
Page 11: ...p screw until it is no longer possible to lift the speaker from the wall mount assembly 6 Replace the Extron logo pressing it firmly into place N The Extron logo can be fitted either horizontally or v...
Page 12: ...ews Replace the logo Troubleshooting Tips If you have problems with your speaker refer to the table on page 11 for the possible problem cause and remedial action If you do not see your problem listed...
Page 13: ...s are adequately high Replace suspect devices with known working devices Retry the system 3 Output poor or intermittent Damaged cables or faulty connection Check cables and connections Reconnect or re...
Page 14: ...0 to 70 C 10 to 90 noncondensing Operating 32 to 122 F 0 to 50 C 10 to 90 noncondensing Mounting Wall mountable with included V lock brackets N V lock brackets can be angled up to 20 upward 35 downwar...
Page 15: ...is Limited Warranty does not apply if the fault has been caused by misuse improper handling care electrical or mechanical abuse abnormal operating conditions or non Extron authorized modification to t...
Page 16: ...Europe Beeldschermweg 6C 3821 AH Amersfoort The Netherlands 800 3987 6673 31 33 453 4040 FAX 31 33 453 4050 Extron Electronics Asia 135 Joo Seng Rd 04 01 PM Industrial Bldg Singapore 368363 800 7339...