


1
MLC Plus 84 D • Setup Guide
The Extron MLC Plus 84 D MediaLink
®
Controller with IP Link
®
Pro integrates Ethernet
connection into AV systems to allow users to remotely control, monitor, and troubleshoot AV
equipment, including display devices and switchers. The controller includes an embedded
Web server and support for Power over Ethernet (PoE). It also includes
ports for bidirectional serial control, IR output, relays, digital input, and
volume control.
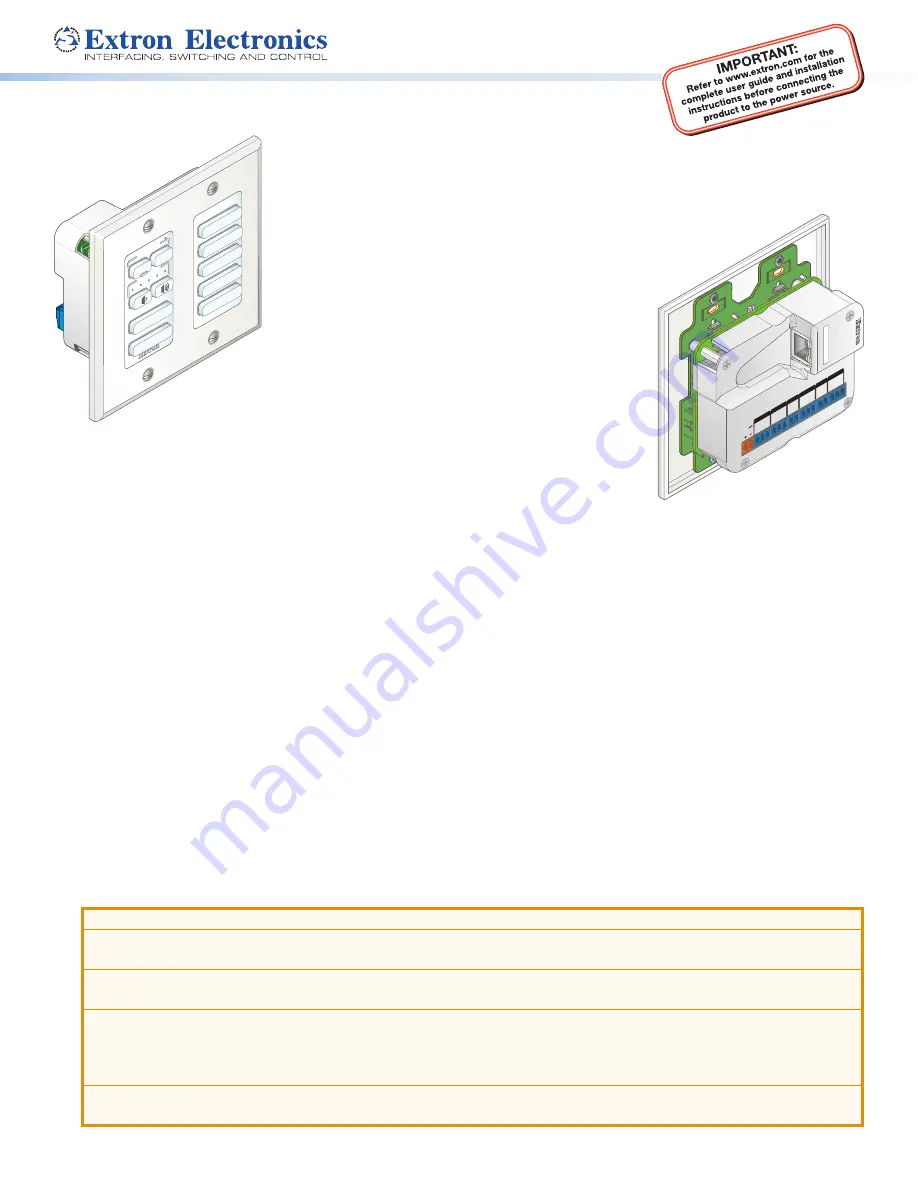
The MLC Plus 84 D fits a standard US two-gang electrical
junction box or mud ring. It includes a two-gang
Decora
®
-style wallplate and a two-gang mud ring.
This guide provides instructions for an experienced
installer to install an MLC Plus 84 Series controller and
to create a basic configuration. Configure the
controller using Extron Global Configurator (GC)
software running in Global Configurator Professional
(GC Professional) or Global Configurator Plus (GC Plus)
mode. The MLC integrates with Extron GlobalViewer
®
Enterprise (GVE) software and the GlobalViewer
Web-based AV resource management for remote control
applications. Global Configurator and other useful software
applications are available at
Installation
Step 1: Get Ready
Use the following check list to prepare for the installation.
Download and install the latest version of the following:
•
Global Configurator software
— for setting up and configuring the controller. GC includes the
Toolbelt
feature and a
way to upgrade the firmware of the controller. You must have an Extron Insider account and contact an Extron support
representative to obtain GC software (see
Locating Software, Firmware, and Driver Files on the Extron Website
page 10).
•
IP Link Pro device drivers
— for use with GC, to make control of other devices possible.
All are avail able from
Locating Software, Firmware, and Driver Files on the Extron Website
Obtain network information for the unit from the network administrator. You will need the following details for each IP Link Pro
device:
DHCP setting (on or off)
Subnet mask
User name
Device (MLC Plus 84) IP address
Gateway IP address
Passwords
Write down the MAC address of each IP Link Pro device (such as the MLC Plus 84) to be used.
Obtain model names and setup information for devices the MLC Plus 84 will control.
Step 2: Prepare the Installation Site
ATTENTION:
•
Installation and service must be performed by authorized personnel only.
•
L’installation et l’entretien doivent être effectués par le personnel autorisé uniquement.
•
Extron recommends installing the MLC Plus 84 into a grounded, UL Listed electrical junction box.
•
Extron recommande d’installer le MLC Plus 84 dans un boîtier d’encastrement électrique mis à la terre, listé UL.
•
If the controller will be installed into fine furniture, it is best to hire a licenced, bonded craftsperson to cut the access
hole and perform the physical installation so the surface will not be damaged.
•
S’il est prévu d’installer le contrôleur dans du beau mobilier, il est préférable de faire appel à un artisan autorisé et
qualifié pour couper le trou d’accès et réaliser l’installation de telle façon que la surface ne soit pas endommagée.
•
Follow all national and local building and electrical codes that apply to the installation site.
•
Respectez tous les codes électriques et du bâtiment, nationaux et locaux, qui s’appliquent au site de l’installation.
Figure 1.
MLC Plus 84 D
Front Panel
Figure 2.
MLC Plus 84 D
Rear Panel
LAPTO
P
DOC
CAM
PC
DV
D
AU
X V
IDE
O
VG
A
HD
MI
DOC
CA
M
LAP
TO
P
PC
DIS
PL
AY
VO
LUM
E
AUTO
IMA
GE
AV
MUTE
OF
F
ON
LAN/PoE
MA
C:
00-05-A6-XX-XX-XX
S/N:
####### E######
00-05-A6-XX-XX-X
X
Tx
Rx
G
Tx
Rx
G
1
2
C
G
C
V
G
S
PO
WE
R
12V
0.4A
MA
X
COM
1
CO
M 2
VOL
IR
G
IN
D IN
RE
LA
YS


