background image

1

IMPO

RTAN

T:

IMPO

RTAN

T:

Go to www

.extron.com f

or the complete 

user guide

, installation instructions,

 and 

specifications bef

ore connecting the 

product to the po

wer sour

ce.

ISS 608 • Setup Guide

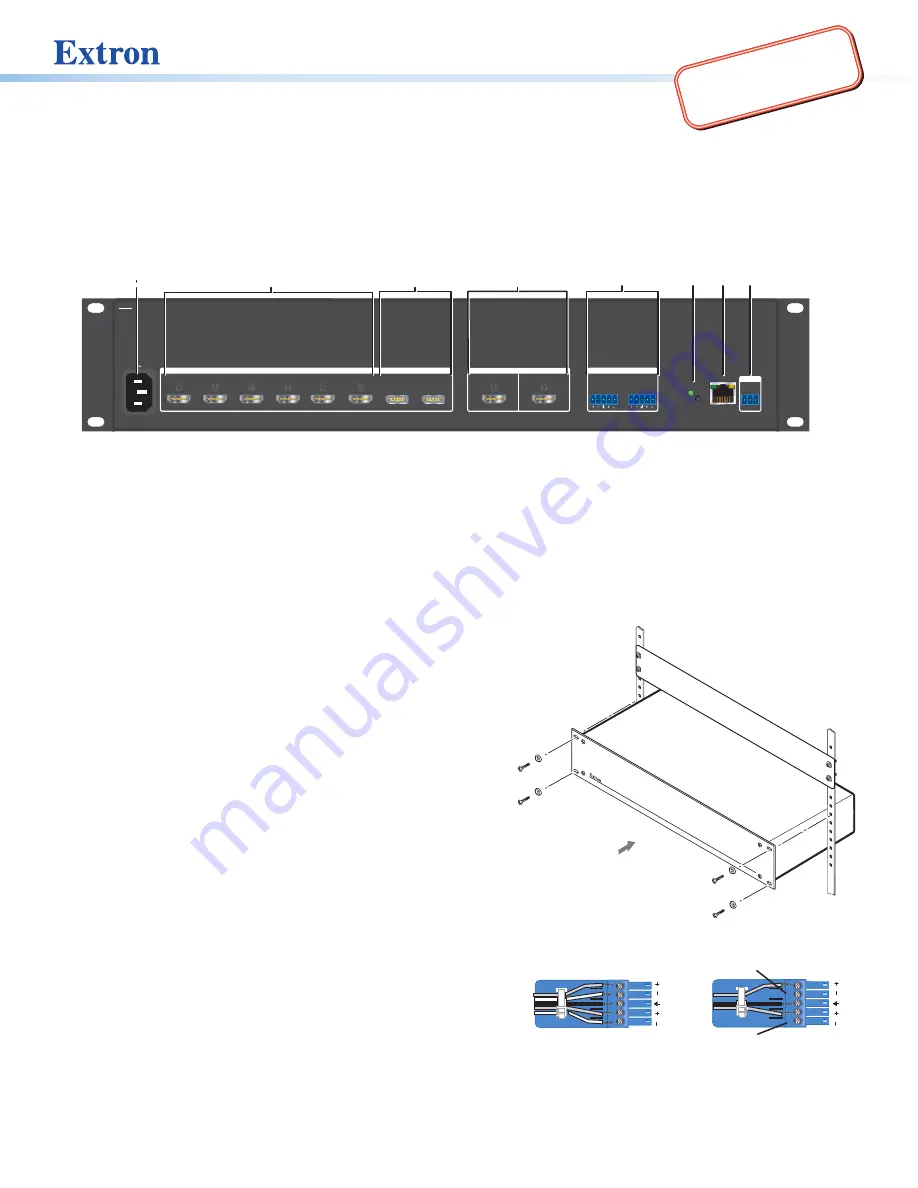
This guide provides quick start instructions for an experienced installer to set up and operate the Extron ISS 608 Integration 
Seamless Switcher, a seamless, scaling, video and audio switcher. The ISS 608 features six HDMI inputs, two DisplayPort inputs, 
and two HDMI outputs. The inputs and outputs are HDCP 2.2 compliant and support resolutions up to 4096x2160 at 60 Hz.

Installation and Cabling Features

RESET

100-240V       --A MAX

50-60 Hz

HDMI

1

HDMI

2

HDMI

3

HDMI

4

HDMI

1A

HDMI

DISPLAYPORT

6

7

DISPLAYPORT

8

HDMI

2A

INPUTS

ISS 608

OUTPUTS

PREVIEW

PROGRAM

AUDIO

REMOTE

HDMI

5

PREVIEW

L

R

PROGRAM

L

R

LAN

Tx Rx

RS-232

G

F

F

A

A

G

G

H

H

D

D

C

C

B

B

E

E

Figure 1. 

ISS 608 Rear Panel

A


AC power connector

E


Analog


audio output connectors

B


HDMI input connectors

F


Reset button and LED

C


DisplayPort input connectors

G


LAN connector

D


HDMI output connectors

H


Remote RS-232 connector

Connections

Step 1 — Mounting

Turn off or disconnect all equipment power sources.

• 

For tabletop use, affix the rubber feet and remove the brackets.

• 

For optional rack mounting, mount in a rack via the attached 
brackets (see figure 2).

Step 2 — Video inputs

• 

HDMI input connectors 1 through 6

 — Connect HDMI video to 

these inputs (see figure 1, 

B

).

• 

DisplayPort input connectors 7 and 8

 — Connect DisplayPort 

video to these inputs (

C

).

Step 3 — Video outputs

HDMI output connectors

 — Connect displays to the Program and 

Preview HDMI output connectors (

D

).

Figure 2. 

Mounting Diagram

Step 4 — Audio outputs

Connect balanced or unbalanced stereo audio or mono audio 
devices to the program and preview 5-pole captive screw 
output connectors (

E

) (see figure 3 for wiring).

Balanced Audio Output

Tip

Ring

Tip

Ring

Sleeves

Unbalanced Audio Output

Tip

No Ground Here

No Ground Here

Tip

Sleeves

LR

LR

Do not tin the wires

Balanced Stereo Input

Tip

Sleeves

Ring

Ring

Tip

LR

Unbalanced Stereo Input

Tip

Sleeve

Sleeve

Tip

LR

3/16” Max
(5mm)

Figure 3. 

Audio Wiring Configuration


Summary of Contents for ISS 608

Page 1: ...et button and LED C DisplayPort input connectors G LAN connector D HDMI output connectors H Remote RS 232 connector Connections Step 1 Mounting Turn off or disconnect all equipment power sources For tabletop use affix the rubber feet and remove the brackets For optional rack mounting mount in a rack via the attached brackets see figure 2 Step 2 Video inputs HDMI input connectors 1 through 6 Connec...

Page 2: ...CD screen reverts to its default display cycle alternating between three displays two showing the selected program and preview inputs and their rates and the third showing the selected output rate 2 sec 2 sec Default Display Cycle Extron ISS 608 60 1684 01 FW Ver 1 00 Prog 01 HDMI 1080p 60Hz 720p 60 Hz Prev 08 DP Output Rate 1080p 60Hz Power on Extron Electronics 2 sec Front Panel Operations ISS 6...

Page 3: ...on to recall the selected preset VIDEO KEY Video on the preview bus can be keyed to appear over the existing video on the program bus using an RGB key a luminosity level key or a transparency effect To configure 1 Select the VIDEO KEY button to go to the Video Key Effect submenu 2 Rotate the ADJUST knobs to select the key effect Available options are Transparency RGB or Level 3 Select the NEXT but...

Page 4: ...isplayed on the program output If no logo preset is on the preview output the logo on the program output is removed NOTE The LOGO button lights solid if there is a logo on preview output but not on program output The LOGO button blinks if there is a logo on program output whether there is a logo on preview output or not Recall Layout Presets Layout presets are used to preconfigure a presentation p...

Page 5: ...utX InX Vid Tie input X to output X Vid Tie input to output audio only X X OutX InX Aud Tie input X to output X Aud KEY X Input number 1 8 two digit response with 0 padding X Output number 1 Preview 2 Program Take effect select Set Take effect EO1 X1 2 SWEF SwefO1 X1 Sets the Take effect to X1 View setting EO1SWEF X1 View current setting Default 0 KEY X1 Take video effect 0 Cut 1 Dissolve 2 Wipe 3...

Page 6: ... front panel lockout 2 Exe Mode 2 Partial front panel lockout Menu and Next buttons disabled 3 Exe Mode 3 Program lockout all changes to Program are locked out LAN IP Configuration and Setup Set DHCP mode EX1 DH Idh X1 Set IP address EX9 CI Ipi X9 Default 192 168 254 254 Set subnet mask EX9 CS Ips X9 Default 255 255 0 0 Set gateway IP address EX9 CG Ipg X9 Default 0 0 0 0 Set DNS server IP address...

Reviews: