background image

IRL 20 • Quick Start Guide

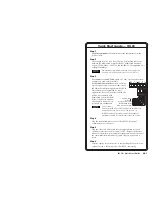
Step 1

Turn the equipment off

 and disconnect the equipment from the

power source.

Step 2

Cut a length (150'/45 m or less) of Extron Comm-Link cable to go
between the MediaLink Controller (MLC), MediaLink Switcher,
System 5 IP Switcher, or AVT 100 and the IRL 20.  See appendix A for
cable part numbers.

The maximum total distance between an Extron device
(switcher, controller) and the IRL 20 is 150’ (45.7 m).

Step 3

For switchers or an AVT 100

, attach a 3.5 mm, 5-pole captive screw

connector to each end of the cable.

For MediaLink controllers

, attach a 3.5 mm,

5-pole captive screw connector to the end of
the cable that will be plugged into the IRL 20.

Only three wires are required for most
applications, but use four wires if the IRL 20
will be daisy chained with
MediaLink Control Modules.
Refer to the device’s manual
and chapter 2 for details on
ports and pin assignments.

Do not connect
more than one IRL 20 or IR Link (either in parallel or in
series) to an Extron device.  Also, read the user’s or
installation manual for each product to determine the
maximum quantity of control modules that can be used.

Step 4

Plug the terminated cable to one of the IRL 20’s rear panel
communications connectors.

Step 5

Plug the other end of the cable into the appropriate port of the
switcher, controller, control module, or AVT.  Refer to the device’s
manual for details on ports and pin assignments.  Wire both ends of
the cable identically (ground to ground, signal to signal, and so
forth).

Step 6

Attach a captive screw connector to another length of Comm-Link
cable as in step 3, then plug it into the IRL 20’s remaining

Quick Start Guide — IRL 20

QS-1

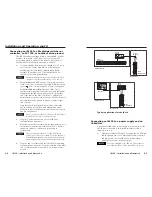
+12V

GND

CM

ModIR

SCP

+12

V

G

ND

C

M

ModIR

SCP

+12 VDC power

Modulated IR output

Control module signal

SCP control pad signal

Ground (  )

Summary of Contents for IRL 20

Page 1: ...therlands 31 33 453 4040 Fax 31 33 453 4050 Extron Electronics Asia 135 Joo Seng Road 04 01 PM Industrial Building Singapore 368363 65 6383 4400 Fax 65 6383 4664 Extron Electronics Japan Kyodo Building 16 Ichibancho Chiyoda ku Tokyo 102 0082 Japan 81 3 3511 7655 Fax 81 3 3511 7656 www extron com 2004 Extron Electronics All rights reserved IR Repeater 68 1036 01 Rev A 12 04 IRL 20 ...

Page 2: ...stellt werden können Wartung Alle Wartungsmaßnahmen sollten nur von qualifiziertem Servicepersonal durchgeführt werden Die internen Komponenten des Gerätes sind wartungsfrei Zur Vermeidung eines elektrischen Schocks versuchen Sie in keinem Fall dieses Gerät selbst öffnen da beim Entfernen der Abdeckungen die Gefahr eines elektrischen Schlags und oder andere Gefahren bestehen Schlitze und Öffnungen...

Page 3: ...Control Modules Refer to the device s manual and chapter 2 for details on ports and pin assignments Do not connect more than one IRL 20 or IR Link either in parallel or in series to an Extron device Also read the user s or installation manual for each product to determine the maximum quantity of control modules that can be used Step 4 Plug the terminated cable to one of the IRL 20 s rear panel com...

Page 4: ...tem connect the devices to a power source turn them on aim an IR remote control at the IRL 20 and check for the appropriate response at the remotely controlled Extron device Step 8 If needed disconnect all the devices from the power source s and correct any cabling errors Step 9 Restore power to the equipment 100 240V 1 3A 50 60Hz _ LEFT RIGHT _ 2 1 C C 4 3 C 6 5 C Tx Rx G G S G S G S G S G G Ps V...

Page 5: ...IRL 20 Table of Contents Table of Contents cont d IRL 20 1 Chapter One Introduction About the IRL 20 Features ii ...

Page 6: ...ht in a rack or furniture Features Compactness and flexibility The IRL 20 s small enclosure can be secured to any surface without having to cut any holes in furniture or walls This allows for a wide range of mounting locations 1 2 CM IR SCP 12VDC GND CM Mod IR SCP CM IR SCP 12VDC GND CM Mod IR SCP IR RCV R IRL 20 GND Signal 5VDC 100 240 V 1 3A 50 6 0Hz _ LEF T RIG HT _ 2 1 C C 4 3 C 6 5 C Tx Rx G ...

Page 7: ... left or the right half of this connector Wire both ends of the cable identically ground pin to ground pin modulated IR to modulated IR etc Plug the other end of the cable into the appropriate connector on an Extron MediaLink Controller MLC MediaLink Switcher System 5 IP Switcher or AVT 100 IRL 20 Front 40 40 30 feet max Extron IR Remote IR SNSR GND SIG 5V 5 VDC Demodulated IR Ground 12V GND CM Mo...

Page 8: ...ther end of the cable into the appropriate port of the switcher controller control module or AVT Refer to the device s manual for details on ports and pin assignments Do not connect more than one 1 IRL 20 either in parallel or in series to a switcher Also read the user s or installation manual for each product to determine the maximum quantity of control modules that can be used 5 Plug one end of ...

Page 9: ...or three emitters can be wired to the same connector if needed You can use one 5 pole connector to connect both the power input and the IR Emitter IR output It is not necessary to use two connectors 3 Place the head of the IR Emitter near or in front of the IR pickup device of the IR controllable Extron product 12V GND CM ModIR SCP 12V GND CM ModIR SCP IR SNSR IRL 20 GND SIG 5V IRL 20 Rear Externa...

Page 10: ...e and violet shielded single strands for signals 22 AWG drain wire 24 AWG Specifications Control remote IR repeater IR controller module Extron IR remote controls only IR output carrier frequency 38 kHz Use the IRL 20 with Extron products only General External power supply 12 VDC regulated from an Extron MediaLink Controller MediaLink Switcher System 5 IP AVT 100 or an external power supply Power ...

Page 11: ...IRL 20 Specifications Part Numbers and Accessories Specifications Part Numbers Accessories cont d A 4 ...

Reviews: