background image

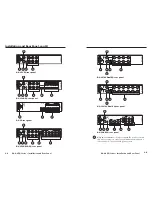
DA AV EQ Series • Installation and Rear Panel

DA AV EQ Series • Installation and Rear Panel

Installation and Rear Panel, cont’d

9

Audio input (RCA) 

— Connect an unbalanced audio input

source to these female RCA connectors.  (See the diagram
below.)

Tip (+)

S

leeve (   )

RCA plug diagram

10

Audio outputs 


Connect speakers to these 5-pole captive

screw connectors.  Wire the captive screw connectors for stereo
output as shown in the following diagram.

For unbalanced audio, connect both sleeves
to the center contact ground. DO NOT connect
the sleeves to the negative (-) contacts.

CAUTION

Tip

Ring

Tip

Ring

LR

Sleeves

Unbalanced Output

Tip

Sleeves

Tip

LR

NO GROUND HERE

NO GROUND HERE

Balanced Output

Do not tin the wires!

Wiring the captive screw audio output connectors

11

Audio outputs (RCA) 


Connect speakers to these RCA

connectors.  (See the plug diagram under 

i

, above.)

12

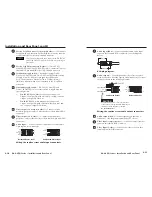
Video input (composite video) 

— Connect a composite video

source to this female BNC connector.

1

3

Video input (S-video) 

— Connect an S-video source to this

female 4-pin mini DIN connector.

2-11

2-10

2

Passive Loop-Thru connector (composite video)

 — (All models

except DA 6A and the three S-video models) Connect a monitor
to this female BNC video loop-through connector.

This connector functions as an input on the DA 12V/6V
and 8V/4V Dual EQ models when they are operating in
Dual mode.

3

Passive Loop-Thru connector (S-video)

 — (DA 6SV EQ,

DA 6SVA EQ, and DA 6SVA RCA EQ only) Connect a monitor to
this female 4-pin mini DIN video loop-through connector.

4

Termination toggle switch

 — (All models except DA 6A,

DA 12V/6V Dual EQ, and DA 8V/4V Dual EQ) Set this switch
to High Z (up) if a monitor is plugged into the passive
Loop-Thru connector.  Set the switch to 75 Ohm (down) to
simulate a monitor when none is attached to the Loop-Thru
connector.

5

Dual mode toggle switch

 — (DA 12V/6V Dual EQ and

DA 8V/4V Dual EQ only) Use this switch to toggle between
operating modes.

DA 12V/6V EQ:

 Switches between operating as one

1-input, 12-output DA with active loop-out (up), and two
1-input, 6-output DAs (down).

DA 8V/4V EQ: 

Switches between operating as one

1-input, 8-output DA with active loop-through (up), and
two 1-input, 4-output DAs (down).

6

Video outputs 1-6 (composite video) 

— Connect output

monitors, projectors, and/or other devices to these female BNC
connectors.

7

Video outputs 1-6 (S-video) 

— Connect output monitors,

projectors, and/or other devices to these female 4-pin mini DIN
connectors.

8

Audio input 

—  Connect an audio input source to this female

5-pin captive screw connector.

Unbalanced Stereo Input

Balanced Stereo Input

Tip

Sleeve

Sleeve

Tip

LR

LR

Tip

Ring

Sleeves

Tip

Ring

Wiring the captive screw audio input connectors

Summary of Contents for DA 12V/6V Dual EQ

Page 1: ...53 4040 FAX 31 33 453 4050 Extron Electronics Asia 135 Joo Seng Rd 04 01 PM Industrial Bldg Singapore 368363 800 7339 8766 65 6383 4400 FAX 65 6383 4664 Extron Electronics Japan Kyodo Building 16 Ichibancho Chiyoda ku Tokyo 102 0082 Japan 81 3 3511 7655 FAX 81 3 3511 7656 www extron com DA 6A DA 8V 4V Dual EQ DA 12V 6V Dual EQ DA 3AV RCA 68 977 01 Rev B 09 07 Audio Video Distribution Amplifiers DA...

Page 2: ...etrieb gesetzt werden Stromunterbrechung Um das Gerät auf sichere Weise vom Netz zu trennen sollten Sie alle Netzkabel aus der Rückseite des Gerätes aus der externen Stomversorgung falls dies möglich ist oder aus der Wandsteckdose ziehen Schutz des Netzkabels Netzkabel sollten stets so verlegt werden daß sie nicht im Weg liegen und niemand darauf treten kann oder Objekte darauf oder unmittelbar da...

Page 3: ...nditions 1 this device may not cause harmful interference and 2 this device must accept any interference received including interference that may cause undesired operation The Class A limits are designed to provide reasonable protection against harmful interference when the equipment is operated in a commercial environment This equipment generates uses and can radiate radio frequency energy and if...

Page 4: ...Step 3 Wire the audio captive screw connectors For the models with captive screw connectors for audio input and output follow the illustrations below to wire them Unbalanced Stereo Input Balanced Stereo Input Tip Sleeve Sleeve Tip L R L R Tip Ring Sleeves Tip Ring Wiring the captive screw audio input connectors For unbalanced audio connect both sleeves to the center contact ground DO NOT connect t...
Page 5: ...ed to 4 pin mini DIN connectors Composite video devices are connected to BNC connectors Audio devices are connected to captive screw or RCA connectors Step 5 Adjust the potentiometers pots for the output cable lengths if necessary If using very short output cables make sure that the potentiometers are in the unity gain position that is with the arrow on each pot pointing to the dot beside or above...

Page 6: ...DA AV EQ Series Table of Contents Table of Contents cont d DA AV EQ Series 1 Chapter One Introduction About this Manual About the DA AV EQ Series ii This page was intentionally left blank ...

Page 7: ...o distribution amplifiers and discusses how to install and operate them The terms DA amplifier and distribution amplifier are used interchangeably to refer to any of the models in the DA AV EQ series About the DA AV EQ Series The Extron DA AV EQ Series products are high performance composite video or S video distribution amplifiers with audio Models with audio only and video only are also availabl...

Page 8: ...LO OP TH RU IN PU T IN PU T OU TP UT S OU TP UT S DA 6A V EQ L R L R 1 2 L R L R L R 3 4 L R L R 5 6 Sound Systems Projector DVD Monitor Loop through DA 6AV EQ Audio Video Distribution Amplifier Plasma Displays VCR 6 Cables 1000 Cables 800 Cables 100 Cables Example of devices connected to a DA 6AV EQ 100 240 V 0 2A 50 6 0 Hz R 1 2 3 3 2 1 L 75 Oh m HIG H Z LO OP TH RU IN PU T INPU T OU TP UT S OU ...

Page 9: ...0 x 3 16 Screws Mounting a DA AV EQ on a 6 deep rack shelf Mounting the DA AV EQ Series The DA AV EQ distribution amplifiers can be set on a table mounted on a rack shelf or mounted through or under a desk podium or tabletop The following optional mounting kits are available for the DA AV EQ Series RSB 126 1U 6 deep basic rack shelf part 60 604 10 RSU 126 1U 6 deep universal rack shelf kit part 60...

Page 10: ...ations The holes should be drilled from the underside or inside concealed side of the furniture where the amplifier will be located 7 Insert 8 wood screws into the four pilot holes Tighten each screw into the mounting surface until slightly less than 1 4 of the screw head protrudes 8 Align the mounting screws with the slots in the brackets and place the unit against the surface with the screws thr...

Page 11: ...ough desk mounting Mount the DA AV EQ through a desk or table using the optional through desk mounting kit part 70 077 02 Through desk mounting the DA AV EQ 1 Mark the opening through which the unit will be mounted approximately 1 8 by 8 9 4 6 cm by 22 6 cm 2 Cut out the material from the installation area with a jigsaw 3 Drill pilot holes 1 4 6 4 mm deep and 3 32 2 mm in diameter in the desk or t...

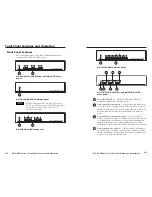
Page 12: ...3AV RCA 1 2 4 6 9 11 12 DA 3AV RCA rear panel 1 AC power connector Plug a standard IEC power cord into this male connector to connect the distribution amplifier to a 100 to 240 VAC 50 Hz or 60 Hz power source 2 8 DA 6SV EQ OUTPUTS INPUT LOOP THRU HIGH Z 75 Ohm 5 3 1 6 4 2 50 60 Hz 100 240V 0 2A 1 7 13 4 3 DA 6SV EQ rear panel DA 6SVA EQ OUTPUTS INPUT LOOP THRU HIGH Z 75 Ohm 5 3 1 6 4 2 50 60 Hz 10...

Page 13: ...or functions as an input on the DA 12V 6V and 8V 4V Dual EQ models when they are operating in Dual mode 3 Passive Loop Thru connector S video DA 6SV EQ DA 6SVA EQ and DA 6SVA RCA EQ only Connect a monitor to this female 4 pin mini DIN video loop through connector 4 Termination toggle switch All models except DA 6A DA 12V 6V Dual EQ and DA 8V 4V Dual EQ Set this switch to High Z up if a monitor is ...

Page 14: ...ies only to models with captive screw audio connectors On the internal board each audio output has a set of jumpers one left and one right By placing these jumpers on the appropriate pins on the board you can set the gain for each channel to 6 dB 0 dB 6 dB or unity depending on whether the output is wired for balanced or unbalanced audio To set the gain for an output channel using the internal jum...

Page 15: ...able shows the resulting gain levels for each possible jumper position and balanced unbalanced wiring combination Balanced 0 dB 6 dB Unbalanced 6 dB 0 dB Output Wiring Balanced Jumper on right and middle pin Unbalanced Jumper on left and middle pin Jumper Position For example if you wire output 1 as an unbalanced audio and you place the jumpers for both channels on the left and middle pins the gai...

Page 16: ...ne set for each pair of outputs Use an Extron Tweeker or a small Phillips screwdriver to rotate these potentiometers labeled with Y above it to adjust the luminance gain and equalization EQ when devices with long cables are connected 4 Gain potentiometer chroma SV EQ and SVA EQ models one for each pair of outputs Use an Extron Tweeker or a small Phillips screwdriver to rotate this potentiometer la...

Page 17: ...he output cable lengths Gain and EQ are adjusted from the front panel of all DA AV EQ series products except the DA 6A and DA 3AV RCA On S video models you can adjust luma Y gain and equalization and chroma C gain On composite video models you can adjust Gain and EQ Adjustments are made for each pair of outputs Gain and EQ potentiometers pots on the front panels enable you to make gain and equaliz...

Page 18: ...e from the display and connect it to the oscilloscope with 75 ohm termination 3 Adjust the composite video or Y Gain pot to achieve 0 7 Vp p for the white bar of the test pattern For the S video models adjust the C gain pot to achieve 0 3 Vp p of color burst level 4 Adjust the EQ pot until no overshooting or round corners appear on the test pattern 5 Repeat steps 1 through 4 for all other output p...

Page 19: ...Vp p Impedance 75 ohms Return loss 30 dB 5 MHz Sync Standards NTSC 3 58 NTSC 4 43 PAL SECAM Specifications Video Gain all models except DA 6A and DA 3AV RCA Video and Y 1 dB to 3 dB x 0 9 to x 1 4 adjustable per every 2 outputs C chroma 0 dB to 10 dB x 1 to x 3 adjustable for DA 6SV EQ DA 6SVA EQ and DA 6SVA RCA EQ Equalization all models except DA 6A and DA 3AV RCA 0 dB to 6 dB x 1 to x 2 at 5 MH...

Page 20: ...r 60 604 10 RSB 126 Also furniture mountable with an optional Under Desk Mounting Kit 70 077 01 or Through Desk Mounting Kit 70 077 02 Enclosure type Metal A 4 Audio Gain Unity when internal jumpers are set to match output wiring See table below for other conditions Balanced 0 dB 6 dB Unbalanced 6 dB 0 dB Output Wiring Balanced Jumper on right and middle pin Unbalanced Jumper on left and middle pi...

Page 21: ...190 10 Kit RSB 126 1U 6 Deep Basic Rack Shelf 60 604 10 MBU 125 Under desk Mount Kit 70 077 01 MBU 129 Through desk Mount Kit 70 077 02 A 6 Models Enclosure dimensions 1 7 H x 8 7 W x 6 0 D 1U high half rack wide 4 3 cm H x 22 1 cm W x 15 2 cm D Depth excludes connectors Cooling Convection unvented Product weight 2 lbs 0 9 kg Shipping weight 4 lbs 2 kg Vibration ISTA 1A in carton International Saf...

Page 22: ... SVM M Male to Male 4 pin 26 316 xx Mini DIN S Video Cables S video models only MHR 2P SVM M Male to Male 4 pin 26 522 xx Mini DIN S Video cables plenum S video models only RG6 BNC Series BNC Male to Male Single 26 383 xx Conductor SHR cables CSR 6 Captive Screw to RCA Female 26 575 01 Audio Adapter audio models only RCA Male to Male Stereo Audio cable IN87xx audio models only ...

Reviews: