background image

Operation, cont’d

CrossPoint 42 HVA Matrix Switcher • Operation

3-4

4.

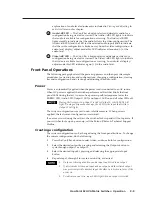
If audio and video are tied to different inputs (audio breakaway), and if
you select video and audio for display, the LED for the selected video input
lights steadily and the LED for the selected audio input blinks.

5.

If an output with no tie is selected, only that output’s LED lights.

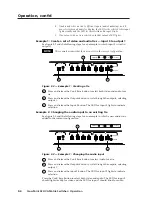
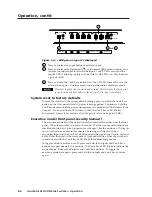
Example 1:  Create a set of video and audio ties — input 3 to output 1

See figure 3-2 and the following steps for an example in which input 3 is tied to
output 1.

This example assumes that there are no ties in the current configuration.

Figure 3-2 — Example 1:  Creating a tie

A

Press and release the Conf/Save button to select both video and audio for a
tie.

B

Press and release the Outputs button to cycle through the outputs, selecting
output 1.

C

Press and release the Input 3 button. The LED for input 3 lights to indicate
selection.

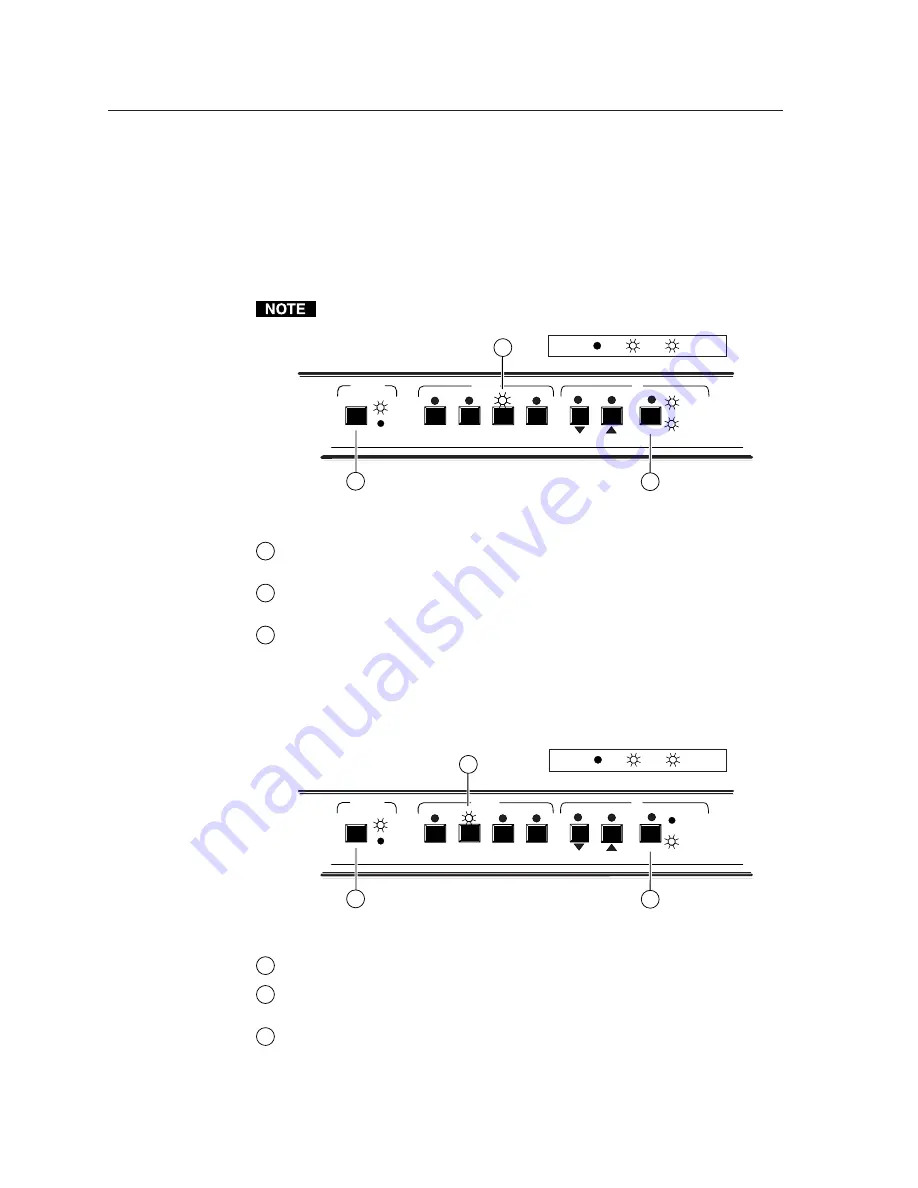
Example 2:  Changing the audio input to an existing tie

See figure 3-3 and the following steps for an example in which a new audio tie is
added to the current configuration.

Figure 3-3 — Example 1:  Changing the audio input

A

Press and release the Conf/Save button to select Audio for a tie.

B

Press and release the Outputs button to cycle through the outputs, selecting
output 1.

C

Press and release the input 2 button. The LED for input 2 lights to indicate
selection.

Press the Conf/Save button to select both video and audio. The LED for input 3
should light steadily for video and the LED for input 2 should blink for audio.

CONF/SAVE

4

3

2

1

I/O

INPUTS

OUTPUTS

1

2

A

C

B

LED key:       = off,          = on,          = blinking,

B

AUDIO/-dB

VIDEO/+dB

CONF/SAVE

4

3

2

1

I/O

INPUTS

OUTPUTS

1

2

A

B

C

B

LED key:       = off,          = on,          = blinking,

AUDIO/-dB

VIDEO/+dB

Summary of Contents for CrossPoint 42 HVA

Page 1: ...CrossPoint 42 HVA CrossPoint Matrix Switcher 68 654 01 Rev A Printed in the USA 08 02 ...

Page 2: ...rksam machen daß im Inneren des Gehäuses dieses Produktes gefährliche Spannungen die nicht isoliert sind und die einen elektrischen Schock verursachen können herrschen Achtung Lesen der Anleitungen Bevor Sie das Gerät zum ersten Mal verwenden sollten Sie alle Sicherheits und Bedienungsanleitungen genau durchlesen und verstehen Aufbewahren der Anleitungen Die Hinweise zur elektrischen Sicherheit de...

Page 3: ...800 ohms Step 6 Cable stereo output Cable the switcher for stereo audio output Each output has a 3 5 mm 5 pole captive screw connector that outputs the selected unamplified line level audio Connect an audio device such as an audio amplifier or powered speakers 6 Step 7 Power up Plug the switcher input devices and output devices into a grounded AC source and turn on the input and output devices Ste...

Page 4: ...es changes when you change the configuration I O LED indicates the current configuration mode It is steady when setting up a video and or audio tie and it blinks in audio level display adjust mode Video dB and Audio dB LEDs indicate when video or audio is selected The Audio LED blinks to indicate audio breakaway The Audio button also selects the audio level adjust mode The Video dB LED indicates a...

Page 5: ...efinitions 3 2 Input buttons output buttons and LEDs 3 2 I O Control buttons and LEDs 3 2 Front Panel Operations 3 3 Power 3 3 Creating a configuration 3 3 Viewing the current configuration 3 5 Viewing and adjusting the audio level 3 5 System reset to factory defaults 3 6 Executive mode front panel security lockout 3 6 Rear Panel Controls 3 7 Chapter 4 Programmer s Guide 4 1 Host to Switcher Instr...

Page 6: ...ations A 2 Part Numbers A 4 CrossPoint part numbers A 4 Optional accessories A 4 Cables A 4 Appendix B Reference Information B 1 Hardware Upgrade and Maintenance B 2 Opening the switcher B 2 Closing the switcher B 2 Installing a firmware update B 2 Replacing the AC fuse B 4 All trademarks mentioned in this manual are the properties of their respective owners ...

Page 7: ...CrossPoint 42 HVA Matrix Switcher 1 Chapter One Introduction About the CrossPoint 42 Matrix Switcher Features ...

Page 8: ...ith virtually no crosstalk or signal noise between channels The CrossPoint 42 HVA is housed in rack mountable 1U high 19 wide metal enclosure The appropriate rack mounting kit is included with the switcher The switcher has an internal 100VAC to 240VAC 50 60 Hz 40 watt auto switchable power supply that provides worldwide power compatibility Figure 1 1 A typical CrossPoint 42 HVA Matrix Switcher app...

Page 9: ... control Windows based control program Extron s Windows based control program provides a versatile range of operational options with its graphical interface and drag and drop point and click operation The Windows based control program also has an emulation mode that lets you create a switcher configuration file at the home office and then download it for use by the switcher on site Extron s Simple...

Page 10: ...anel and any combination of MCP 1000 slave control panels and or MKP 1000 slave control keypads The remote control devices are easy to use and provide tactile buttons for quick selection Each MCP 1000 can be used for one touch switching for a particular output and selecting global presets Each MKP 1000 dedicated to an output can be used to select a different input for that output or to select a pr...

Page 11: ...CrossPoint 42 HVA Matrix Switcher 2 Chapter Two Installation Mounting the Switcher Cabling and Rear Panel Views ...

Page 12: ...re 2 1 2 Hold the switcher with the attached brackets against the underside of the table or other furniture or against the wall Mark the location of the screw holes of the bracket on the mounting surface 3 Drill 3 32 2 mm diameter pilot holes 1 4 6 4 mm deep in the mounting surface at the marked screw locations 4 Insert 8 wood screws into the four pilot holes Tighten each screw into the mounting s...

Page 13: ...output devices do not have BNC video output connectors For these cases a suitable cable or connector adapter is necessary between the device output connector and the BNC input connector of the CrossPoint 2 RGBHV video inputs Connect RGBHV video inputs to these BNC connectors for each input 3 RGBHV video outputs Connect RGBHV video outputs to these BNC connectors for each output The CrossPoint 42 H...

Page 14: ...anced mono Unbalanced stereo Tip signal Sleeve Gnd Figure 2 4 Phono audio connectors The audio level for each input can be individually set via the front panel or RS 232 to ensure that the level on the output does not vary when switching from input to input See chapter 3 Operation chapter 4 Programmer s Guide and chapter 5 Matrix Software for details 5 Connections for audio outputs These 3 5 mm 5 ...

Page 15: ...00 remote control panel master unit to the switcher s RS 232 connector You can also attach an MKP 1000 remote keypad or MCP 1000 slave unit to the MCP 1000 master unit Refer to the MCP 1000 Remote Control Panel User s Manual and the MKP 1000 User s Manual for details See chapter 4 Programmer s Guide for definitions of the SIS commands and chapter 5 Matrix Software for details on how to install and...

Page 16: ...Installation cont d CrossPoint 42 HVA Matrix Switcher Installation 2 6 ...

Page 17: ...CrossPoint 42 HVA Matrix Switcher 3 Chapter Three Operation Front Panel Controls and Indicators Front Panel Operations Rear Panel Controls 42 ...

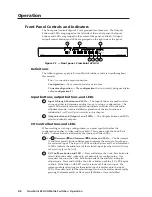
Page 18: ...apter 2 Outputs button and Outputs 1 and 2 LEDs The Outputs button and LEDs select and identify outputs I O Control buttons and LEDs When creating or viewing a configuration you must specify whether the configuration applies to video audio or both This is done with the Conf Save button Current mode is indicated by the Audio and Video LEDs 3 and 4 Decrement and Increment buttons and LEDs The Decrem...

Page 19: ...AC source When AC power is applied the switcher performs a self test that blinks the front panel LEDs during the test An error free power up self test sequence leaves the RGBHV LED Audio LED Output 1 LED and Input 1 LED on and all other LEDs off During the first power up Input 1 is tied to Output 1 so both LEDs will light During subsequent power ups the LED for the input that is tied to Output 1 w...

Page 20: ...n to cycle through the outputs selecting output 1 C Press and release the Input 3 button The LED for input 3 lights to indicate selection Example 2 Changing the audio input to an existing tie See figure 3 3 and the following steps for an example in which a new audio tie is added to the current configuration Figure 3 3 Example 1 Changing the audio input A Press and release the Conf Save button to s...

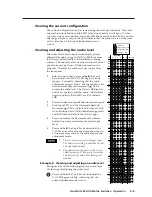
Page 21: ... Audio dB displays negative polarity Both LEDs are lit to indicate 0dB 2 Press and release an input button to select an input 3 Each Input LED and the Decrement and Increment LEDs indicate 0dB when off 1dB when blinking slowly 2dB when blinking quickly and 3dB when lit Refer to the chart at right 4 Press and release the Decrement or Increment button to increase or decrease the audio input level 5 ...

Page 22: ... 1 Video and Audio LEDs turn on then the Conf Save LED blinks System reset clears all ties and sets all audio gain levels to unity gain 0dB Executive mode front panel security lockout The executive mode limits the operation of the CrossPoint switcher from the front panel When the switcher is in executive mode all of the front panel functions are disabled and the ties can be viewed but not changed ...

Page 23: ...orizontal or combined sync and a second set for vertical sync Figure 3 5 Sync termination switches Each switch provides the option of selecting either 510 ohms or 75 ohms The 75 ohms position is required only for an input with non TTL sync greater than 5V p p The normal default position is 510 ohms An input that produces an out of sync display a display that is rolling vertically and or tearing ho...

Page 24: ...Operation cont d CrossPoint 42 HVA Matrix Switcher Operation 3 8 ...

Page 25: ...CrossPoint 42 HVA Matrix Switcher 4 Chapter Four Programmer s Guide Host to Switcher Instructions Switcher Initiated Messages Using the Command Response Table ...

Page 26: ...port SIS commands consist of one or more characters per command field They do not require any special characters to begin or end the command character sequence Each switcher response to an SIS command ends with a carriage return and a line feed CR LF which signals the end of the response character string A string is one or more characters Switcher Initiated Messages When a local event such as a fr...

Page 27: ...present variables in the command response fields Symbol definitions are provided on the next page and an ASCII to Hexadecimal HEX conversion table is provided below Command and response examples are shown throughout the table Command Response Table Symbol Definitions Carriage return line feed Carriage return no line feed Esc W X1 Input number 01 04 X2 Input number for tie 0 maximum number of input...

Page 28: ...udio Mute X3 1Z z Amt X3 1 Audio Un mute X3 0Z z Amt X3 0 Read Audio Mute X3 Z z X9 Global where X3 is not included global Audio Mute is activated Audio Mute all 1 Z z Amt 1 Audio Un mute all 0 Z z Amt 0 Audio input gain and attenuation Set audio input gain to dB value X1 X5 G In X1 Aud X4 Example 1 2G In01 Aud 02 Set input 1 audio gain to 2dB Set audio input attenuation to dB value X1 X6 g In X1 ...

Page 29: ...Clears all ties resets audio to 0dB Un mute RGB Audio all mutes Esc ZZ Zpz Un mute all View ties and gain View RGBHV output tie X3 X2 Example 2 3 Output 2 video tied to input 3 video View audio output tie X3 X2 Example 2 4 Output 2 audio tied to input 4 audio View gain for input X1 G X4 Information requests Information request I i V1 X2 A1 X2 V2 X2 A2 X2 Vmt1 X9 Amt1 X9 Vmt2 X9 Amt2 X9 Example i R...

Page 30: ...Programmer s Guide cont d CrossPoint 42 HVA Matrix Switcher Programmer s Guide 4 6 ...

Page 31: ...CrossPoint 42 HVA Matrix Switcher 5 Chapter Five Switcher Software Windows Based Program Control ...

Page 32: ...Windows installation creates a C UNIVSW folder and places two icons Universal Switcher Control Program and Universal Switcher Help into a group named Extron Electronics Using the software 1 To run the software double click on the Universal Switcher Control Program icon in the Extron Electronics program group 2 Click on the comm port that is connected to the CrossPoint s RS 232 port 3 The Extron Un...

Page 33: ...5 3 CrossPoint 42 HVA Matrix Switcher Matrix Software Figure 5 1 Universal Switcher Control Program Main Menu window Figure 5 2 RGB Delay and Unit Reset window Figure 5 3 Configure Audio Options window ...

Page 34: ...Matrix Software cont d CrossPoint 42 HVA Matrix Switcher Matrix Software 5 4 ...

Page 35: ...CrossPoint 42 HVA Matrix Switcher A Appendix A Specifications and Part Numbers Specifications Part Numbers ...

Page 36: ...BHV RGBS RGsB RsGsBs HDTV component video S video composite video Connectors 2 x 5 BNC female Minimum maximum level 0 5V to 2 0V p p Impedance 75 ohms Return loss 30dB 5 MHz DC offset 5mV maximum with input at 0 offset Switching type Triple Action Sync Input type RGBHV RGBS RGsB RsGsBs Output type RGBHV RGBS RGsB RsGsBs Input level 0 5V to 5 0V p p 4 0V p p normal Output level AGC to TTL 4V to 5V ...

Page 37: ...s RMS Control remote switcher Serial control port 1 RS 232 9 pin female D connector Baud rate and protocol 9600 8 bit 1 stop bit no parity Serial control pin configurations 2 TX 3 RX 5 GND Program control Extron s control program for Windows Extron s Simple Instruction Set SIS General Power 100VAC to 240VAC 50 60 Hz 40 watts internal auto switchable Temperature humidity Storage 40 to 158 F 40 to 7...

Page 38: ...pter 10 264 01 SVHS BNC adapter 26 353 01 Cables When using signals with a scanning frequency of 15 125 kHz and running distances of 100 feet or more use high resolution BNC cables to achieve maximum performance Bulk cable Extron Part Part Super High Resolution Cable Bulk SHR 1 500 22 098 02 Bulk SHR 1 1000 22 098 03 Bulk SHR 4 500 22 099 02 Bulk SHR 5 500 22 100 02 BNC SHR crimp connectors qty 50...

Page 39: ...Cable BNC 4 25 MHR 25 feet 7 5 meters 26 210 04 BNC 4 50 MHR 50 feet 15 0 meters 26 210 05 BNC 4 75 MHR 75 feet 23 0 meters 26 210 06 BNC 4 100 MHR 100 feet 30 0 meters 26 210 07 BNC 4 150 MHR 150 feet 45 0 meters 26 210 08 BNC 4 200 MHR 200 feet 60 0 meters 26 210 09 BNC 4 250 MHR 250 feet 75 0 meters 26 210 54 BNC 4 300 MHR 300 feet 90 0 meters 26 210 53 BNC 5 Mini HR Cable BNC 5 25 MHR 25 feet ...

Page 40: ...Specifications and Part Numbes cont d CrossPoint 42 HVA Matrix Switcher Specifications and Part Numbers A 6 ...

Page 41: ...CrossPoint 42 HVA Matrix Switcher B Appendix B Reference Information Hardware Upgrades ...

Page 42: ...ver straight up as shown in figure B 1 Lift the cover evenly to clear the grooves at the edge of the rear panel Closing the switcher 1 Reinstall any cables removed To plug a self latching cable into the desired receptacle align the holes in the connector with the pins in the receptacle then press evenly until the receptacle tabs lock into place 2 Place the top cover in place and replace all the sc...

Page 43: ... gently and pull the IC straight out of the socket Set the IC aside 5 Note the key angled corner of the new firmware IC and the dot on the underside that indicates pin 1 figure B 4 Orient the IC to match the key and pin 1 indicated by arrow on the socket and carefully press the IC in place Figure B 4 Key and pin 1 mark 6 Reinstall the switcher s front panel and cover See Closing the switcher on pa...

Page 44: ...able you can check the fuse 4 Place a new 2A 250V fast blow fuse in the retaining clips 5 Reinstall the switcher s cover See Closing the switcher on page B 2 If you choose to check the switcher for proper operation before putting the cover back on ensure that tools and hands are outside the switcher then connect the power cord to the unit and to an AC source The switcher should power up normally U...

Page 45: ...tral America Extron Electronics Europe Extron Electronics Beeldschermweg 6C 1230 South Lewis Street 3821 AH Amersfoort Anaheim CA 92805 USA The Netherlands Asia Japan Extron Electronics Japan Extron Electronics Asia Daisan DMJ Bldg 6F 135 Joo Seng Road 04 01 3 9 1 Kudan Minami PM Industrial Bldg Chiyoda ku Tokyo 102 0074 Singapore 368363 Japan This Limited Warranty does not apply if the fault has ...

Page 46: ...t The Netherlands 31 33 453 4040 Fax 31 33 453 4050 Extron Electronics Asia 135 Joo Seng Road 04 01 PM Industrial Building Singapore 368363 65 6383 4400 Fax 65 6383 4664 Extron Electronics Japan Daisan DMJ Building 6F 3 9 1 Kudan Minami Chiyoda ku Tokyo 102 0074 Japan 81 3 3511 7655 Fax 81 3 3511 7656 www extron com 2002 Extron Electronics All rights reserved ...

Reviews: