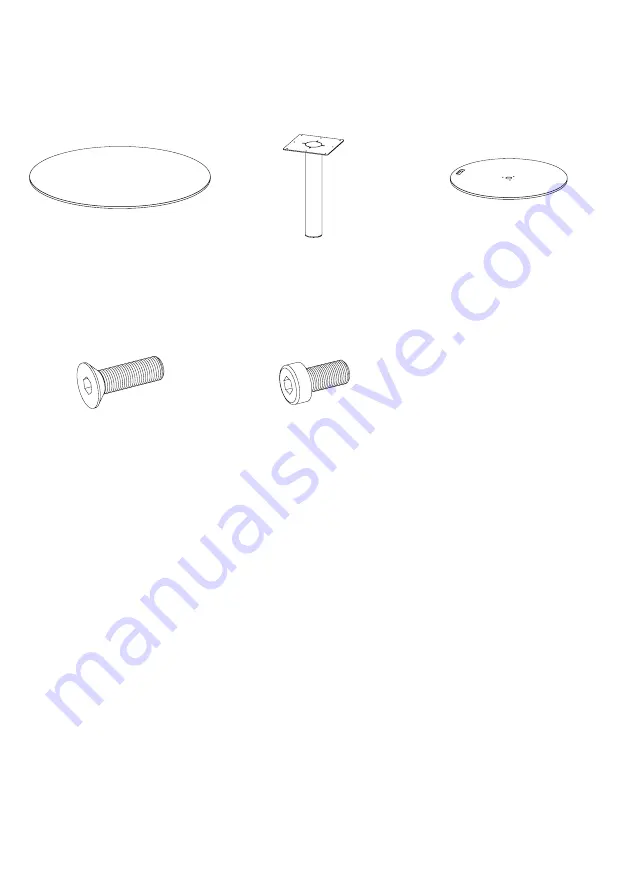
1 x tafelblad
1 x buis
1 x voetplaat
VRIJSTAANDE TAFEL
OPTIONEEL
nederlands 19
3 x verzonken binnenzekantbout M6x25
8 x binnenzeskantbout M6x12
Page 1: ...ants PRODUCT KOSMOS KOSMOS WITH PARASOL FREESTANDING TABLE MAINTENANCE READ INSIDE ASSEMBLY INSTRUCTIONS HOW TO USE USEFUL TIPS FOR KEEPING YOUR TOOL FOR TOGETHERNESS IN SHAPE LANGUAGES EN NL DE FR IT...
Page 2: ...justable table p 10 covers p 11 bulb replacement p 12 onderhoud p 13 assembly freestanding table p 14 inhoud p 17 montage kosmos p 20 montage met kosmos shade p 22 bijregelen verstelbare kabel p 24 mo...
Page 3: ...est cushion low high 6 x bolt M8x80 6 x nut M8 2 x large seating cushion 1 x small seating cushion 4 x large backrest cushion low high 1 x adjustable table leg fixed table leg 1 x tabletop 1 x tableto...
Page 4: ...4 inhoud 4 x bolt M8 x 70 1 x plastic spacer 1 x cap 50 x 50 1 x cap 60 x 60 1 x shade frame with fabric 1 x vertical shade pole KOSMOS SHQDE OPTION...
Page 5: ...english 5 3 x bolt M6x25 8 x bolt M6x12 1 x tabletop 1 x tube 1 x base plate VRIJSTAANDE TAFEL OPTION...
Page 6: ...the bolts in case you bought a fixed table first mount the aluminium profile to the small seat frame and the tabletop connection on top of it with M6 30mm bolts 2 Now connect the two halves of the sea...
Page 7: ...table down with your right hand while pressing the lever under the table top with your left HOW DOES THE ADJUSTABLE TABLE WORK 4 Screw the table top down with the countersunk screws M6x2 The control...
Page 8: ...ed and then turn the set screws clockwise until against the vertical tube Use a 4 Allen wrench to do this 5 From the inside of the furniture insert 4 bolts M8x70 through the holes provided two at the...
Page 9: ...o the end of the parasol pole Lower the cord through the opening until it emerges at the bottom After assembly a certified electrician to fit the end of the cable with a suitable plug with an appropri...
Page 10: ...just unscrewed If still not sufficient repeat steps 1 3 3 Check for any slack between the cable mounting screw 4 If so turn the screw out until the play is gone turn then continue for an additional 2...
Page 11: ...the the Kosmos with the pie shaped opening in the entrance of the seating unit The table comes out above the cover and the table leg sits in the tip of the pie piece 2 Pull the side flap all the way...
Page 12: ...Remove the tube cap in the center of the parasol pull the cord through the tube and unscrew the nut from the lighting base 4 Remove the broken LED from the tube and twist the bulb off so that it can...
Page 13: ...ons and aluminum plate SHADE Clean the parasol fabric and cover by rinsing with water and hand soap and gently rubbing with a soft brush Initially make sure the parasol fabric does not get too dirty a...
Page 14: ...x 25 on the underside of the the stainless steel tube as shown in the drawing 2 Now place the table top on the stainless steel tube as indicated in the on the stainless steel tube as shown in the dra...
Page 15: ...english 15...
Page 16: ...justable table p 10 covers p 11 bulb replacement p 12 onderhoud p 13 assembly freestanding table p 14 inhoud p 17 montage kosmos p 20 montage met kosmos shade p 22 bijregelen verstelbare kabel p 24 mo...
Page 17: ...un laag of hoog 1 x verstelbare tafelpoot of vaste tafelpoot 1 x tafelblad 1 x tafelkussen 2 x groot zitkussen 1 x klein zitkussen 4 x groot rugkussen laag of hoog 3 x klein rugkussen laag of hoog 6 x...
Page 18: ...1 x parasolframe met doek 1 x parasolpaal 4 x bout M8 x 70 KOSMOS PARASOL OPTIONEEL 18 inhoud 1 x plastic plaat 1 x dop 50 x 50 1 x dop 60 x 60...
Page 19: ...1 x tafelblad 1 x buis 1 x voetplaat VRIJSTAANDE TAFEL OPTIONEEL nederlands 19 3 x verzonken binnenzekantbout M6x25 8 x binnenzeskantbout M6x12...
Page 20: ...nnectie er bovenop met bijgeleverde bouten M6 x 30 2 Koppel nu de beide zetelhelften aan het kleine zetelframe met behulp van telkens drie bouten M6x80 en drie moeren M8 Opgelet span deze nog niet aan...
Page 21: ...blad Dit bedieningselement moet naar de zetelopening wijzen 5 Plaats nu de kussens in de Kosmos Om van de tafel een zetelbed te maken druk met de rechterhand de tafel naar beneden terwijl je met links...
Page 22: ...twee bovenaan Schuif aan de buitenkant vervolgens de plastic afstandshouder Erover en vervolgens de parasolpaal Draai goed aan De twee vrije openingen dienen om de parasol iets naar achter te laten he...
Page 23: ...de parasol niet gebruikt te hebben mogelijks houdt de magneetsluiting het tijdelijk niet door interne spanning in het parasoldoek Plaats dan zolang als nodig het riempje op de magnetische baleinen zo...
Page 24: ...oeven uit de draaien en draai de klep om 3 Controleer of er speling tussen de kabel de bevestigingsschroef zit 4 Zo ja draai de schroef uit tot de speling weg is draai dan nog 2 extra toeren verder 5...
Page 25: ...tot aan de onderzijde van het meubel Positioneer de hoeknaden van de hoes mooi bovenop het hoekstuk 4 Knoop aan de achterkant van de Kosmos het touwtje vast onder de parasolpaal Het beste kan dit zoa...
Page 26: ...erlichtingssokkel los 4 Verwijder de kapotte LED uit de buis en draai de bol er af zodat deze op de nieuwe LED lamp bevestigd kan worden Vergeet hierbij niet ook de rubberen ring te plaatsen 5 Plaats...
Page 27: ...Ga nooit zitten op de rugleuning om beschadiging aan de kussens en de aluminiumplaat te vermijden PARASOL Reinig het zeil van de parasol en de hoes door te spoelen met water en handzeep en voorzichti...
Page 28: ...5 min 1 Neem de voetplaat en monteer deze d m v 3 verzonken binnenzeskantbouten M10 x 25 aan de onderkant van de inoxen buis zoals aangegeven op bovenstaande tekening 2 Plaats nu het tafelblad op de i...
Page 29: ...nederlands 29...
Page 30: ......
Page 31: ......
Page 32: ...publication are copyright protected and are the property of Extremis No part of this publication may be copied or distributed without Extremis prior written consent The names of the authors of photogr...