


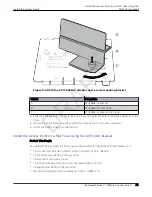


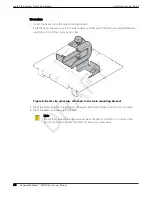


Figure 5: Attach the KT-135628-01 adapter on the main mounting bracket
Callout
Description
A
KT-135628-01 adapter
B
KT-135628-01 T-bar holder
C
KT-135628-01 adapter locking pin
3. Slide the KT-135628-01 T-bar holder onto the T-bar and replace the tiles to hold the adapter onto the
T-bar.
4. Hold and rock the access point back and forth to ensure that it is securely mounted.
5. Attach the RJ45 connector to the GE1 port.
Install the Access Point on a Flat T-bar Using the DCFLUSH bracket
Before You Begin
Ensure that the T-bar meets the following conditions before installing the DCFLUSH bracket on it:
•
T-bar width must be 9/16 in. (15mm), 15/16 in. (24mm), or 1.5 in. (38 mm).
•
T-bar bottom must be flat all the way across.
•
T-bar must be structurally sound.
•
T-bar maximum base thickness must not exceed 0.080 in. (2 mm).
•
Ceiling tile must be flat all the way across.
•
Maximum ceiling tile protrusion allowed is 0.015 in. (0.380 mm).
Install the Access Point
Install the Access Point on a Flat T-bar Using the
DCFLUSH bracket
ExtremeWireless™ AP310i/e Access Points
25
DRAFT