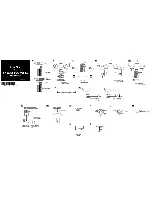
Install the brackets that secure the ceiling linking beam
in place. Use x2 19mm bolts, washer and captive nuts at
each end.
Install the metal floor plates. The 2 halves will slot into
place and require no fixings.
STEP
5
STEP
6
Install the internal wall joiners. Use the
angled bracket that joins the ceiling beam
and the wall then overlay the covering plate.
Align the holes and affix using:
•
x2 13mm bolts, washers and captive nuts for the
wall link cover
•
x2 13mm bolts, washers and captive nuts for the
wall link cover and angled bracket
Repeat process for both sides.
STEP
7
Complete the assembly of the roof panels and unit,
referring to the assembly instructions. The roof panels
will slot into place leaving a channel which serves as
a gutter.
STEP
8
REMEMBER – Once the 2 units are complete, tighten the
bolts holding the side linking units in place.
www.extraspace.com